
You are using an out of date browser. It may not display this or other websites correctly.
You should upgrade or use an alternative browser.
You should upgrade or use an alternative browser.
Slow going - my double storey extension build
- Thread starter kingandy2nd
- Start date
Excellent update! Like myself you seem to be very critical of yourself - don't be! you're doing a grand job and I'm sure tradesmen wouldn't be achieving the level of quality you are.
- Joined
- 27 Dec 2018
- Messages
- 77
- Reaction score
- 4
- Country

Awaiting the next update eagerly ") I keep checking back here for the updates! Wish I had this confidence to attempt it myself so don't be negative on yourself at all!
I keep checking back here for the updates! Wish I had this confidence to attempt it myself so don't be negative on yourself at all!
I keep checking back here for the updates! Wish I had this confidence to attempt it myself so don't be negative on yourself at all!Great progress! Thanks for updating this thread, I'm studying all the pictures and text as I have all this to come!
Great update Andy, detailed info also, will be very helpful to lots of people I'm sure.
Excellent update! Like myself you seem to be very critical of yourself - don't be! you're doing a grand job and I'm sure tradesmen wouldn't be achieving the level of quality you are.
Awaiting the next update eagerly
Andy, what determined the use of a piles as opposed to the standard strip or raft foundation? Is it where the ground is very soft and an alternative to a very deep strip foundation, for example?
Your block work is perfect.
Hey guys, thanks for the kind words and the support
@Grantx I live quite close to the sea, and originally the land where the estate was built was all sand dunes so the ground is very soft. All the houses around my area are on piles - if you did down about a foot from the imported soil, all you find is pure sand - as you might have seen from the groundworks photos.
Hey all,
In terms of a time update, this thread is now about 6 months behind the real world, June 2020. The weather was still gorgeous, which was great for my tan but hard for my bricklaying as the mortar was always going off way too quickly.
After using the mixer on the stand and pouring whole wheelbarrow full out at a time onto spot boards, I learnt to leave the muck in the mixer a lot longer and just shovelling it out at a bucketful at a time to the nearest spot board. I also bought a sheet of conservatory roofing perspex and cut it up to make spotboards as they were much easier to clean and didn't suck any moisture out of the mix - well worth doing if your planning on doing brickwork in any kind of scale.
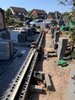
You may of noticed from one of the floorslab photos, that the builder's merchant had been around again and delivered all the blocks, insulation, concrete, sand, lintels etc for the ground floor part of the build. After delivery, the front garden looked like a concrete fort

After a bit of research I opted for Plasmor Fibolite 7N blocks for the outer skin and Thermalite Shield 3.6 blocks for the inner. Standard sizes (440 x 100 x 215mm) and I had 550 of each. The outer skin is the one I toyed with the most as I wanted concrete blocks, but was concerned about the lifting weight and the ability to take render. I read a post where @noseall recommended 7n blocks as they take render better (I didn't need 7ns for strength) and @VDubDan and @garyo had a thread talking about the fibolites.
In hindsight the fibolites were the right choice, not the cheapest (£1.26 + VAT each) but easy to work with, and I can lift and place one handed (with trowel in the other). Although I would say that's only possible at below waist heights - where I need to lift them up higher it's a two handed job...at least with my strength! The Thermalites weren't a great choice - very variable in quality and I did experience some thermal cracking with them. However, they are super light and easy to cut with a wood saw.
I also followed the designer's spec and bought 50mm celotex insulation for a partial fill cavity. In hindsight, I should have gone with a full-fill cavity for ease - and so far I've lost two torpedo levels down the ruddy cavity!!
I also treated myself to some Blakes Builders Profiles - the extra long version, alone with some block dollys. I ordered them direct over the phone, and they arrived the next day - very helpful folks. If you don't know, these basically allow you to quickly and easily run string lines for your wall runs.

Wall starter's run up the wall (although only one fixed in the photo), and I'd run a course of bricks on the inner skin at this point, so I could lay the wide DPC across the skins to act as the cavity tray.
I had actually made a mistake at this point by not considering how the pier for the steel on this corner would be supported (the wall in shot with the window will later be removed to be part of the new kitchen diner). Later on in the build I will have to take down this inner skin, and cut up the existing wall 100mm in to create a cavity... I'll circle back to this point in another post as it might not make too much sense here!

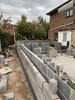
With the nice long summer days, I was able to do two courses (on a skin) in a day. As I have basically only been able to work at the weekend on the build, this mean each week the build was gaining two courses on both skins - with 11 courses needed to get up to the first floor level. I did say it was a VERY slow build! It did get a bit quicker once I got to the heights where the windows started as it meant less blocks to lay
You can see the celotex going in here. I also had to run an additional course of engineering bricks before starting with the blocks as it mean my coursing would then align with the existing houses for the floor levels, etc.
If you're doing a build, definitely take the time to work out your coursing, first floor or even your windows downstairs so that everything is inline. Gauge down from the windows was a good tip I read.

You can also see my builders profile in the very foreground and distance - it's definitely important to clear the perp joint full of mortar when wet where the clamp for the profile goes, rather than try to rake it out once fully dry - as I did. They did save me time once set out properly - just remember to have your lines very tight!
Making progress... probably not the way the pros do it, but I found building the two courses of the inner skin first, then the two skins of the outer wall, before fitting the celotex and then starting back to the inner skin again was my favoured way of working. This was for two reasons;
1. the blockwork gets wobbly at 3 and four courses high if they're all wet mortar beds, and
2. also it allowed me to have a little be more space with the trowel to clear the back of the outer skin before the insulation goes in.

I was slow and methodical with my brickwork and spent time pointing everything up properly as I went. Even though the outside will be rendered, I wanted to ensure the joints are all good and I wasn't how long it would be before the actual house got rendered.
After a few weeks my labourer (also known as my better half) discovered that she liked doing the pointing, which was a bonus as it allowed me to lay a bit more each day without needing to break off to do the pointing You can see her in action below.
You can see I also cut some spare DPM and laid on my floors as I was forever dropping blobs or mortar due to my inexperienced trowel skills, so this saved the floor a bit.

Moving onwards and upwards. I decided to build the wall inbetween the garage and the kitchen later as I knew I'd need to cut into the wall for the other RSJ pier and connect it to that wall, and basically I was trying to leave the original house structure in tact for as long as possible.
You can start to see where the windows in the kitchen were going, which was nice as it was less blocks to lay too!

The British summer returned to it's normal, rainy, ways by this point and an unexpected feature (which remains to this day) is the paddling pool which is the kitchen floor. At least it goes to show that the floor doesn't have any holes in it!

I've hit my 10 photo limit again, so I'll call it a day here.
All my blocks, sand, concrete, insulation etc (basically everything for the build up to the first floor) came in a £3.7k and the profiles costs me £300 in total, so another £4k spent. Total spend to this point, £23.5k.
Thanks for looking.
In terms of a time update, this thread is now about 6 months behind the real world, June 2020. The weather was still gorgeous, which was great for my tan but hard for my bricklaying as the mortar was always going off way too quickly.
After using the mixer on the stand and pouring whole wheelbarrow full out at a time onto spot boards, I learnt to leave the muck in the mixer a lot longer and just shovelling it out at a bucketful at a time to the nearest spot board. I also bought a sheet of conservatory roofing perspex and cut it up to make spotboards as they were much easier to clean and didn't suck any moisture out of the mix - well worth doing if your planning on doing brickwork in any kind of scale.
You may of noticed from one of the floorslab photos, that the builder's merchant had been around again and delivered all the blocks, insulation, concrete, sand, lintels etc for the ground floor part of the build. After delivery, the front garden looked like a concrete fort
After a bit of research I opted for Plasmor Fibolite 7N blocks for the outer skin and Thermalite Shield 3.6 blocks for the inner. Standard sizes (440 x 100 x 215mm) and I had 550 of each. The outer skin is the one I toyed with the most as I wanted concrete blocks, but was concerned about the lifting weight and the ability to take render. I read a post where @noseall recommended 7n blocks as they take render better (I didn't need 7ns for strength) and @VDubDan and @garyo had a thread talking about the fibolites.
In hindsight the fibolites were the right choice, not the cheapest (£1.26 + VAT each) but easy to work with, and I can lift and place one handed (with trowel in the other). Although I would say that's only possible at below waist heights - where I need to lift them up higher it's a two handed job...at least with my strength! The Thermalites weren't a great choice - very variable in quality and I did experience some thermal cracking with them. However, they are super light and easy to cut with a wood saw.
I also followed the designer's spec and bought 50mm celotex insulation for a partial fill cavity. In hindsight, I should have gone with a full-fill cavity for ease - and so far I've lost two torpedo levels down the ruddy cavity!!
I also treated myself to some Blakes Builders Profiles - the extra long version, alone with some block dollys. I ordered them direct over the phone, and they arrived the next day - very helpful folks. If you don't know, these basically allow you to quickly and easily run string lines for your wall runs.
Wall starter's run up the wall (although only one fixed in the photo), and I'd run a course of bricks on the inner skin at this point, so I could lay the wide DPC across the skins to act as the cavity tray.
I had actually made a mistake at this point by not considering how the pier for the steel on this corner would be supported (the wall in shot with the window will later be removed to be part of the new kitchen diner). Later on in the build I will have to take down this inner skin, and cut up the existing wall 100mm in to create a cavity... I'll circle back to this point in another post as it might not make too much sense here!
With the nice long summer days, I was able to do two courses (on a skin) in a day. As I have basically only been able to work at the weekend on the build, this mean each week the build was gaining two courses on both skins - with 11 courses needed to get up to the first floor level. I did say it was a VERY slow build! It did get a bit quicker once I got to the heights where the windows started as it meant less blocks to lay
You can see the celotex going in here. I also had to run an additional course of engineering bricks before starting with the blocks as it mean my coursing would then align with the existing houses for the floor levels, etc.
If you're doing a build, definitely take the time to work out your coursing, first floor or even your windows downstairs so that everything is inline. Gauge down from the windows was a good tip I read.
You can also see my builders profile in the very foreground and distance - it's definitely important to clear the perp joint full of mortar when wet where the clamp for the profile goes, rather than try to rake it out once fully dry - as I did. They did save me time once set out properly - just remember to have your lines very tight!
Making progress... probably not the way the pros do it, but I found building the two courses of the inner skin first, then the two skins of the outer wall, before fitting the celotex and then starting back to the inner skin again was my favoured way of working. This was for two reasons;
1. the blockwork gets wobbly at 3 and four courses high if they're all wet mortar beds, and
2. also it allowed me to have a little be more space with the trowel to clear the back of the outer skin before the insulation goes in.
I was slow and methodical with my brickwork and spent time pointing everything up properly as I went. Even though the outside will be rendered, I wanted to ensure the joints are all good and I wasn't how long it would be before the actual house got rendered.
After a few weeks my labourer (also known as my better half) discovered that she liked doing the pointing, which was a bonus as it allowed me to lay a bit more each day without needing to break off to do the pointing
You can see her in action below.You can see I also cut some spare DPM and laid on my floors as I was forever dropping blobs or mortar due to my inexperienced trowel skills, so this saved the floor a bit.
Moving onwards and upwards. I decided to build the wall inbetween the garage and the kitchen later as I knew I'd need to cut into the wall for the other RSJ pier and connect it to that wall, and basically I was trying to leave the original house structure in tact for as long as possible.
You can start to see where the windows in the kitchen were going, which was nice as it was less blocks to lay too!
The British summer returned to it's normal, rainy, ways by this point and an unexpected feature (which remains to this day) is the paddling pool which is the kitchen floor. At least it goes to show that the floor doesn't have any holes in it!
I've hit my 10 photo limit again, so I'll call it a day here.
All my blocks, sand, concrete, insulation etc (basically everything for the build up to the first floor) came in a £3.7k and the profiles costs me £300 in total, so another £4k spent. Total spend to this point, £23.5k.
Thanks for looking.
Attachments
Last edited:
Fantastic!
Hey all,
This thread is long overdue for an update. Work/life/DIY balance is still not in a good order, so it's tough finding the time to sit down and write up these posts.
OK, so the walls continued to go upwards and I got a bit more confident/competent with my block laying skills and it was still pretty slow going.
I was conscious that as I went though building the outer walls, I still needed to think about the piers that would go into the kitchen to hold the Universal Beam (UB) that would support the first floor wall in the new knocked-though kitchen and diner. I realised that I'd made a bit of a booboo by using a wall starter on the inner skin at the rear of the property for tow reasons: 1. I needed to continue the cavity and prevent cold bridging, and 2. The pier that was here needed to be made out of solid blocks and not thermalites. Thankfully with my disc cutter I was able to take out the minimum number of blocks in a wedge shape to be able to get back to the right starting point.
The first picture is basically me with the chalk working out where the various cuts, padstone and beam would be relative to the the floor above. (Although it looks like it says DEAD, this did say BEAM before the rain got to it). This is before I cut out the wall starter and blocks too.

As the eagle-eyed amongst you will see, unfortunately the flue and boiler for the house were slap-bang in the way and needed to be removed. My local gas-safe guy decommissioned the boiler for £50. We knew this had to happen, and we do have an immersion heater for the hot water.... however as I type this now in February (and with the Beast From The East 2 visiting) I can tell you it's been a pretty cold winter in our house with only some oil-filled electric radiators to warm the house
You can also see in the picture S, C, C, C, S. This is me working out the courses for my pier which is a combination of concrete 7nm blocks and concrete commons. This pier will come out one block width - it didn't need to come out this far but I'm sticking the new boiler in this corner so having a 350mm pier sticking out will hide the boiler a bit and a slightly shorter beam gives more flexibility with getting pipework back into the original house.

Out with the evolution disc cutter and you can see I made short work of the wall. I only posted the picture above as it shows how poorly the original blockwork was done (at least on the inside) and you can see the remnants of the cavity wall insulation that was done in 2013. In contrast on the pic below you can see how tidy my inside blockwork is where I needed to take out the thermalites I mentioned earlier
By the way the plastic sheeting did NOTHING to prevent the kitchen from being covered in a thick layer of dust...so I was not in the good books with the other half! The disc cutter makes all the dust, but for the price of it verses a petrol/water one for less dust, I was happy to do the cleaning up. Once the wall was cut I took my SDS drill with chisel attachment to the wall and it came apart fairly easily.

Finally got the whole of the section cleared, with the extra brick taken out above where the beam will go for the strongboy/acro, which was put in immediately after this picture.
I didn't get any pictures of me building up the pier on this side - I think I was doing it in the semi dark, so sorry about that!
Nevertheless, onto the other side of the kitchen and here I was going to have a small pier which connected into the new garage wall that was still to be build. Again I broke out the disc cutter and made myself a nice channel for (what I thought would be an easy pier). I purposely left one brick's width in place to support the back door lintel but this only left a tiny gap to work in. This picture was pre-tidy up, however what it does also show is that not only was I contending with a narrow space, but a a stud wall, a cupboard under the stairs and a joist at the top of the stairs... all of which made access from the inside virtually impossible.

I started to build up the pier and the garage wall as I went but it was tough going, especially trying to tie into the existing wall too.

Eventually I got up to padstone height. Don't ask me why I put a DPM in on the wall starter here, I don't know why I did..

However, I then realised I'd made a bit of a balls-up. When building this pier, I'd basically not gone inside and looked at it at all from the inside. Again, partly because it was awkward to get to, and partly because I just assumed if the brick's looked ok from my view outside, they'd be alright inside!
WRONG!! It was a bit of a dogs dinner. Basally there were a few uneven bricks, or that weren't particularly well centred on the brick below. It probably would have been fine, but after a couple of days considering it I decided that it had to be taken down as I wasn't 100% happy with it and this pier would not only hold up the UB for the existing house wall, but it also take the weight of the RSJ's at 90 degrees that would hold up the bedroom and roof of the extension.
I was so annoyed at myself for not being more sensible as I built, that I didn't take any photos of this bit. However I proceeded to demolish the built pier and part of the garage wall that went along with it. I then decided to take out the the last bit of brickwork that had been left to support the back door lintel to give myself a bit more space to work in. I then rebuilt and ensured that I continually went inside with each course to ensure it was all good from that side to.
Finally the garage wall was built too... although I wouldn't recommend working on a scaffold board like this... I just couldn't be bothered with my scaffold tower for the last couple of courses. Oh, you can kind of see in this picture that the external walls have grown a bit too by this point

In hindsight I am happy I spent the time/effort that I took to redo that pier, as I think it would have bothered me forever more if I'd left it as it was.
Although it's not the greatest picture as the insulation board had started to go in to block some of the gaps up, you can at least see the pier on the left now built - both of them would have a padstone to go on top but having read some of the other threads about that I elected to get the beam in and then fit the padstones afterwards.
And before you ask, most of those gaps/insulation are still there to this day (February) and my other half no long goes into our walk-in freezer (formally known as the kitchen )
)
You may also notice a lump of red steel in this photo... but more on that in my next post!

After all that fun and excitement at the back of the house, the front of the property also needed a bit of destruction caused to it with a space for two RSJs and a padstone... but to be honest with you that was a walk in the park in comparison! Here's me chopping it out - which was a combination of stitch drilling with the SDS drill and my evo cutter, before chiselling it out with the SDS.
You can see how much mortar the original brickies managed to lose down the cavity!

Ok that's my 10 photo limit again, but I'll try not to leave it so long before the next update. I think I wasted about £50 in blocks and bricks with my re-building, but I'd not really spent any more money worth reporting by this point so the rolling total spend was still £23.5k.
Thanks for reading
Andy
This thread is long overdue for an update. Work/life/DIY balance is still not in a good order, so it's tough finding the time to sit down and write up these posts.
OK, so the walls continued to go upwards and I got a bit more confident/competent with my block laying skills and it was still pretty slow going.
I was conscious that as I went though building the outer walls, I still needed to think about the piers that would go into the kitchen to hold the Universal Beam (UB) that would support the first floor wall in the new knocked-though kitchen and diner. I realised that I'd made a bit of a booboo by using a wall starter on the inner skin at the rear of the property for tow reasons: 1. I needed to continue the cavity and prevent cold bridging, and 2. The pier that was here needed to be made out of solid blocks and not thermalites. Thankfully with my disc cutter I was able to take out the minimum number of blocks in a wedge shape to be able to get back to the right starting point.
The first picture is basically me with the chalk working out where the various cuts, padstone and beam would be relative to the the floor above. (Although it looks like it says DEAD, this did say BEAM before the rain got to it). This is before I cut out the wall starter and blocks too.
As the eagle-eyed amongst you will see, unfortunately the flue and boiler for the house were slap-bang in the way and needed to be removed. My local gas-safe guy decommissioned the boiler for £50. We knew this had to happen, and we do have an immersion heater for the hot water.... however as I type this now in February (and with the Beast From The East 2 visiting) I can tell you it's been a pretty cold winter in our house with only some oil-filled electric radiators to warm the house
You can also see in the picture S, C, C, C, S. This is me working out the courses for my pier which is a combination of concrete 7nm blocks and concrete commons. This pier will come out one block width - it didn't need to come out this far but I'm sticking the new boiler in this corner so having a 350mm pier sticking out will hide the boiler a bit and a slightly shorter beam gives more flexibility with getting pipework back into the original house.
Out with the evolution disc cutter and you can see I made short work of the wall. I only posted the picture above as it shows how poorly the original blockwork was done (at least on the inside) and you can see the remnants of the cavity wall insulation that was done in 2013. In contrast on the pic below you can see how tidy my inside blockwork is where I needed to take out the thermalites I mentioned earlier
By the way the plastic sheeting did NOTHING to prevent the kitchen from being covered in a thick layer of dust...so I was not in the good books with the other half! The disc cutter makes all the dust, but for the price of it verses a petrol/water one for less dust, I was happy to do the cleaning up. Once the wall was cut I took my SDS drill with chisel attachment to the wall and it came apart fairly easily.
Finally got the whole of the section cleared, with the extra brick taken out above where the beam will go for the strongboy/acro, which was put in immediately after this picture.
I didn't get any pictures of me building up the pier on this side - I think I was doing it in the semi dark, so sorry about that!
Nevertheless, onto the other side of the kitchen and here I was going to have a small pier which connected into the new garage wall that was still to be build. Again I broke out the disc cutter and made myself a nice channel for (what I thought would be an easy pier). I purposely left one brick's width in place to support the back door lintel but this only left a tiny gap to work in. This picture was pre-tidy up, however what it does also show is that not only was I contending with a narrow space, but a a stud wall, a cupboard under the stairs and a joist at the top of the stairs... all of which made access from the inside virtually impossible.
I started to build up the pier and the garage wall as I went but it was tough going, especially trying to tie into the existing wall too.
Eventually I got up to padstone height. Don't ask me why I put a DPM in on the wall starter here, I don't know why I did..
However, I then realised I'd made a bit of a balls-up. When building this pier, I'd basically not gone inside and looked at it at all from the inside. Again, partly because it was awkward to get to, and partly because I just assumed if the brick's looked ok from my view outside, they'd be alright inside!
WRONG!! It was a bit of a dogs dinner. Basally there were a few uneven bricks, or that weren't particularly well centred on the brick below. It probably would have been fine, but after a couple of days considering it I decided that it had to be taken down as I wasn't 100% happy with it and this pier would not only hold up the UB for the existing house wall, but it also take the weight of the RSJ's at 90 degrees that would hold up the bedroom and roof of the extension.
I was so annoyed at myself for not being more sensible as I built, that I didn't take any photos of this bit. However I proceeded to demolish the built pier and part of the garage wall that went along with it. I then decided to take out the the last bit of brickwork that had been left to support the back door lintel to give myself a bit more space to work in. I then rebuilt and ensured that I continually went inside with each course to ensure it was all good from that side to.
Finally the garage wall was built too... although I wouldn't recommend working on a scaffold board like this... I just couldn't be bothered with my scaffold tower for the last couple of courses. Oh, you can kind of see in this picture that the external walls have grown a bit too by this point
In hindsight I am happy I spent the time/effort that I took to redo that pier, as I think it would have bothered me forever more if I'd left it as it was.
Although it's not the greatest picture as the insulation board had started to go in to block some of the gaps up, you can at least see the pier on the left now built - both of them would have a padstone to go on top but having read some of the other threads about that I elected to get the beam in and then fit the padstones afterwards.
And before you ask, most of those gaps/insulation are still there to this day (February) and my other half no long goes into our walk-in freezer (formally known as the kitchen
) You may also notice a lump of red steel in this photo... but more on that in my next post!
After all that fun and excitement at the back of the house, the front of the property also needed a bit of destruction caused to it with a space for two RSJs and a padstone... but to be honest with you that was a walk in the park in comparison! Here's me chopping it out - which was a combination of stitch drilling with the SDS drill and my evo cutter, before chiselling it out with the SDS.
You can see how much mortar the original brickies managed to lose down the cavity!
Ok that's my 10 photo limit again, but I'll try not to leave it so long before the next update. I think I wasted about £50 in blocks and bricks with my re-building, but I'd not really spent any more money worth reporting by this point so the rolling total spend was still £23.5k.
Thanks for reading
Andy
Amazing progress considering the weather recently! Have you got wheels for the scaff tower? I had some made for mine and it makes it so much easier to move around the slab!
Hey all,
This thread is long overdue for an update. Work/life/DIY balance is still not in a good order, so it's tough finding the time to sit down and write up these posts.
OK, so the walls continued to go upwards and I got a bit more confident/competent with my block laying skills and it was still pretty slow going.
I was conscious that as I went though building the outer walls, I still needed to think about the piers that would go into the kitchen to hold the Universal Beam (UB) that would support the first floor wall in the new knocked-though kitchen and diner. I realised that I'd made a bit of a booboo by using a wall starter on the inner skin at the rear of the property for tow reasons: 1. I needed to continue the cavity and prevent cold bridging, and 2. The pier that was here needed to be made out of solid blocks and not thermalites. Thankfully with my disc cutter I was able to take out the minimum number of blocks in a wedge shape to be able to get back to the right starting point.
The first picture is basically me with the chalk working out where the various cuts, padstone and beam would be relative to the the floor above. (Although it looks like it says DEAD, this did say BEAM before the rain got to it). This is before I cut out the wall starter and blocks too.
View attachment 222064
As the eagle-eyed amongst you will see, unfortunately the flue and boiler for the house were slap-bang in the way and needed to be removed. My local gas-safe guy decommissioned the boiler for £50. We knew this had to happen, and we do have an immersion heater for the hot water.... however as I type this now in February (and with the Beast From The East 2 visiting) I can tell you it's been a pretty cold winter in our house with only some oil-filled electric radiators to warm the house
You can also see in the picture S, C, C, C, S. This is me working out the courses for my pier which is a combination of concrete 7nm blocks and concrete commons. This pier will come out one block width - it didn't need to come out this far but I'm sticking the new boiler in this corner so having a 350mm pier sticking out will hide the boiler a bit and a slightly shorter beam gives more flexibility with getting pipework back into the original house.
View attachment 222058
Out with the evolution disc cutter and you can see I made short work of the wall. I only posted the picture above as it shows how poorly the original blockwork was done (at least on the inside) and you can see the remnants of the cavity wall insulation that was done in 2013. In contrast on the pic below you can see how tidy my inside blockwork is where I needed to take out the thermalites I mentioned earlier
By the way the plastic sheeting did NOTHING to prevent the kitchen from being covered in a thick layer of dust...so I was not in the good books with the other half! The disc cutter makes all the dust, but for the price of it verses a petrol/water one for less dust, I was happy to do the cleaning up. Once the wall was cut I took my SDS drill with chisel attachment to the wall and it came apart fairly easily.
View attachment 222059
Finally got the whole of the section cleared, with the extra brick taken out above where the beam will go for the strongboy/acro, which was put in immediately after this picture.
I didn't get any pictures of me building up the pier on this side - I think I was doing it in the semi dark, so sorry about that!
Nevertheless, onto the other side of the kitchen and here I was going to have a small pier which connected into the new garage wall that was still to be build. Again I broke out the disc cutter and made myself a nice channel for (what I thought would be an easy pier). I purposely left one brick's width in place to support the back door lintel but this only left a tiny gap to work in. This picture was pre-tidy up, however what it does also show is that not only was I contending with a narrow space, but a a stud wall, a cupboard under the stairs and a joist at the top of the stairs... all of which made access from the inside virtually impossible.
View attachment 222060
I started to build up the pier and the garage wall as I went but it was tough going, especially trying to tie into the existing wall too.
View attachment 222061
Eventually I got up to padstone height. Don't ask me why I put a DPM in on the wall starter here, I don't know why I did..
View attachment 222063
However, I then realised I'd made a bit of a balls-up. When building this pier, I'd basically not gone inside and looked at it at all from the inside. Again, partly because it was awkward to get to, and partly because I just assumed if the brick's looked ok from my view outside, they'd be alright inside!
WRONG!! It was a bit of a dogs dinner. Basally there were a few uneven bricks, or that weren't particularly well centred on the brick below. It probably would have been fine, but after a couple of days considering it I decided that it had to be taken down as I wasn't 100% happy with it and this pier would not only hold up the UB for the existing house wall, but it also take the weight of the RSJ's at 90 degrees that would hold up the bedroom and roof of the extension.
I was so annoyed at myself for not being more sensible as I built, that I didn't take any photos of this bit. However I proceeded to demolish the built pier and part of the garage wall that went along with it. I then decided to take out the the last bit of brickwork that had been left to support the back door lintel to give myself a bit more space to work in. I then rebuilt and ensured that I continually went inside with each course to ensure it was all good from that side to.
Finally the garage wall was built too... although I wouldn't recommend working on a scaffold board like this... I just couldn't be bothered with my scaffold tower for the last couple of courses. Oh, you can kind of see in this picture that the external walls have grown a bit too by this point
View attachment 222065
In hindsight I am happy I spent the time/effort that I took to redo that pier, as I think it would have bothered me forever more if I'd left it as it was.
Although it's not the greatest picture as the insulation board had started to go in to block some of the gaps up, you can at least see the pier on the left now built - both of them would have a padstone to go on top but having read some of the other threads about that I elected to get the beam in and then fit the padstones afterwards.
And before you ask, most of those gaps/insulation are still there to this day (February) and my other half no long goes into our walk-in freezer (formally known as the kitchen
You may also notice a lump of red steel in this photo... but more on that in my next post!
View attachment 222062
After all that fun and excitement at the back of the house, the front of the property also needed a bit of destruction caused to it with a space for two RSJs and a padstone... but to be honest with you that was a walk in the park in comparison! Here's me chopping it out - which was a combination of stitch drilling with the SDS drill and my evo cutter, before chiselling it out with the SDS.
You can see how much mortar the original brickies managed to lose down the cavity!
View attachment 222057
Ok that's my 10 photo limit again, but I'll try not to leave it so long before the next update. I think I wasted about £50 in blocks and bricks with my re-building, but I'd not really spent any more money worth reporting by this point so the rolling total spend was still £23.5k.
Thanks for reading
Andy
Thanks.Amazing progress considering the weather recently! Have you got wheels for the scaff tower? I had some made for mine and it makes it so much easier to move around the slab!
I have to admit the build thread is running about 6 months behind the real world so it was still the glorious summer when I was doing the above! But yeah, being up on the roof in December / January has been a bit chilly.
I do have wheels for the scaffold tower which I agree are very handy. The tower is an 8m tall one, but I’d never use it to that height. I actually got a second set of wheels from eBay and have basically used it as two towers...which came in very handy then moving the RSJs. More in my next update on that
- Joined
- 8 Jul 2019
- Messages
- 20
- Reaction score
- 7
- Country
Yeah I have to say we all worry about our brickwork but the state of the blockwork of the people who built that, when I put 2 steels in a year ago I found a big crack in the blockwork.... I look at it this way now... if it holds up like that I hope ours does....
Bloody well done mate! That's a hell of an effort.
Must admit, I do have a twinge of regret for not sticking out the blockwork a bit - especially when the builder/brickie showed up and said "Awesome, you've done all the difficult stuff".
Very happy with my Plasmor blocks - I actually went aglite in the end. Glad to see somebody else agonising over the choices. These are bits where you save so much time on your next project, because you know precisely what you want!
Thanks very muchBloody well done mate! That's a hell of an effort.
Must admit, I do have a twinge of regret for not sticking out the blockwork a bit - especially when the builder/brickie showed up and said "Awesome, you've done all the difficult stuff".
Very happy with my Plasmor blocks - I actually went aglite in the end. Glad to see somebody else agonising over the choices. These are bits where you save so much time on your next project, because you know precisely what you want!
Yeah, all these little things you ponder over for ages, but at least you know for next time. I'd definitely use the plasmors again.
Ok, time for the next instalment - steels!!!
My Structural Engineer did an amazing job in supporting me as a dumb DIYer through this whole process and reworking things and solving problems when they occurred.
My overall RSJ design was as follows:

In addition to pages of calculations, I also got loads of helpful diagrams of actually how to fix/implement the above plan. With the view of saving the picture count, I've combined a couple of examples onto a single screenshot along with the listing of steels that I ordered from the local steel supplier (Alexander Steel Liverpool if anyone is local)

2 weeks and £1,700 later all these arrived on my drive. I was concerned with the big steels how they'd get them off the truck, I was thinking I'd need a crane or something but two guys turned up with them all loaded onto the back of a flatbed truck, and with a bit of assistance from me and the other half, these were all whipped off the back of the truck in about 20 minutes flat. Lots of shimmying and pivoting from one end rather than lifting/carrying of the whole weight of the RSJs.

After getting inspiration from @JPBlackie in this thread https://www.diynot.com/diy/threads/moving-an-rsj-660kg.549936/ we also used the cut up round fencepost method to shift the steels around the sight into the right positions for lifting. The two steels with the welded plates on them were by far the heaviest ones to move around/list, but rolling them round on the fence posts really did make it a doddle to get close to where they needed to go.

I'd been collecting cheap acro props on eBay, paying between £7 & £10 quid for them and avoiding the really rusty ones, as I didn't know how long I'd need the for it's better than hiring them at £20 per week. After buying a couple of full price XL stongboys new, I then found a chap selling 9 in Manchester for £175 ... so I've ended up with 11 XL strongboys which was way more than the 5 I needed, but one day they'll go back on eBay. I went for the XL stongboys because they can support two skins from one side, but I just wanted a bit more room between the existing wall/pilars and the acro props when I was lifting the beam into position.
In the picture below I'd stitch drilled the bricks out using my SDS (and not cleaned up at the point of taking the photo). The acros you see in the photo below were just there temporarily to support the brickwork above the piers.
One thing that seems obvious now, but hadn't occurred to me beforehand (despite seeing all the measurements) was that all these RSJs were too long to fit into the rooms in which they were suppose to go as obviously they are the width of the room plus the bearings. Hence why you see the RSJ diagonally in the room.

Another thing I'd not thought of, but the guy who sold me the acros helpfully mentioned, was that because my wish to leave the existing walling in place that I'd need a cantilevered genie lift to raise the beams up, as these have additional weights that extend behind them but mean that there are no legs that project forward of the lifting arms - meaning you can get close up to the wall you're lifting onto.
Oh, and another thing I'd not realised was how difficult it would be to move the RSJs once they were lifted on the lift. The genie lift itself was a beast and really heavy, but with the beam loaded it was virtually impossible to move more than a couple of inches backwards and forwards, and literally no chance of manoeuvring it sideways to where you actually wanted it to be!
Probably not the ways the pros would do it, but I improvised by lifting the RSJs up as high as they would go on the genie lift, then rolling my scaffold tower underneath the beam before lowering it onto the scaffold tower at a height that meant the RSJ cleared the two walls.
Although the scaffold tower wheels didn't like it too much, I was then able to wheel the RSJ pretty much into the right position for the wall before bringing the genie lift back in at a 90 degree angle to the wall ready for the final list into position.

You can just about see in the picture above that I'd had the evolution disc cutter out at this point to cut the mortar/brickwork where the acros were going to go.
I'd rested the the RSJ temporarily on the two walls of the extension close enough to the wall it would be support in order to get the acros in behind it, but with enough space for me to finish off the cuts into the house wall to remove the brickwork where the RSJs would go. The big 203 x 203 you see below with the plate on top would not only be supporting both skins of the existing house wall you see, but inbetween the 3rd and 4th acro props where the bigger cut out is, there would be the two RSJs to support the new first floor walls as well.
Although I didn't take a picture, there are also 4 acros / strongboys inside the original kitchen with some 4 x 2 timber supporting the floor joists.

Now the next bit was an absolute nightmare to be honest! The final movement of no more than 30cm backwards from the photo above to get the RSJ into position must have taken about 2 hours of grunting, shouting and swearing. The genie lift would not move straight back the way I wanted it to. It was like that dodgy trolley you get at the supermarket where the wheels send you off in different directions each time you push.
I'm sure there's probably a knack to it, but getting the steel in so that the steel plate was supporting both skins correctly, there was sufficient baring on each pillar and that the thing was actually level took a long time and so many attempts I lost count.
However, we finally got there and I banged a couple more acro props/strongboys in place underneath the RSJ to hold it in place. I then fitted the pad stones and mortar'ed the pad stones and a number of bricks above the beam back into place.
I didn't get to many photos at this stage, but the one below as the next RSJs started to go in shows the main 203 x 203 in place.
As per the picture below, again we had to get creative for the 4 x 254 x 146 RSJs that would be holding up the first floor walls of the extension to get them into position, because of the same issue of them being longer than the rooms they were going into and the inability to move the genie lift around once loaded.
As there is a wall between the garage and the kitchen, the two rear RSJs took the most steps to get into place. The process was:
1. RSJ Rolled into garage on fence posts
2. Lifted on genie lift and then lowered onto scaffold tower that was moved under the genie lift.
3. Scaffold tower wheeled to be flush with the kitchen/garage wall
4. Genie lift relifted the RSJ, and scaffold tower removed.
5. Genie lift pushed/manhandled forward so that RSJ was over the other side of the kitchen garage wall (this bit was proper sketchy as the RSJ had to be on the very end of the lifting arms to be able to get enough clearance to get it over the wall!)
6. Scaffold tower erected on kitchen side of wall and RSJ lowered back onto scaffold tower.
7. Genie lift moved from garage to kitchen and then relift the RSJ.
8. Via trial and error work out how much 'stuff' needed to go onto the scaffold tower to get the RSJ at the correct height to go into it's final position, before lowering the RSJ back onto stuff (see the blocks and metal work in the picture below)
9. Roll scaffold tower into final position with RSJ's having the right baring.
10. Use genie lift again to get just enough heigh to remove some 'stuff' so that the RSJ reseted in correct position
The repeat all the palaver above for the second RSJ, but now with the first RSJ in the way as well just to make it more awkward!

Same RSJ with the stuff to get it into position below.

Here it is with both RSJs in place for the rear wall for the first floor. There's a small RSJ with a padstone on top on this side as the 1st floor wall is at right angles to where the back door for the new kitchen will be.
I made a screw-up at this point that I popped the bolts in for the timber that would be my ledger board, but I didn't have the wood at the time. I should have fitted the wood into the web of the RSJ at this point to make my life easier...but I just didn't think about it at the time, so this lead to some faffing around later to retro-fit 8x3 timber and get it bolted in properly.

At this point I'd done one final lift with the genie lift for the day to lift these two RSJs together in order to reused my scaffold tower and 'stuff' to get the RSJs level and mortar'd in, leaving it overnight to set.
My Structural Engineer did an amazing job in supporting me as a dumb DIYer through this whole process and reworking things and solving problems when they occurred.
My overall RSJ design was as follows:
In addition to pages of calculations, I also got loads of helpful diagrams of actually how to fix/implement the above plan. With the view of saving the picture count, I've combined a couple of examples onto a single screenshot along with the listing of steels that I ordered from the local steel supplier (Alexander Steel Liverpool if anyone is local)
2 weeks and £1,700 later all these arrived on my drive. I was concerned with the big steels how they'd get them off the truck, I was thinking I'd need a crane or something but two guys turned up with them all loaded onto the back of a flatbed truck, and with a bit of assistance from me and the other half, these were all whipped off the back of the truck in about 20 minutes flat. Lots of shimmying and pivoting from one end rather than lifting/carrying of the whole weight of the RSJs.
After getting inspiration from @JPBlackie in this thread https://www.diynot.com/diy/threads/moving-an-rsj-660kg.549936/ we also used the cut up round fencepost method to shift the steels around the sight into the right positions for lifting. The two steels with the welded plates on them were by far the heaviest ones to move around/list, but rolling them round on the fence posts really did make it a doddle to get close to where they needed to go.
I'd been collecting cheap acro props on eBay, paying between £7 & £10 quid for them and avoiding the really rusty ones, as I didn't know how long I'd need the for it's better than hiring them at £20 per week. After buying a couple of full price XL stongboys new, I then found a chap selling 9 in Manchester for £175 ... so I've ended up with 11 XL strongboys which was way more than the 5 I needed, but one day they'll go back on eBay
. I went for the XL stongboys because they can support two skins from one side, but I just wanted a bit more room between the existing wall/pilars and the acro props when I was lifting the beam into position.In the picture below I'd stitch drilled the bricks out using my SDS (and not cleaned up at the point of taking the photo). The acros you see in the photo below were just there temporarily to support the brickwork above the piers.
One thing that seems obvious now, but hadn't occurred to me beforehand (despite seeing all the measurements) was that all these RSJs were too long to fit into the rooms in which they were suppose to go as obviously they are the width of the room plus the bearings. Hence why you see the RSJ diagonally in the room.
Another thing I'd not thought of, but the guy who sold me the acros helpfully mentioned, was that because my wish to leave the existing walling in place that I'd need a cantilevered genie lift to raise the beams up, as these have additional weights that extend behind them but mean that there are no legs that project forward of the lifting arms - meaning you can get close up to the wall you're lifting onto.
Oh, and another thing I'd not realised was how difficult it would be to move the RSJs once they were lifted on the lift. The genie lift itself was a beast and really heavy, but with the beam loaded it was virtually impossible to move more than a couple of inches backwards and forwards, and literally no chance of manoeuvring it sideways to where you actually wanted it to be!
Probably not the ways the pros would do it, but I improvised by lifting the RSJs up as high as they would go on the genie lift, then rolling my scaffold tower underneath the beam before lowering it onto the scaffold tower at a height that meant the RSJ cleared the two walls.
Although the scaffold tower wheels didn't like it too much, I was then able to wheel the RSJ pretty much into the right position for the wall before bringing the genie lift back in at a 90 degree angle to the wall ready for the final list into position.
You can just about see in the picture above that I'd had the evolution disc cutter out at this point to cut the mortar/brickwork where the acros were going to go.
I'd rested the the RSJ temporarily on the two walls of the extension close enough to the wall it would be support in order to get the acros in behind it, but with enough space for me to finish off the cuts into the house wall to remove the brickwork where the RSJs would go. The big 203 x 203 you see below with the plate on top would not only be supporting both skins of the existing house wall you see, but inbetween the 3rd and 4th acro props where the bigger cut out is, there would be the two RSJs to support the new first floor walls as well.
Although I didn't take a picture, there are also 4 acros / strongboys inside the original kitchen with some 4 x 2 timber supporting the floor joists.
Now the next bit was an absolute nightmare to be honest! The final movement of no more than 30cm backwards from the photo above to get the RSJ into position must have taken about 2 hours of grunting, shouting and swearing. The genie lift would not move straight back the way I wanted it to. It was like that dodgy trolley you get at the supermarket where the wheels send you off in different directions each time you push.
I'm sure there's probably a knack to it, but getting the steel in so that the steel plate was supporting both skins correctly, there was sufficient baring on each pillar and that the thing was actually level took a long time and so many attempts I lost count.
However, we finally got there and I banged a couple more acro props/strongboys in place underneath the RSJ to hold it in place. I then fitted the pad stones and mortar'ed the pad stones and a number of bricks above the beam back into place.
I didn't get to many photos at this stage, but the one below as the next RSJs started to go in shows the main 203 x 203 in place.
As per the picture below, again we had to get creative for the 4 x 254 x 146 RSJs that would be holding up the first floor walls of the extension to get them into position, because of the same issue of them being longer than the rooms they were going into and the inability to move the genie lift around once loaded.
As there is a wall between the garage and the kitchen, the two rear RSJs took the most steps to get into place. The process was:
1. RSJ Rolled into garage on fence posts
2. Lifted on genie lift and then lowered onto scaffold tower that was moved under the genie lift.
3. Scaffold tower wheeled to be flush with the kitchen/garage wall
4. Genie lift relifted the RSJ, and scaffold tower removed.
5. Genie lift pushed/manhandled forward so that RSJ was over the other side of the kitchen garage wall (this bit was proper sketchy as the RSJ had to be on the very end of the lifting arms to be able to get enough clearance to get it over the wall!)
6. Scaffold tower erected on kitchen side of wall and RSJ lowered back onto scaffold tower.
7. Genie lift moved from garage to kitchen and then relift the RSJ.
8. Via trial and error work out how much 'stuff' needed to go onto the scaffold tower to get the RSJ at the correct height to go into it's final position, before lowering the RSJ back onto stuff (see the blocks and metal work in the picture below)
9. Roll scaffold tower into final position with RSJ's having the right baring.
10. Use genie lift again to get just enough heigh to remove some 'stuff' so that the RSJ reseted in correct position
The repeat all the palaver above for the second RSJ, but now with the first RSJ in the way as well just to make it more awkward!
Same RSJ with the stuff to get it into position below.
Here it is with both RSJs in place for the rear wall for the first floor. There's a small RSJ with a padstone on top on this side as the 1st floor wall is at right angles to where the back door for the new kitchen will be.
I made a screw-up at this point that I popped the bolts in for the timber that would be my ledger board, but I didn't have the wood at the time. I should have fitted the wood into the web of the RSJ at this point to make my life easier...but I just didn't think about it at the time, so this lead to some faffing around later to retro-fit 8x3 timber and get it bolted in properly.
At this point I'd done one final lift with the genie lift for the day to lift these two RSJs together in order to reused my scaffold tower and 'stuff' to get the RSJs level and mortar'd in, leaving it overnight to set.
Last edited:
DIYnot Local
Staff member
If you need to find a tradesperson to get your job done, please try our local search below, or if you are doing it yourself you can find suppliers local to you.
Select the supplier or trade you require, enter your location to begin your search.
Please select a service and enter a location to continue...
Are you a trade or supplier? You can create your listing free at DIYnot Local
Similar threads
- Replies
- 15
- Views
- 7K
- Replies
- 1
- Views
- 2K