Solutions for roofing felt overhang

p54

Joined
23 Oct 2026
Messages
5
Reaction score
0
Country
United Kingdom
Hi all,

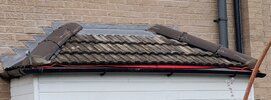
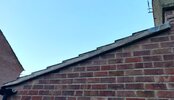
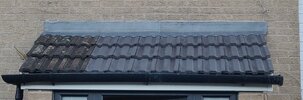
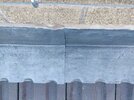
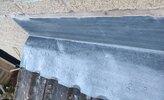
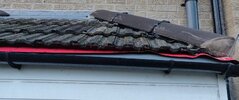
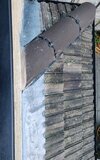
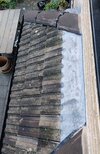
Some roofing work has just been done on my house, included in which was some new felt. This felt protrudes from beneath the tiles (which I gather is normal), but it's bright red and looks awful.

Is there anything I can do about this without causing issues? Whether it's trimming, staining, covering, anything.

Thanks
 

Attachments

  • felt_01.jpg
    felt_01.jpg
    321.4 KB · Views: 60
Got to say the whole job looks rubbish. The ridge isn't even straight. I am not convinced that the top ridge will even survive the next storm. As for the felt I am not sure maybe paint it.
 
It's not normal.

It should be trimmed back to the fascia line or a bit further back and ideally taped.

Are there comb fillers beneath the tiles? It does not look like it given the state of the membrane.
 
Thanks for the replies, both, I appreciate that.

Yes, I'm unhappy with the quality of the work all round and, no, there are no comb fillers (though, granted, I'd never heard of them before).

This small porch area is just one part of the work they did. The other was a single story, pitched roof extension on top of a garage / utility room.

For context, the utility section has a suspended ceiling and was uninsulated. I'd also had a relatively minor leak coming through the failing mortar at the front edge of the roof (garage section), and the old felt needed replacing on top of that. The solution from several quotes was to lift the tiles, insulate, re-felt / baton, replace existing tiles, new lead, etc. etc.

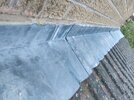
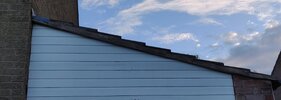
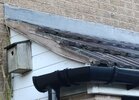
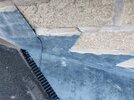
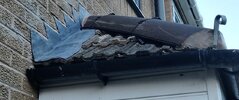
Unfortunately, this larger roof is already leaking into the garage (photos attached - first two are the apex of the roof, third is the lower end). So, the work they've done has actually made things significantly worse. I can only presume that the section above the suspended ceiling is in a similar state, and it's just not soaked through the insulation yet.

0001.jpg

0002.jpg

0003.jpg


I've had the guy out today asking for an emergency fix, and his long-term solution is to lift the top few rows of tiles and install a second layer of felt. He's adamant that the newly installed lead is sound, and that water is travelling up under the top row of tiles.

Now, to me (a roofing layman), this sounds like nothing more than a temporary solution to prevent additional issues in the next few weeks. I've agreed to the quick fix for now as I don't want the suspended ceiling in the utility section to collapse.

I'm going to be getting some other companies out to assess the state of the work and go from there.

Am I right in thinking the proffered fix of a bit of extra felt is nonsense?

Thanks again

 
There's no way that water should be coming in from a new roof.

It does not require "a second layer of felt", rather the first layer and flashing should be done correctly.
 
OP,
Whoever did the roofs made a mess of them.
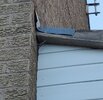
The porch lead flashing (& the garage abutment flashing) should have a 20mm turn going into a 25mm chase - & then be wedged & pointed in.
FWIW: there's no ridge only two hips.

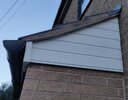
Is the garage a tiled shed roof - why not post external pics showing the abutment flashing, & the whole roof from gutter to abutment?
 
Hopefully this stack of photos helps - apologies if they're not the best, I was hanging out the windows this morning quickly before work.

I'll do it in a couple of posts due to the file limit.

Garage for this one.

Yes, the guttering is sagging - but not their fault on this one.
 

Attachments

  • garage_00.jpg
    garage_00.jpg
    72.9 KB · Views: 25
  • garage_01.jpg
    garage_01.jpg
    264.7 KB · Views: 24
  • garage_02.jpg
    garage_02.jpg
    324.1 KB · Views: 22
  • garage_05.jpg
    garage_05.jpg
    94.1 KB · Views: 26
  • garage_06.jpg
    garage_06.jpg
    191.1 KB · Views: 24
  • garage_07.jpg
    garage_07.jpg
    142.2 KB · Views: 23
Front porch.
 

Attachments

  • front_porch_00.jpg
    front_porch_00.jpg
    146.4 KB · Views: 22
  • front_porch_05.jpg
    front_porch_05.jpg
    198.9 KB · Views: 22
  • front_porch_04.jpg
    front_porch_04.jpg
    103.5 KB · Views: 21
  • front_porch_03.jpg
    front_porch_03.jpg
    313.8 KB · Views: 21
  • front_porch_01.jpg
    front_porch_01.jpg
    221.5 KB · Views: 23
And rear porch.
 

Attachments

  • rear_porch_00.jpg
    rear_porch_00.jpg
    176.6 KB · Views: 20
  • rear_porch_01.jpg
    rear_porch_01.jpg
    316.4 KB · Views: 20
  • rear_porch_02.jpg
    rear_porch_02.jpg
    338 KB · Views: 19
  • rear_porch_03.jpg
    rear_porch_03.jpg
    349.1 KB · Views: 16
  • rear_porch_04.jpg
    rear_porch_04.jpg
    281.7 KB · Views: 17
  • rear_porch_05.jpg
    rear_porch_05.jpg
    116.2 KB · Views: 16
Thanks for the photos. What has changed? Is this a garage conversion, or was it a flat roof, that is now a pitched roof?
Do you know what pitch it is?
 
Hopefully this stack of photos helps - apologies if they're not the best, I was hanging out the windows this morning quickly before work.

I'll do it in a couple of posts due to the file limit.

Garage for this one.

Yes, the guttering is sagging - but not their fault on this one.
As said, what is the pitch of the roof? Those (granular?) Ludlows only go down to 30 degrees.

It should NOT be leaking.
 
Pull the insulation out, and you'll see what's going on behind it. It will just be wedged in most likely, it's been poorly fitted anyway.
 

If you need to find a tradesperson to get your job done, please try our local search below, or if you are doing it yourself you can find suppliers local to you.

Select the supplier or trade you require, enter your location to begin your search.


Are you a trade or supplier? You can create your listing free at DIYnot Local

 
Back
Top