Staining plywood and different types

Joined
18 May 2017
Messages
67
Reaction score
0
Location
Thames Ditton
Country
United Kingdom
After much deliberation, I decided to clad my garden studio in ply sheets and some cedar as an added feature. I will cut the ply sheets so they have a shadow gap between each one so will definitely need to treat the edges properly which will be exposed.

I want to stain the ply a dark grey/black so the grain shows through, but not patchy like my samples were, using Osmo UV external tints. Think it was the old birch ply I used though!

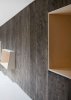
Ideally looking for it to be close to something like the pic below. So I need to know what type of ply to use i.e. good grade WBP Spruce, CDX or the hardwood variety? Should I sand them, use conditioner before staining???

Any help much appreciated.
 

Attachments

  • ply-example.jpg
    ply-example.jpg
    123.9 KB · Views: 6,526
Sponsored Links
I used some left-over spruce flooring ply to clad my shed. It has the advantage of being T&G so you can put the tongues facing upward to help it shed water. I also treated the boards before assembly. Vertical joints need applied trim to keep water out. Try not to have any exposed horizontal joints.

I have also used hardwood-faced T&G. One problem is that the outer veneer is extremely thin; the other is that being square-edged, any water in the joint can soak in and cause delamination (even if it is WBP). It is essential to fill any visible voids in the edges (I now use a small syringe and waterproof glue) and treat the edges especially thoroughly with weatherproof paint or stain. Good eaves and gutters will minimise the amount of water that runs down the face.

Shuttering ply is a cheap material and fairly durable.

For weather resistance however, I am convinced that the shiplap cladding I have also used is best. It is shaped to shed water. I use linseed oil now which is easy to recoat and seems durable. Fix it to battens so that it can dry out on the back, if damp.

You need to stop the cladding about 9" above ground level to prevent it being wetted by rainsplash from the ground, and use an impervious material such as a dwarf wall. The bottom of the cladding must not touch this, or it will be sitting in water.

For decorative purposes, if you want a regular colour, apply a wood dye such as Rustins, Liberon or Colron spirit based (the water based does not work) and then an untinted or very pale protective finish.
 
Thanks, some useful info to look up there. Did you use a stain on the hardwood faced ply... does it have a nice grain that comes out?

I could try what you say re filling voids and was thinking about painting bitumen
on the edges, before staining front seeing as it will be a dark stain anyhow!

Just really want that wood grain look!
Thanks
 
yes, I have had very nice results on the hardwood faced ply.

I prepared some for use as flooring and I am very pleased with the result. I put in extra effort to draw lines at 100mm intervals in the direction of the grain, and brushed wood dye on the fake "boards" in random selections of three or four very similar tints.

I think next time, for speed, I would dye the whole lot with a warm tone such as the light teak, then pick out random boards with a light additional coat in the same or a similar colour. It looks better if the colours are very nearly, but not quite, the same. It is more effort than I would usually put into beautifying a shed.

If I could find T&G or shiplap in an attractive and durable hardwood, I fear it would be vastly expensive.

Edit
this is an early trial. It looks better with the dyes more alike
 
Last edited:
Sponsored Links
They look really good. Didn't expect the hardwood ply to show up grain like that. Just out of interest did you prep the ply before with anything or just stain straight eg. conditioner before staining. Also are the ones just out of the image on the right still drying; as I can see the stain bleeding a bit into the edges?

Thanks for the info, that encourages me to stain hardwood ply... I realise it may not last as long as a close jointed hardwood, but worst case I can always re-treat in a couple of years, or replace cladding if any disasters happen.
 
The one on the right is not as good, I experimentally drew the lines across the grain and tried to stain it, but as you say, the stain bled. It is also the back face of the board, and a lower grade of veneer so the grain was not as good. The lines are drawn with a Stabilo permanent "write 4 all" Medium tip pen. You need several as the wood wears down the point. The black line tricks the eye into not seeing minor wobbles in the straightness of the wood dye. Do the darkest tint first and most carefully and let it dry. If a paler tint overlaps it slightly, later, it will not show.

Once it is dyed, I use a colourless finish (mine being a floor varnish) so you just go over the whole thing without needing to apply it in stripes. Perhaps you could use a "natural pine" exterior protective stain which is very pale with a bit of yellow.

I don't know what you mean by conditioner.

I get a cleaner cut with my panel saw than with my circular saw or jigsaw, which both leave chipped and snagged edges. The factory edges, and cuts done by the retailer on their huge machine, are much better. I can't carry a whole 2400x1200 sheet of 18mm ply so I drew up a cutting plan before purchase. As it was a floor I had to trim some edges for uneven walls and for plumbing. If the cuts go under the skirting they don't matter.

A good woodworker would have a better saw than me.
 
Last edited:
re conditioner I mean a pre-staining treatment. Just friend mentioned some wood conditioner he used before staining to avoid streaks/blotches.
 
haven't seen that. A fine sanding, and if necessary, wipe over with white spirit, or even a damp sponge to remove residual dust after brushing or hovering is enough for me.
 

DIYnot Local

Staff member

If you need to find a tradesperson to get your job done, please try our local search below, or if you are doing it yourself you can find suppliers local to you.

Select the supplier or trade you require, enter your location to begin your search.


Are you a trade or supplier? You can create your listing free at DIYnot Local

 
Sponsored Links
Back
Top