You'll have to split the cistern from the pan. Procedure is as follows:
1. Isolate the incoming cold water. If lucky, you'll have an isolation valve on the incoming water just below the WC. If not, you'll have to find some other way of isolating.
2. Empty cistern. Flush, then sponge out remaining water.
3. Disconnect the incoming water pipe from the threaded shank of the inlet valve, below the cistern. Get a new washer to remake the connection (1/2" fibre washer, e.g. Screwfix item 1109J).
4. Unscrew the nut (usually white plastic) below the cistern holding the inlet valve in place.
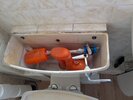
5. Remove the inlet valve and ball. Sponge out any remaining water.
6. Beneath the cistern there will be two wing nuts near the centre. Almost certainly corroded and immovable. Remove these somhow, Grips, multi-tool, hacksaw or whatever.
7. Remove the two screws holding the back of the cistern to the wall. If the plastic or rubber washers are in reasonable shape, retain them for re-use.
8. Lift the cistern off the pan and turn it upside down. In the centre of the base you will see a metal plate secured by a large (usually white plastic) nut. Remove the nut. Unless in good condition, discard the metal plate.
9. If replacing the plate and or screws, get a new close coupling kit. Screwfix list several as items 84958, 346JM, 924HT and 835CL. Of these the McAlpine one is stainless steel and should last better than the others.
10. With the plate removed you can remove the syphon. I'd suggest discarding it and replacing with an adjustable Dudley Turbo88 (Screwfix item 9756F). The Dudley is a two part syphon, and with it you can replace the disphragm without taking the WC apart. If you want to keep your existing syphon, dismantle it and get / make a new diaphragm washer.
11. Thoroughly clean the inside of the cistern, particularly where the bases of the syphon and inlet valve sit.
12. Fit the syphon and metal plate. Big black rubber washer inside the cistern.
13. Secure the cistern to the pan with the close coupling kit.
14. Secure the cistern to the wall with screws. Use the old ones if in good condition, otherwise, if you use new ones, try and get brass screws. Use the old soft washers if suitable, otherwise replace wiht new soft washers.
15. Secure the inlet valve. Rubber washer inside the cistern. If the washer is cone shaped, narrow end down into the hole.
16. Remove all traces of old fibre washer in tap connector and replace withe new one.
17. Reconnect pipe.
18. Turn water back on.
You could also replace the inlet valve at the same time. My preference is for the Fluidmaster bottom entry (in this case) with a brass threaded shank. However you'd need to check first that it would fit. There are other makes such a Skylo Viva, Thomas Dudley and many more.