Joined
30 Mar 2012
Messages
666
Reaction score
4
Location
Monmouthshire
Country
United Kingdom
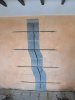
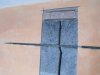
View attachment 117457 View attachment 117462 View attachment 117463 View attachment 117457 View attachment 117462 View attachment 117463 View attachment 117457 View attachment 117462 View attachment 117463 View attachment 117462 View attachment 117463 View attachment 117460 View attachment 117461 View attachment 117460 View attachment 117459 View attachment 117368 View attachment 117457 View attachment 117458 View attachment 117455 View attachment 117456 View attachment 117454 View attachment 117451 View attachment 117369 View attachment 117368 View attachment 117362 re the right hand black line on the wall drawn over the crack with a thick permanent marker; the lintel below that cracked wall is redundant, the opening that required the lintel is now blocked up but still not rendered (image), there doesn't appear to be a corresponding vertical crack in the outer leaf. 1.8m vertical crack No. 3 emanates from the top corner of a floor joist recess.

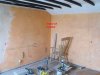
This room corner is on the 1st floor above the left side of the patio doors (image).

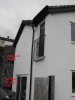
The wall on the left is over patio sliding patio doors, previous car port entrance.
There is also a horiz. crack in the outer leaf render of this wall (over patio doors).

I'll get some render/plaster off (they're both sand/cement rendered & skimmed) to expose the blockwork (and confirm cracks).
Render cracks have been there for many years. Both vertical cracks have had a rad in the vicinity of the crack at some point (redundant rad bracket holes to right of chair).

re vert. crack (No. 3) I was thinking of putting some of those helical rods into the inner leaf mortar courses to stabilise it and stop the crack simply reappearing after I attend to the cracked render/plaster. There are plenty of advisory web pages out there but they tend to show the outer leaf and it's usually a red brick wall that has cracked, often in conjunction with subsidence.

Would anyone advise also chasing crack No.3 out whilst I'm in, and pointing it up? If so, what depth? Mortar or resin mortar?
 

Attachments

  • DSCF3351.JPG
    DSCF3351.JPG
    117.3 KB · Views: 442
  • DSCF3352.JPG
    DSCF3352.JPG
    63.9 KB · Views: 417
  • DSCF3353.JPG
    DSCF3353.JPG
    157.7 KB · Views: 461
Last edited:
Sponsored Links
Dain1, good evening.

A few points?
How old is the Property?
How long is the wall that has cracked? and how high?
Are there any other doors or windows in the wall?
Are there any other cracks around the Property? especially in the room above where this crack has formed, if indeed there is a room above

The above can give some clues as to what is going on.

As for using a product such as Helibar [or similar], when installed correctly they can and do work on internal walls, I specify them on numerous ocasions internally as well as externally.

Ken.
 
If you've had to draw a line over it with a marker pen just to get it to show up enough for a photo, I wouldn't worry about it. When you can get your hand in it, that's when it's time to leave the building
 
A crack that long is unlikely to relate to any lintel, and is more likely to be shrinkage.

You can cut some bars in ( see www.twistfix.co.uk for kit and instructions) but that may not be the correct repair.

It may be just as effective to repair with mesh across the plaster.
 
Sponsored Links
+1. Concrete blocks - particularly aac - tend to shrink and leave vertical cracks.
 
My apologies gents, images revised and initial text edited for clarity (I hope).
There is no room above, that is the 1st floor.
The place is various ages, the room in question is early eighties, & was originally supported by 2 free standing L shaped piers to create a car port below.
Inner/outer leaves are conc. block, sort of a blue/grey in colour
The patio windows and small extension are recent.


I wanted a window above the patio doors but it would have looked straight in thru a neighbours balcony doors. I crept a glazed door in to the new build for some extra light although another neighbour was a bit twitchy about it. Too late now.
 
Last edited:
Woody - Mesh? Would that be galv or stainless mesh? What width? TP do 65,100,115 etc. The stainless is 0.1 thinner (is stainless for external work?).

It would be handy to know how much render to strip off either side of a crack so that I don't have to get the cutting discs going twice.
 
Last edited:
Dain1, good evening again.

A further question?

How wide was the original crack prior to your enhancement with the marker pen?

Ken.
 
Below the render at block face, vertical crack (No. 3) is slightly more than 1mm wide at mid height.
 
Last edited:
Well, that 's the helibar across the vertical crack @450ctrs, the max spacing according to the instructions. The roof strap was a little awkward. The shots were taken half way thru, before the helibar was fully buried in resin mortar.

I did mark out to put in an extra bar where a rad is going back on the wall later, but is that going overboard? It has 2 No. 6mm helical bars within the footprint of the rad anyway...so hopefully that will do.

I used a 9" diamond disc to chase out the cracks and original mortar courses to about 2.5" depth for a bit of a 4:1 repoint, rammed in. Some of the original vertical joints were a bit tight, a bit more muck in them when the wall went up wouldn't have hurt.

Approx. 300mm width render removed to expose the job. I was thinking of meshing it with galv expament/clout nails before patching in the render over a tacky 3:1 PVA mix.

The render patch won't be a scratch and top coat, the original wet and skim is about 12mm max, so 1 smooth coat of 4:1 on the mesh, then some easy multi-surface to skim.
 

Attachments

  • DSCF3376.JPG
    DSCF3376.JPG
    78.3 KB · Views: 373
  • DSCF3377.JPG
    DSCF3377.JPG
    199.7 KB · Views: 345
Last edited:
Cracks 1 & 2 next, I'm not sure that the horiz crack (1) which seems to follow a mortar course needs any more than a repoint, why would it need stitching? That wall is over patio doors, best expose the issue and have a look.

I was thinking of cutting the old render back to expose, but not too wide, narrower than a float this time. Maybe a mesh strip to go over the repair/repoint before patching in some new render and finish.
 
Last edited:

DIYnot Local

Staff member

If you need to find a tradesperson to get your job done, please try our local search below, or if you are doing it yourself you can find suppliers local to you.

Select the supplier or trade you require, enter your location to begin your search.


Are you a trade or supplier? You can create your listing free at DIYnot Local

 
Sponsored Links
Back
Top