Slow going - my double storey extension build

Sorry folks, I'm almost as slow at keeping this log updated as I am with my actual build!

So back to the story, with the ground finally cleared, with only a day or two spared before the piling contractors were coming, it was cutting it fine. Up to this point I've spent nearly £4k in total which was mostly on the demolition guys (£2.5k), and then having to hire/buy the equipment to finish their job, with nearly £1.5k on the plans, planning and building control costs

I'd been doing a lot of ringing around for piling contractors and found quite a lot of variability in the pricing and the level of helpfulness they'd provide to a DIYer! In the end I found a Wigan-based W&L Piling where the main contact was really helpful and his price was competitive, which included the designs, piles, ring beam, concrete, and the groundworks (inc soil removal) to be ready for the actual foundations. The way it works with piling, is that you're given a base price which covers most things but then you pay an extra cost for every meter down the piles go beyond the quote depth. So in my case the quote included piling to 4m, with £20 (plus Vat) for every meter for every pile beyond that.

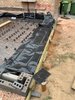
The piling guys did a detailed piling design which was sent off to BC beforehand. It was 29 pages in total, but I've clipped a few extracts to include here, but basically required 13 piles in various places:

IMG_4424.jpg


IMG_4425.jpg


BC were happy with the plans, but as per normal they would want to inspect before the concrete was poured.

The guys from the piling co turned up on time, and did the groundworks on day 1. Unfortunately I was away for work, so there aren't many pictures from this stage, but as you can see - my house is literally built on nothing but sand and we ended up with a massive pile of it at the end of that day (as modelled by my better half :) ).

IMG_9998 copy.jpg


IMG_9993 copy.jpg


It took the guys a further 3 days for setting the actual piles and ring beams, and was was expected they had to go pretty deep 14m in some places to hit solid ground for the piles - which of course adds a lot to the costs when you have 13 piles at £20 per meter!

PHOTO-2018-12-07-08-51-33 2.jpg
PHOTO-2018-12-07-08-55-41.jpg


I was expecting all sorts of heavy machinery but no such stuff - just these pneumatic rams as seen at the rear of the house in the last picture above.

All the piles were in and building control came out and signed-off on the concrete pour on the 3rd December, so we had a whole 2 days to spare on my nominal deadline of the 6th December which was the 3rd anniversary (and expiry) of the planning permission!

The next day the concrete was poured and we were left with something that actually looked like progress :)

IMG_0026 copy.jpg
IMG_0022 copy.jpg


In the end, the extra depth (beyond 4m) of the piles added near £2k to the estimate, so the total cost of the works was £9.5k including the VAT.

Therefore total spend to this point was £13.5k.

Appreciate that money can be a funny subject for some, but I'm detailing the rough costs as a guide for future readers (baring in mind those prices were 2018 prices in the NW of England), rather than boastful 'look how much we've spent kind of way'. Would be interested if people want to know/care about the costs of if I should just omit from future updates?!
 
Sponsored Links
Personally I think the costs are really helpful. I am also in the North West and have ideas of an extension at some point so this is a really useful guide.
It also highlights the pitfall costs which hadn’t been factored in or were not included at quotation stage.
Hopefully you have a healthy contingency fund and I wish you well and watch on with interest
 
Looks like you’ve done plenty!

I would love to know costs! I always ask but feel cheeky. And I never get told haha. I only want to know purely for the simple fact that I am about to do a similar build my self and have no clue what so ever on how much it will cost me. I’m East Yorkshire so won’t be too dissimilar on price
 
Ok, so back to my thread.

At this point we fast-forward another year to December 2019, and during that time absolutely nothing happened with the extension build - mostly because my work was crazy and a lot of the time I was working 7 days...which as you can imagine means little time to do anything else.

However, with a couple of weeks off at Xmas, I decided it was a good time to move onto the next phase of the works which was to lay all the underground drainage.

I've never done any drainage works before, and was a little apprehensive, but in chatting to an old friend who is a builder his words of wisdom were really helpful -"It's easy, just remember sh*t flows downhill" :LOL:

Being a house of the 70s, all the existing pipework was clay, and all the manholes are horrible original concrete sections, with tonnes of concrete around them!

The plan designer seems to want a lot of digging to go on, with pipes going front to back and virtually everywhere! Originally the designer had put a soakaway at the front of the property despite there not being space for one. The plans were re-drawn to connect to the rainwater drains at the front of the property, but everything else was left quite jumbled - which I only realised when starting to actually consider what I needed to do/buy.

In the end, with the agreement of BC, I went from the original plans for the drains from this,
Screenshot 2020-07-15 at 08.37.21.png


To this:

Screenshot 2020-07-15 at 08.36.12.png


This meant a few things:
1. A lot less digging around the front of the property for the rainwater pipes.
2. The rainwater from the 1st floor roof will drain onto the ground floor roofs, rather than down the side of the house.
3. A couple of extra manholes around the side/rear
4. Breaking into the pipe by the original manhole (near the conservatory) rather than connecting directly to the manhole (through 1 foot of concrete!).

So the toys arrived from the hireshop the weekend before Xmas and me and the other half got digging.

IMG_2999 2.JPG


To be honest, I had a total brain fart and ordered a 4 ton skip, when I needed up with 25ish tons of waste in the end! So the skip and the skip loader were a total waste of time and about £300!! I know it was 25 tons of waster (there was more after the picture below which was the end of day 1), as the skip was removed (4 ton) then a grab truck took a further 15 away (it's max load) and I still had about 4-5 ton left - which I just moved by shovel/wheel barrow off my drive in the end to the side of the garden (and its still there now July 2020!). At least my partner had fun on the skip loader!!

IMG_3022.JPG
IMG_3003.JPG


So by the end of the first day we had the trenches in the back garden dug and the soakaway installed. I opted for the create type soakaway, which I got flat packed - only took about 10 mins to put together and was simple enough to do.

IMG_3006.JPG
IMG_3012.JPG

IMG_3010.JPG
IMG_3014.JPG


It was a bit awkward to get the lines right and work out how to dig the trenches in such a way to maximise the digger use (and reduce the amount of manual digging to be done). Also I was trying to leave the paving slabs in place, but given I had to go down 1.5m along a lot of the trench, unfortunately they ended up moving a bit (about 20mm) away from the decking so they have to be re-laid at some point anyway! :cry:

The forum is limiting my post to 10 pictures, so that's your lot for now, but I will do another post soon with the rest of the drainage works.
 

Attachments

  • IMG_3005.JPG
    IMG_3005.JPG
    599.1 KB · Views: 344
Last edited:
Sponsored Links
Looks good.

I assume you love cars? I am coping well without a garage, if I had an integrated double garage it'd soon become a room and the cars will be left on the drive!
 
Looks good.

I assume you love cars? I am coping well without a garage, if I had an integrated double garage it'd soon become a room and the cars will be left on the drive!
In the end I would like to get a little classic car to tinker with, but to be honest most of the garage will be taken up storing the vast array of tools I have :)
 
So when it came to laying all the drainage I did make a few school boy errors when ordering stuff, and having ordered it online it’s more of a pain in the backside to return than it’s worth to do! I didn’t realise things like, mini (300mm) chambers we’re only good to 600mm deep so I ordered a load of those, then needed to get 450mm ones. Also, once you put a joint on, it’s near impossible to get off - which caused for a few bits (usually expensive sweeping bends) to be written off! My advice would be to plan, plan and plan some more before ordering!

First job was finding the existing clay pipe at the rear of the property and breaking into it to connect the new rear drainage. Took a bit of digging and a bit of nerves digging under the path (Hoping it wouldn’t collapse) but I was able to find the existing pipe. You can see the state of the old concrete ‘bunker’ manhole, so I was very happy the BC chap said I didn’t need to break into it. For reference, what looks like a step down into the trench below the manhole in the picture is actually the concrete encasing it!

0A893636-57AA-4028-8901-421E5F524B1B.jpeg


I then broke out the evo disc cutter and it was easy (but scary) to make the cuts into the pipe.

1BCF5440-6A9A-411A-967E-4549669345E1.jpeg


Connectors were then fitted with a Y joint and we were good to go to start with the new pipes than then get the first manhole in.

2CADD8C2-E24E-4620-8A84-FA57D1CD4BFD.jpeg
AB938CDB-1162-464D-A647-8BBE17F99BC6.jpeg


Thankfully the deepest manhole was about 1150mm deep to the ground level, so only needed a small amount chopped out of the riser - which is simple with a handsaw. Any deeper than 1200mm and you need to start fitting restrictions which adds to the cost.

939192AD-1EA9-42D7-836F-1D6C721A38CF.jpeg
D16ABB6B-2C04-43CA-9009-45FD9ADB3078.jpeg


You can just about see the cross over of pipes between the soakaway and the sewerage pipes, which meant the manhole in the foreground had to be deeper than I’d of liked to allow the appropriate 300mm spacing between the pipes.

At the front of the house I had the fun and games of trying to find the existing clay pipe for the rainwater drains. One end had been connected to a manhole under the new foundations, so it had all been dug out and the markers I’d placed had been lost. I knew roughly from the connecting manhole where the pipe should have been, but depth unknown. So it was just a trial and error hand dig, while being careful as I didn’t want to damage the pipe with the shovel. It was like striking gold when I found it!!

Out came the disc cutter again and I connected up the new plastic pipe to the clay and put in a manhole to get the angles I needed for where the drain will be at the front of the property.

B4D94294-A9DC-4691-B2E3-5B3EDEF7FA8A.jpeg


I had 2 tons of 10mm pea shingle as everything I read said to put the pipes on that, and then cover it in shingle. BC came out and said ‘why have you used that shingle?!’. I was thinking I’d screwed up - but he just said that I could have just re-used my sand that came out of the holes as you can use material up to 10mm in diameter! Panic over, that was another 100 quid in shingle wasted and 2 tons of extra dirt/sand I had to pay to remove.

However, with BC happy the big fill in started again, leaving a very muddy/sandy back garden!!

D14E08F3-FDD9-4C69-B05A-A4E937FD555B.jpeg
B6E1B723-22F7-45E6-920E-6398859B285F.jpeg


Finally, after the fill in and the remove of the original pathetic skip of sand, we were left with this pipe of 20 tons of sand on the drive...which lived there for about a month before we got a grab truck to get most of it.

BC354D4C-2A03-4D80-91C9-733F007918C4.jpeg


So, spend was £400 on plant, £150 wasted on mini skip, £170 on grab truck, £1600 on various drainage stuff - probably about £300 of that was unused in the end!! Will eventually eBay the spares and try and get something back.

So total spend to this point, £16k.
 
Last edited:
Good work bro. RE Plastic fittings...a bit of a tip...if you ever need to get the fittings off you get a screwdriver in the bit near the rubber and flip the lock ring off. I used to try and pull it apart until I asked the guy at osma. Once the plastic ring is apart you can reuse it again by re putting the ring and rubber back in the fitting....well you can do that with osma and some of the others as I have done it myself before....
Thanks Glen, didn’t even realise they had a bit that comes off! Will take a look and see if I can salvage some of the bits I’ve chucked in my rubbish pile :)
 
Thanks Glen, didn’t even realise they had a bit that comes off! Will take a look and see if I can salvage some of the bits I’ve chucked in my rubbish pile :)
Yeah give it a go and let me know. I did it a few times when I was doing some work on my soil stack.
 
Now we’re nearly caught up with real time. Drains were all done and filled in just after Xmas 2019. Fast forward to late February 2020 and with the impending risk from Covid 19 and lockdown, I thought I would be a good opportunity to get some more of the building done.

Having called into my local builders merchants, I ordered 7nm foundation blocks, 7nm fibolite blocks and blue engineering bricks along with all the ancillaries to allow me to build up to DCP. The blue engineering bricks will be on show below the dcp (and the render), so hoped I can lay these well enough.

I ordered 275 x 300 x 140mm foundation blocks in sufficient numbers to allow a course around the outline of the building. I opted for these as a total newbie to brick/block laying as the 300mm is the width of the wall including the cavity - this making the spacing of the wall a little easier.

Work then got busier again so it ended up being late April 2020 before I actually got to lay any blocks! I’m only able to do work on the extensions at the weekends, which does make the whole thing move slowly, but definitely a nice change from my desk job!

I must have measured the site layout about a dozen time to ensure the setting out was done correctly! I was glad I did a lot of the checking, as I did find a bit where my setting out was wrong. I also had my first go with the water level (with my other half’s help), which is an amazing simple and easy way to check the heights. I did find some variations in the foundations height of up to 25mm which I decided I’d just level out with the first mortar bed. But again, I measured repeatedly to ensure the heights in the corners were correct to make the laying easier/more accurate.

The foundation blocks were heavy, but weren’t that tough to lay. The biggest challenge was the weather which was hot and causing the mortar go off pretty darn quick. I bought my MacAllister cement mixer about 5 years ago for £150 from B&Q, and have used it a few times before...but it’s about to have the busiest year of its life!!

First mortar mix shot:

IMG_4294.JPG


Getting the rear corner in:

IMG_4296.JPG


IMG_4297.JPG

IMG_4300.JPG


It took me best part of a day to get as far as the picture above, but I spent an awful lot of time levelling, gauging and more levelling of every block.

By the end of the next day I’d got the dividing wall done and the blockwork on the inner skin which gets me up to DPC. You can just see the start of the outer skin’s engineering blocks. I went for black mortar tone and made the first batch very black, which ended up causing me drama later as in lockdown I couldn’t get any more mortar tone locally so ended up driving to Wrexham to get some more where wickes had it in stock!

(the wooden planks were my way of shifting the cement mixer into the back garden every night, but as it was heavy I soon got bored of that and just left it outside with a bulk bag over it :) )

IMG_4342.jpeg


Another thing that was in short supply in lockdown was MOT 1, but thankfully the chap who owned the grab truck that took away my dirt/sand came through with 18 tonnes which was dumped straight onto the front of the extension where the garage would be.

IMG_4354.jpeg


I hadn’t finished the brickwork at the stage of the hardcore delivery, but had soon afterwards. Not the best brickwork ever I know, but ultimately it’s all going to be below or near ground level, so no one will look at it too closely I hope! I’m pleased with the mortar tone.

IMG_4356.jpeg


A great investment was my wacker plate than I bought from Aldi for less than £300 but it’s exactly the same Scheppach model for £450 at toolstation! I’ve found it more than capable for my needs, although I did wack the MOT down in three 50mm layers to be sure (after having wacked the life out of the sand below beforehand). I had to shovel about 12 tons of hardcore into a wheel barrow and move by hand around the site. The another 4 tons was scrapped into position as it was near where the pile was...and the final couple of tons where put around the outside of the extension to negate the overall sandpit feel of the site.

IMG_4363.jpeg


IMG_4366.jpeg


I don’t have any photos post-wacking of the hardcore, but then out came the wheel barrow again to shift of the 3 tons of binding sand that was put on top Of the hardcore...then more wracking was done. Needles to say at the end of the weekend of shovelling and whacking I was shattered!!

3A7EB4D6-9C7B-45DD-810F-1D4A49A119E3.jpeg


Blocks, bricks and various other things from the builders merchant £1.5k, MOT £0.5k, so total spend to date £18k.

Next up, damp-proofing insulation and wire mesh ahead of the concrete.
 
Last edited:
Sorry all, I've been really slow at updating this thread. I'm sure most will understand that doing a build, especially around work, can become all-consuming, so stuff like this gets put onto the back burner.

So we're now mid-May 2020, in the midst of Coronavirus lockdown and some of the best weather we've had for a long time. Next was getting the floor slabs down as per the plan specs above the hardcore/blinding sand -

Screenshot 2020-11-07 at 21.46.31.png


In the kitchen:

Damp Proof Membrane (1200 gauge)
100 Ecotherm Insulation
DPM Again
100mm Concrete
65mm scree (to be done later)

In the garage:
DPM
150mm Concrete

The 1200 gauge DPM went down easily, and only needed one join in it, which we used the correct tape for with was definitely a two person job as the wind was a bit breezy!

IMG_4372.JPG

IMG_4373.JPG


Then in the space that will be the kitchen we laid the 100mm ecotherm insulation, which was very simple to cut and fit in place, before the second DPM went on. It took next to no time to do it. Probably took longer to tape the insulation with the foil tape than the rest put together.

IMG_4381.JPG


Although there seemed to be mixed opinions online to whether reinforcing mesh was required throughout the concrete, I prefer to over spec than under spec, so the kitchen floor got a 6mm reinforcing mesh and the garage floor got a 7mm mesh, which was all tied together with 200mm overlaps by my better half using wire twists. (I don't have the patience for such things).

Some people use bricks for spacing, but we got the correct height plastic spacers (50mm and 75mm) to get the mesh in the centre of the concrete. Annoyingly the builder's merchant sent a bag of 200 of the 50mm spacers, and a bag with only 12 of the 75mm spacers in - despite having ordered 200 of those (a full bag) too. As these things came from the builders merchant with my original a few weeks beforehand, I couldn't go back and dispute at this stage, so the lesson for all is to always check your deliveries are complete when they are delivered!!

It was also Saturday afternoon when I noticed the shortfall, so I was a bit scuppered with being able to carry on, but another £40 spend via Amazon and I had a bag of 75mm spaces on Sunday - thank you Amazon Prime :)

IMG_4407.JPG


I'd not put all the spacers in at this point, but in the above you can see the garage door opening, which I built some shuttering out of some old 4 x 2 timbers I'd had stored outside for years when it was building a deck and ordered way too much wood - thankfully this justified me keeping it for all this time :) You can't really see it, but I also opted to dig the entrance to the garage door a further 100mm deeper to make the concrete thicker/stronger at the point of pressure when cars enter / exit.

Also to help with the concreting process I also built a tamping tool out of more 4 x 2 to assist with the concreting process. It wasn't the prettiest thing in the world, but turned out to be perfect for the job! With some other timber on the kitchen wall to raise the level, it would work for the different floor heights and depths of concrete (there's a 100mm step down into the garage). You can also see the 25mm upstand insulation that I cut to size and placed around the edge of the kitchen floor.

IMG_4420-1.JPG


IMG_4422.JPG


I realised I'd made a mistake at this point, as I'd not left sufficient spacing around the edge of the perimeter between the mesh and the up stands - you need to leave at least 40mm to prevent rust bleeding through the edge of the concrete. But with my angle grinder, some wood and damp towels (to protect the DPM from sparks), I sorted that without too much drama.

IMG_4423-1.JPG


Building Control came round and were happy with it all, which was good as the concrete was coming the following day :)
 

Attachments

  • IMG_4408-1.JPG
    IMG_4408-1.JPG
    83.3 KB · Views: 281
Having to start a second post as the 10 picture limit has got me.

I'd rung around a few concrete companies for the C30 I needed, but they were all pretty much the same price. Most tried it on with trying to rent me a pump unit despite their websites offering a barrowing service, which would have been another £350 plus VAT (at least) for the pump, but the company I went with were happy to send a barrow boy along with the driver to shift the concrete - which turned out to be needed.

I'd worked out that I needed 7m2 of concrete using all the online calculators.

I was up and out at 6.30am getting the last few things ready on the site on the concrete day, and to go and pick up the blue bull float I'd hired for the day. I'd toyed with hiring a power float and or other power tampers, but the chap at the hire shop reckoned I'd be alright with the manual float - which was good of him, as it's the cheapest thing he could have rented me.

IMG_4435.JPG


The volumetric truck turned up at 8.20am. Here they are just getting started. The driver didn't want to back the truck up onto the drive as he said it would ruin it. Having taken some of it up previously, I thought at about 300mm of concrete/paving slabs it would fine - bit the driver was right and it cracked in several places, which goes to show how heavy the trucks are fully loaded. I wasn't bothered as it was all getting replaced anyway - but I thought I'd mention it for the benefit of others that might want to keep their drives.

The two lads from the company were like machines barrowing the concrete, before the could directly pour the last third out of the chute.

My other half and my in laws also came along to help, which was great as many hands were needed for tamping while I spread out the concrete. I meant to do a time lapse of the day, but I can't actually work out how to make a time lapse video from all the thousands of pictures my knock-off go pro. However the Ring cam captured most of the action too:


We got just over 3/4 of the way across the space, and the guys advised that I'd had my 7m2 which was a bit of a surprise! Obviously my hole was a bit deeper than I thought!! Thankfully, the guys had more on the wagon and I could just call the office and settle up later.

Less than two hours later, and a total of 9m2 of concrete and the concrete chaps were done and off.

IMG_4436.JPG
Everything I'd read and watched recommended a wet mix to give more time to play with and oh boy was it a wet mix! I left it for about 3 hours and there was still a lot of water pooling but thought I'd better get floating it off. In hindsight, I should have left it to dry longer before I started, as I don't think I actually gained anything from starting earlier end it took more effort!

The tamping had got the floor very smooth, and the kitchen didn't need floating because of the scree that would go on the top so I should have just left it but I had plenty of spare time between floating the garage floor so I was practicing on the kitchen floor too.

Here's another video of me floating - not very exciting, but you don't have to watch. The float was just about long enough to get the garage done, but I could have done with another pole, but once you get the technique of twisting the pole each direction to get the float angle right in both direction, it's not too bad - just need a fair bit of elbow grease.


After a couple of passes with the float, it looked like this

IMG_4437.JPG


Unfortunately despite having had amazing weather for weeks, concrete day was a really really gusty day. You can see/hear how bad it was in the second vid! I spent a lot of time in the afternoon pulling leafs out of the surface as each one would drag and scuff the surface under the float. Probably some people wouldn't have worried, but I can be a perfectionist about such things, so the leaves added a good couple of hours to the process as I kept removing and smoothing.

A few more passes done:
IMG_4438.JPG


It probably doesn't show on the photos, but there were a few imperfections, so I kept on floating but after about 4 hours I could stand on it without leaving footprints.

In the end, the last pass was done at about 9.30pm so it was a very looooong day, I was shattered, but I was happy with the results in the end. The kitchen was a little rough as it was closest to the trees and all the blowing leafs, but as I mentioned this will have a scree on top, so it won't be seen.

IMG_4441.JPG


In terms of costs, most of the materials except the concrete were bought in the last order from the merchants. The concrete was £1,200 in total, and I spent another hundred or so on the extra spacers, bull float hire and a concrete rake. So total spend to this point £19.5k.

Thanks for looking.
 

Attachments

  • IMG_4488.PNG
    IMG_4488.PNG
    315.7 KB · Views: 309
Last edited:

DIYnot Local

Staff member

If you need to find a tradesperson to get your job done, please try our local search below, or if you are doing it yourself you can find suppliers local to you.

Select the supplier or trade you require, enter your location to begin your search.


Are you a trade or supplier? You can create your listing free at DIYnot Local

 
Sponsored Links
Back
Top