Peeling Paint on Bathroom Ceiling - Is This The Correct Approach To Repaint?

Joined
4 Aug 2020
Messages
20
Reaction score
2
Country
United Kingdom
Hi there!

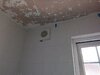
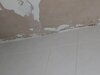
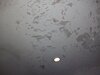
I've recently managed to strip the majority of paint from a flaking and peeling bathroom ceiling that contained 2-3 paint layers in some areas. After stripping away the paint, I can see that the previous ‘painter’ painted over mould in some areas, however filler was added in areas to ensure that the ceiling was smooth.

As you can see, I’ve managed to scrape off most of the paint back, which I understand was a mistake.

32YueWL


My process
  • Washed the walls down with HG Mould Spray and rinsed with cold water. This was around 2 months ago.
  • Scraped the loose bits of paint, until I could scrape no more.
  • Sanded the entire area with 120 grit sandpaper using a sand pole.
  • Vacuumed and wiped away the remaining dust.
  • Cracks in the plaster are ‘primed with a 1:4 of PVA/ Water mix.
  • Wait until dry.
  • Apply a thin coat of joint/ compound Toupret TX110 to the cracks in the plaster
  • Wait until dry
  • Add another thin layer of joint/ compound, so the repaired area is practically level with the surrounding area.
  • Wait until dry
  • Sand the entire ceiling with a light sand with 120 grit sandpaper.
  • Prime the whole ceiling with with Zinsser Bulls Eye 123 sealer primer.
  • Apply 2 coats of Dulux Bathroom Easy Care Bathroom , using a roller with a microfibre medium nap.
My two questions are:
  1. Is my approach suitable?
    I’ve been made well aware that painting is effectively 80% preparation and 20% painting. I really want to get this right the first time. FWIW, I’ve never painted a wall or ceiling in my life.

  2. What’s the best option for applying the Zinsser Bulls Eye 123?
    I’ve got a couple of 4 inch foam rollers, a 4” microfibre sleeve with a short nap and two 9” microfibre sleeves with a medium nap and a couple of high quality brushes. I’ve heard that brushes and sleeves are potentially a one time deal with this primer.

  3. Do I need to water down the Zinsser 123, to ensure that it's absorbed by the plaster/ substrate?
    I'm assuming that I don't need to do this, as this only applies to new plaster, but just want to be sure.
Ideally, I know that it would be best to get the entire ceiling skimmed. However, money is tight at the moment and I’m currently time rich. Thanks COVID-19.

I’ll look into upgrading the extractor fan and I’m now opening the bathroom window regularly after each shower, to alleviate moisture build up, which should reduce condensation and mould build up in the future.

Many thanks.
 
Last edited:
Sponsored Links
if, as is usual, the mould and paint damage was due to excessive humidity in the bathroom, fitting a powerful extractor fan should have been the first thing you did. is there already a hole in the wall for a fan? How big, and where is it? Does it have a run-on timer?

Why do you need the Zinsser?

How old is the ceiling, and why do you think it is cracked? Some photos would help a lot (especially of the upper surface).
 
Why do you need the Zinsser?
I'm a novice and this is what I've picked up during my research on various forums.

I've read that the surface (bare plaster and repaired areas only) needs to be primed with either a PVA Water mix (1:4 ratio) or Zinsser 123, which would allow the paint to stick to the bare plaster and 'potentially' prevent it peeling off again. There is a plenty of controversy on using PVA, that is why I went with the safest option. Please correct me if I'm wrong and misinformed.

A fan currently exists in the bathroom, which stays on 5 minutes after the light is switched off.
However I don't believe it's powerful enough to wick away the moisture produced after using the shower. I'm also getting in the habit of using a squeegee on the walls and shower glass after each shower to alleviate this problem.

The ceiling was repainted around 5 years ago. The ceiling is around 12 years old.

A second larger bathroom in the property (downstairs) doesn't have the same amount of flakiness that this upstairs bathroom possesses. I'm not sure whether this was due to the the previous painters shoddy work or otherwise.

Bathroom Ceiling Crack and Extractor Fan Photos


Thanks
 

Attachments

  • 20200804_BathroomFan.jpg
    20200804_BathroomFan.jpg
    191 KB · Views: 554
  • 20200804_Crack-.jpg
    20200804_Crack-.jpg
    89.6 KB · Views: 426
Last edited by a moderator:
primed with either a PVA Water mix

Please don't ever put glue on a surface you hope one day to paint.

PVA is water soluble. So when you put water-based paint on it, it turns to sludge and prevents the paint sticking to the plaster.

In a bathroom, it softens from the steam and condensation, and bubbles or peels depending on your luck.

The correct treatment for bare plaster, before emulsioning, is to give one or two mist coats of emulsion thinned 10%-20% with water. This will soak into the plaster and when dried, the paint will stick to it. You will know when you have mist-coated enough, because the plaster will no longer suck the moisture out of your brush.

The fan you show has an extract rate around 80 cu.metres pr hour. This is adequate for a WC or a bathroom with infrequent baths, but insufficient for a steamy shower. I presume the duct behind it is 100mm diameter.

It can be adjusted to (I think) a max of 30 minutes overrun on the timer, which will make a big improvement because it will continue sucking water vapour out after you have left. The adjuster screw will be seen if you TURN OFF THE POWER AT THE CONSUMER UNIT (not the light switch) and remove the outer cover. It looks like a modern quiet model, possibly with a ball-bearing motor, so you can consider leaving it on permanently. It will run for about 120 hours on 14pence worth of electricity. The fan will be more effective if the door and window are closed.

Check the loft insulation above the ceiling. If it is thin or gappy the ceiling will be cold in winter and this will promote condensation.
 
Last edited:
Sponsored Links
PVA is water soluble. So when you put water-based paint on it, it turns to sludge and prevents the paint sticking to the plaster.

In a bathroom, it softens from the steam and condensation, and bubbles or peels depending on your luck.
Yes, this is what I've read which is why I elected for the relatively 'expensive' Zinsser option for the large exposed areas in any case.

I understand that a mist coat if required for new plaster. However, is this a necessary process for a ceiling that has been stripped and sanded down to the bare plaster?

Thanks
 
yes, because it's bare plaster. It is the bareness, not the newness, that requires sealing.

I have updated my previous post.
 
yes, because it's bare plaster. It is the bareness, not the newness, that requires sealing.

I have updated my previous post.
Thank you so much. You've been really helpful!

Edit: This is a picture that I took in Jan-2020 of the bathroom ceiling before I stripped the paint away
 

Attachments

  • 202001_PreviousState.jpg
    202001_PreviousState.jpg
    165.8 KB · Views: 502
Last edited:
click the "thanks" button.

looking at your extractor, I think it might be a Manrose, which I do not favour and is not very quiet. It's a brand builders like for reasons unconnected with its quality. But you will probably soon be changing it for a better one.
 
the crack, where the ceiling meets the walls, is I think where the plasterboard is not nailed to a joist above at the edge of the room and the joint has moved.

you may do better to ask on the "plastering" section.

I've treated them by cleaning from above and injecting expanding foam, which glues the wall and ceiling together so you can then use caulk or paintable while silicone in the crack, but this may not be the correct method. I used pink fire foam which also blocks draughts, and smoke and flame in the event of a fire, so seems to me an extra benefit.
 
click the "thanks" button.
Done!

Yes, it is very noisy. I'll look at increasing the run time. Cheers for the additional info.

My aunt recently had her bathroom upgraded (Xpelair model) and I couldn't but help notice that her fan was deathly quiet in comparison
 
Manrose rubbish.

Look at the dbA (noise rating). manrose about 41.

I like the Soler & Palau fans, or Airflow. look for a dbA of 25 or less. If you are stuck with a 100mm duct through the wall, throughput will be around 80 cu.m/hr but there are a few up to around 90 or 100. If you have an open airbrick that is bigger, or can fit one in the loft, or box it in, you can have two or three times the power, but it looks to me like you currently only have a 100mm size. The square outer casing is around 160mm.

There are a number of brands selling identical looking fans, probably from the same factory, but I got caught when I got some Airflow on special offer that didn't include the integral backdraught shutter, and didn't have ball-bearing motors. I presume they are deliberately made as an economy model. They are a bit louder and a bit less efficient. Check the spec.

ooops - I just looked and the prices have gone up. It might be that there is a shortage due to lockdown.

example
https://www.tlc-direct.co.uk/Products/SLS100CRZ.html

https://www.tlc-direct.co.uk/Products/ADQT100T.html
 
I've treated them by cleaning from above and injecting expanding foam

I've seen this technique demonstrated by the Painting and Decorating channel
.

Once again, thanks for your help and supported knowledge. I'm glad I didn't simply follow the "just sand and slap some paint on it" crowd.
 

DIYnot Local

Staff member

If you need to find a tradesperson to get your job done, please try our local search below, or if you are doing it yourself you can find suppliers local to you.

Select the supplier or trade you require, enter your location to begin your search.


Are you a trade or supplier? You can create your listing free at DIYnot Local

 
Sponsored Links
Back
Top