Fitting new bedroom ceiling lighting

Joined
15 Apr 2018
Messages
47
Reaction score
2
Country
United Kingdom
Hi,

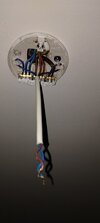
I have just been trying to fit in a new bedroom lamp shade and suddenly found loads of blue and brown wirings when I was only expecting one of each. (See photo)

As a consequence I am at a loss as to how to do steps 1 and 2 of the assembly instructions.(See photo)

All help would be much appreciated.

Thanks

Peter
 

Attachments

  • IMG_20250104_101707295.jpg
    IMG_20250104_101707295.jpg
    111.7 KB · Views: 102
  • IMG_20250104_103255343~2.jpg
    IMG_20250104_103255343~2.jpg
    195.3 KB · Views: 95
Just use the old pendant cover and wire in like your existing cable (blue to left, brown to right, looped round the strain relief). Slip your old cover over the cable before you start so you don't have to disassemble the bulb holder.
 
Also be aware that the middle terminals will still be live even with the switch off - so you should isolate the circuit at the fuseboard.

You shouldn’t need to change any wiring to fit a new shade.
This, but he's already disconnected his old bulb holder so probably as easy to use the new one.
 
Your instructions show a complete new light fitting, with a large metal cup that goes on the ceiling.
Did you want the whole complete new light fitting, or literally just the shade only?

To fit the complete new light fitting, you will require two additional 6amp connector blocks or similar.
EDIT. Which probably won't be ok to use, because you have a metal Class 2 new fitting by the look of it. Damn.
 
Just use the old pendant cover and wire in like your existing cable (blue to left, brown to right, looped round the strain relief). Slip your old cover over the cable before you start so you don't have to disassemble the bulb holder.
Not sure if the new lampholder is fitted to flex, or a metal rod...
 
Two ways to fit multiple wires to a class 2 metal light fitting:

1) Fit a junction box above the ceiling, incorporating all the ceiling wires, plus a new short cable to the new light fitting.

2) House the ceiling wiring in a round pattress (such as a Marshall Tufflex TCR2 WHI white ceiling rose adaptor), with a new piece of cable joined here to connect to the new light fitting. Fit a plastic conduit box lid (they do a larger diameter one) between the pattress and the new light fitting.
 
Depending upon the sizes and clearances then it might be possible to remove the ceiling screws, fit the bracket between the ceiling rose and the ceiling, refit the screws then cover over the rose base with you new cover - providing it is possible to install it to fit safely and all earthed as appropriate.

it might be easier just to refit the shade only onto your existing lampholder (check it is not too heavy).
 
Thanks for the feedback,

Just for clarification - I need the metal part (steps 1 and 2) to attach to the ceiling so that I can attach the lamp shade to the bulb. However the existing white part on the ceiling is blocking it. I can not remove it as do not know how to replace the wiring so I can set up the new lamp shade.

A mix and match approach will not work either as I can not overlay the metal part on top of the white piece and the thick wiring (from having multiple wires) will not fit through the metal hole for the metal piece that needs attaching to the ceiling.
You have three options then
1. Remove the white ceiling terminal block (ceiling rose). disconnect all the wires and replace them in strips of insulated terminal block.
Screenshot 2025-01-13 at 12.57.20.png

Do not lose the brown sleeve that is on one of the blues or we wont be able to help you.
2. Get a maintenance free junction box for lighting and reterminate the wires in it. Make the ceiling hole bigger and put the junction box up there with a bit of 3-core flex attached to your new light
3. Get an electrician to do this for you.

PS
the thick wiring (from having multiple wires) will not fit through the metal hole for the metal piece that needs attaching to the ceiling.
Then fit the bracket to the side of the hole that the wires come through. They do not have to come through that centre hole!
The big base will cover that up anyway.
 
Last edited:
You have three options then
1. Remove the white ceiling terminal block (ceiling rose). disconnect all the wires and replace them in strips of insulated terminal block.
Not the correct way to install a class 2 fitting, especially if metal
View attachment 369182

Do not lose the brown sleeve that is on one of the blues or we wont be able to help you.

2. Get a maintenance free junction box for lighting and reterminate the wires in it. Make the ceiling hole bigger and put the junction box up there with a bit of 3-core flex attached to your new light
And provide a safe way of protecting the end of the earth wire if this is a class 2 fitting
3. Get an electrician to do this for you.

PS

Then fit the bracket to the side of the hole that the wires come through. They do not have to come through that centre hole!
The big base will cover that up anyway.
Again not the correct way to install class 2 fitting, especially if metal.
 
Just for clarification - I need the metal part (steps 1 and 2) to attach to the ceiling so that I can attach the lamp shade to the bulb.
Unless you REALLY want a shiny metal fitting in lieu of plastic,
you really don't NEED to.

See
Just use the old pendant cover and wire in like your existing cable (blue to left, brown to right, looped round the strain relief). Slip your old cover over the cable before you start so you don't have to disassemble the bulb holder.
 

If you need to find a tradesperson to get your job done, please try our local search below, or if you are doing it yourself you can find suppliers local to you.

Select the supplier or trade you require, enter your location to begin your search.


Are you a trade or supplier? You can create your listing free at DIYnot Local

 
Back
Top