Hi All,
I want to replace this leaking tap

with this new tap

and I'm wondering how to get the old tap out.
I've got a tube spanner to get at the nut but am worried out where to separate the pipes.


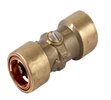
Those isolators look like a good place but they look like they're single use press fit?
So you can press them together but you can't pull them apart?
Looking at it, it seems like if I separate the pipes under the isolators, they won't go through the hole for the tap.
I'm not sure how to gain access to separate the pipes above the isolators.
A saw wire ?

Any tips greatly appreciated!
Cheers,
Wilson.
I want to replace this leaking tap
with this new tap
and I'm wondering how to get the old tap out.
I've got a tube spanner to get at the nut but am worried out where to separate the pipes.
Those isolators look like a good place but they look like they're single use press fit?
So you can press them together but you can't pull them apart?
Looking at it, it seems like if I separate the pipes under the isolators, they won't go through the hole for the tap.
I'm not sure how to gain access to separate the pipes above the isolators.
A saw wire ?
Any tips greatly appreciated!
Cheers,
Wilson.