was done at low level which could imply rising damp?
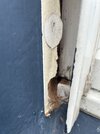
7. A metal corner bead is rusting, & there could be rot under the window board. The skirting is a badly done re-fix - what condition is the floor in?
8. Why not pic the interior of the bay, and the rest of the
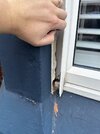
11. Close up inspection by a window guy, and sprinkled water testing would help.
OP,
Your latest pics show that you have rising damp & penetrating damp - in terms of the interior remedial work that will be needed it makes no difference.
I can take you through what needs to be done but first:
There are a number of unanswered questions from my post #24 - perhaps you would like to answer my questions and suggestions?
Tried to answer these as best as I can:
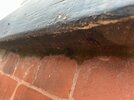
1. The drilled & plugged DPC line seems to be working - however, headers only have been drilled, suggesting that the wall might be solid? Is it a solid wall? Why not measure the wall? - i
t’s a sold brick wall right through to the inside where it’s then plastered? Is that what you mean? Think it’s single brick.
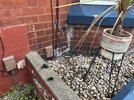
2. No airbricks can be seen - why not stand back & photo the whole of the bay and the walls on either side of the bay. ie the front elevation at low level. -
will get another pic but there is a single air brick under the bay window below floor level. There are also two air bricks that have been installed above the floor level - although not sure they’re any good as I can’t feel any draft from them internally.
3. Lower the pebbles below any air bricks. -
will do
4. Do you have a suspended floor? Ventilation from front to rear of the house is necessary under suspended floors -
it’s suspended floor I think with LVT flooring over it.
5. The interior pics of damp defects show what appears to be mostly penetrating damp.
6. However, there are indications that previous work was done at low level which could imply rising damp?
7. A metal corner bead is rusting, & there could be rot under the window board. The skirting is a badly done re-fix - what condition is the floor in?
- rechecked this and can’t see a metal corner bead? Not sure if it’s just the photo giving off that impression?
8. Why not pic the interior of the bay, and the rest of the wall?
- will get one
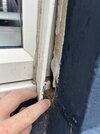
9. The pics in post #9 show very poor attempts at using silicone. All the silicone needs re-doing, maybe the stuck-on trim also needs re-doing or replacing?
- will do
10. Opening & locking testing the frame - & cleaning out the tracks & weep holes is needed. -
have done and everything seems fine
11. Close up inspection by a window guy, and sprinkled water testing would help.