Beveled edge crackle glaze white brick tiles 200x100mm

Joined
30 Aug 2010
Messages
705
Reaction score
4
Location
London
Country
United Kingdom
I am looking to get new tiles for my bathroom in a Victorian House. I've been looking for beveled edge crackle glaze white brick tiles (200x100mm) but they are pretty hard to find.

I found a 150x75 beveled edge crackle glaze brick tile which has a smooth back. Will it stick to the wall as well as a tile with a rough back.

How do I cut the corner tiles to create the brick effect

I originally planned to get the bigger beveled edge crackle glaze white brick which I cant locate. Can anyone let me know if you know where i can get it?

Thirdly, which do you think will look more in keeping with the Victorian style, the 150x75 or the 200x100

Thanks for your help :D
 
Sponsored Links
As long as you use a good trade adhesive and prime the surface your sticking to (if required) then they will stick fine.

The original tiles that you are trying to mimic wouldnt have had a crackle glaze, it was actually a fault that affected the tiles after fixing called crazing.

anyhoo...size wise personally i think the smaller ones look better, and more authentic but its only personal preference !

with a crackle glaze you often have to seal them, so make sure you find out if yours require it
 
Thanks tpt

As long as you use a good trade adhesive and prime the surface your sticking to (if required) then they will stick fine.
Could you recommend which good trade adhesive i should get? I'm not a tiler so it's hard to know whether I am getting the right one. Can I tile over new plaster? or should I use a primer?

Also, how should I cut these tiles? i would need to cut the corner tiles to create the brick effect.
 
Yes you would need to prime new plaster, how long ago was it skimmed?

Use an acrylic primer NOT pva (no matter what the shop assistant may say!) both granfix and bal produce one.
As an alternative to this you can use granfix multifix adhesive which is self priming and can fix straight onto new plaster.

You should be able to cut them quite easily with a 'normal' scribe and snap style diy cutter, the golden rule is to only run the wheel (scribe) over the tile once or you ruin the wheel - these tiles have a soft glaze and so should cut easily. Sometimes the crackle in the glazed can cause them to break unevenly, if this turns out the be the case you may need a watercooled cutter, but again any cheap diy version should cut them easily.
 
Sponsored Links
Yes you would need to prime new plaster, how long ago was it skimmed?
Thanks tpt, i really appreciate your help. What's better, using Granfix Acrylic Bond And Prime and then the Supergrip Adhesive OR the Granfix Multifix Adhesive?

The plaster is completely new (so new it hasn't been done yet ). I removed a few old tiles to check the condition of the plaster behind it when it fell off the wall, all crumbly and soggy. it might not all be like that but I'll know when i take the rest of the tiles off. Is there a better kind of plaster to use behind bathroom tiles? Or should I use a plain undercoat and finishing plaster, the ones you get at DIY shops?

Thanks again
 
Honestly - no difference. Granfix multifix saves you time but is more expensive.

If its currently plasterboard and then skim then your better off not replacing with the same if its a wet area use either aquaboard (a plasterboard like cement based backer board) or a tile backer board like no more ply or kerdi and dont plaster it.

if its not a wet area you can use moisture resistant plasterboard and again dont plaster it. just prime and tile.

If its old plaster over render, over brick then as long as the render is sound you can tile straight onto it (if its level) or re-skim, but there is no need to reskim the render. if the render comes off in chunks then its either re-render or dryline using the above mentioned products
 
If its old plaster over render, over brick then as long as the render is sound you can tile straight onto it (if its level) or re-skim, but there is no need to reskim the render. if the render comes off in chunks then its either re-render or dryline using the above mentioned products
It's render over brickwork and some of it has fallen off leaving me with expose bricks. What should I use to re-render? do I use sand and cement mixture? is there a render mixture that I can get? Thanks again!
 
if the majority of it is sound (check by tapping it and making sure it doesnt sound hollow) and you only bits to patch up then its probably easiest to go and buy a bag of carlite bonding and patch up with that. its quite cheap and you just mix it to a firm paste - same sort of consistency as wall adhesive. Dont fix your tiles with this, just patch up!

when you are checking the remaining render be honest with yourself. your tiles are stuck to this and if it comes off so do the tiles!
 
I'll check the condition on the wall to see if it's just a patch job and use carlite bonding as you suggest. But I think it's more likely that I'll have to re-render a large part of the wall because a few tiles are a bit loose and water must have soaked the render behind it. If so, will I use carlite bonding for that too or should I use something else?
 
if its the full wall then you are best to dry line it with aqua board
 
if the majority of it is sound (check by tapping it and making sure it doesnt sound hollow) and you only bits to patch up then its probably easiest to go and buy a bag of carlite bonding and patch up with that. its quite cheap and you just mix it to a firm paste - same sort of consistency as wall adhesive. Dont fix your tiles with this, just patch up!

when you are checking the remaining render be honest with yourself. your tiles are stuck to this and if it comes off so do the tiles!
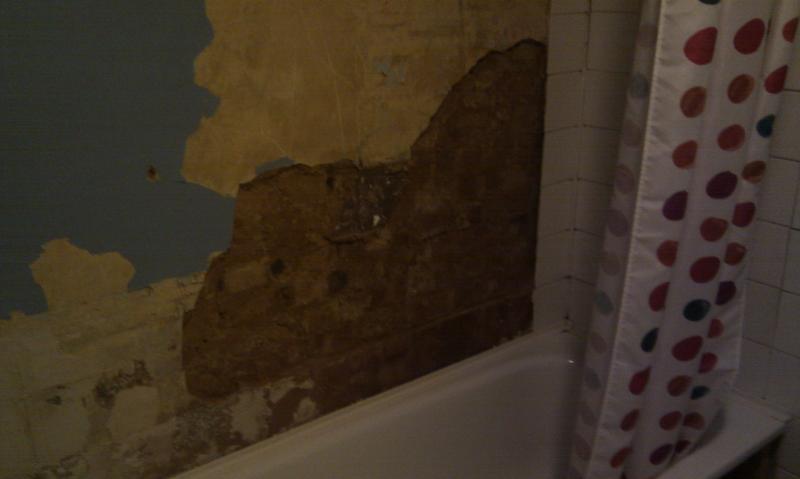
It looks like the bottom corner of the shower wall including the plaster behind the bathtub is knackered. I haven't removed the tiles on other side of the corner yet but i suspect the bottom bit of the plaster is knackered too. Is the best solution to patch it with carlite bonding plaster?

Is carlite bonding plaster waterproof and if so, is that an issue?

Also, what's the best way of sealing the joint between the tiles and the bathtub. Should I just fill the gap between the tiles and the bath with mastic? Or is that useless and if so what's the best way?
 
sorry for the wait!

looks a bit much to patch up, and i notice you have a shower over the bath. You should be treating this as a wet area really.

i would plump for chopping the plaster off back to brick, and then drylining it with aqua board (this is a cement based board that looks like plasterboard. tape the joints and silicone between the aqua board and the bath. The tile, grout and silicone between the bath and the tiles. i would say thats the easiest diy way of doing it (although you may be stretching it as a diy job, depending on your ability)

anyone else on here have an opinion?
 
I don’t disagree with anything that’s been advised so far except that you should NOT tile over Bonding or any gypsum base plaster, it's not a suitable tile base.

As far as I know “Carlite” as a brand name only exists in folklore, it’s all now made by British Gypsum & branded as “Thistle”. You could use conventional sand/cement render but you will have to wait for it to dry out before tiling. Dry lining it with waterproof tile backer board will save all the hassle & will give you a much better tile base.
 
Cheers richard - carlite is a throwback to my days on site....been a while :)
 
Thanks for the advice guys!

Am I right that the consensus here is to use aquaboard in the wet area? What aquaboard should I use? What studs do I need? Do studs come in different thickness to allow me to install them so that it is flush with the existing render (on the bit of wall that doesn't get wet)?

At the moment the bathtub sits in a wooden frame screwed onto the floorboards underneath. I plan to replace the floorboards anyway so I'm wondering whether it makes sense to put aquaboard underneath the bathtub as well?
 

DIYnot Local

Staff member

If you need to find a tradesperson to get your job done, please try our local search below, or if you are doing it yourself you can find suppliers local to you.

Select the supplier or trade you require, enter your location to begin your search.


Are you a trade or supplier? You can create your listing free at DIYnot Local

 
Sponsored Links
Back
Top