Building driveway gates, bracing info please

Joined
28 Jul 2015
Messages
2,408
Reaction score
549
Country
United Kingdom
I’m building a set of driveway gates, each leaf is 1600mm wide by 2m tall.

I have made the frame from 4x2 PSE, with a mid rail, which gives me two panels to drop some match boarding into. These panels are around 1400x825mm.

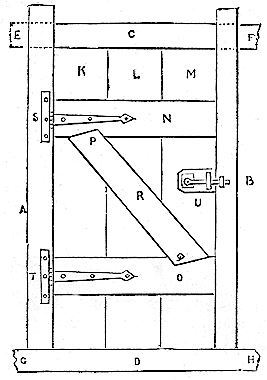
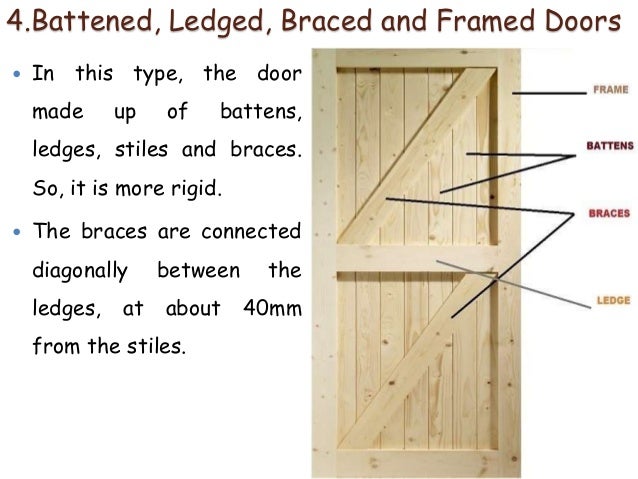
I intended to add some bracing around 45 degrees, but it looks wrong.
Would it be stronger to make two upward pointing chevrons or will a single brace per panel be acceptable? If so what angles should I be going for.

The rails have straight through tenons with wedges.

Tia.
 
Sponsored Links
I'm no carpenter/fencer/structural designer, but given your dimensions a diagonal from the bottom of the hinge side to the top of the moving edge would be the strongest. As the brace would be in compression.
Anything sloping the other way would also work but it will be in tension so relying on the strength of the fixings.
What looks good might not match with what's the strongest though! If your gate wasn't so close to square, you could break it up into squareish areas and brace them separately. Going at 45 degrees where it doesn't hit a corner would leave you with only one triangle created.
If you google pictures of gates (I just did!) then often they have diagonal both ways, one on each side.
Hope that's some use (from a non pro!)
 
The idea is to have a single diagonal brace to keep the gate square, and to take the load from the top corner of the unhinged side, and transfer it to the bottom hinge.

So it's not 45° (unless the gate is perfectly square), but whatever angle it happens to be from corner to corner.
 
a diagonal from the bottom of the hinge side to the top of the moving edge would be the strongest.

and when you assemble it (if it's not too late) do it so that the side furthest from the hinge is an inch or two higher than the hinge side. It will look wrong for a bit but, whatever you do, it will sag. Even if you put a sprung jockey-wheel on the bottom, which is a good idea. If you've already hung them, put a brick or something under the end for a few days to take the entire weight, and you'll find it moves a trifle.

Where the diagonal meets the stiles, make it slightly over-length and chisel a small housing/notch in the rail so that the diagional will be unable to push sideways against the stiles and try to push them apart.

You'll probably spot how it's done if you look at some examples of high quality gates.

I bet one of the expert woodworkers will have a pic.
 
Sponsored Links
here we are. You can just make it out in the RHS pic. Several examples cut in varying ways.

Modern factory-made budget gates often omit it.

Note that the brace is actually not in contact with the stile, so it can't push them apart (this loosens the tenons). You see a lot of doors with the braces pointed like arrowheads, and bearing on both the ledge and the stile, which tries to push the joint apart (especially when the nails rust away, or the door sags a bit, which it always will).

ftk969.jpg


edit: better pic.

Battened-ledged-and-braced-door.jpg
ledge-and-brace.jpg


door-and-windows-by-prof-sagar-raut-18-638.jpg
 
Last edited:
Cheers Chaps

Sadly I’ve already glued up the stiles and rails. I had envisaged having a wheel (thanks), I guessed sag was down to flaky construction, seems I might be wrong, and it’s inevitable.

I’ll take on-board the comments about the bracing.

Thanks again.

Ps, I don’t suppose 3 hinges will make any improvement to overall stability?
 
A wise move for such a heavy door.

Hook and band, I presume? I'd get galvanised, and paint well before fitting. I used stainless coach bolts with acorn nuts for beauty.

Hinge length is supposed to be a third of the door width.

You can slip two or more stainless C-form washers over the hook for a smoother action, and also to increase height a bit if you want. They will prevent the hinge parts grating together and scraping the paint off.
 
Hello again

Quick question re the acorn nuts... presume this is for the front?

Just picked up some adjustable hook and band hinges, and noticed that the coach bolt with square shank (nearest hinge) only fits the hinge from back to front, this means I’ve got the grind the bolt down once tightened. Not sure it will look acceptable.

I’d prefer the domed head to be on the front, but worried it might pull through the wood when tightened?

Any suggestions...

Thanks.
 
Ignore me, :whistle:

Just reversed the bolt and it’s holding tight in the wood, didn’t spin, so dome head to the front.
 
if you're using coach bolts of the correct size (I think mine were M10 but maybe M8), they have a short square shank that fits into a square hole in hook-and-band hinges. As coach bolts have a round head with no slot, ne'erdowells can't undo them from the head side. This works fine if the hinges, and the bolt heads, are on the outer face of the gate. They also look very neat.

However, the nut can look rather rough, especially if on the public side, and dome or capnuts look much better. You can use a C-form washer to spread the pressure if it seems to sink into the wood. I use stainless for all these things as they are exposed to the weather and I am on the coast, I think it looks brill but you can paint the metal if you use zinc-plated (BZP weathers away outdoors).

If the hinge swings freely then there shouldn't be much force on the nuts and bolts, they're just taking the weight in shear.

edit
as you say, the bolt may be a tight enough fit in the wood not to turn. After a few years, when rusted on, this may not be the case, so grease the bolt and nut well. If using stainless, there is a special compound, sometimes based on clay, that prevents the two parts seizing together (they can cold-weld and become impossible to separate). You can buy it in a 50g tin that will last a lifetime. I use Nickel grease but there are various.
 
3BF565DC-517C-4811-9BC4-678D38D9D2EC.jpeg DDD9603C-CAD8-4FBB-AC51-B9C4C776EFAB.jpeg

Thanks for this lot.

Think I will have to resort to fitting the dome head/square shank bit from the back (as it’s meant to).

There isn’t enough clearance to chop the bolt down and tighten etc.
Your idea of dome caps is what I’ll use, as I can shorten the bolt length as required, once it’s fitted.

I’m going galvanised for finish, as it matches other metalwork I have already.

Mocked up a couple of images might make things a bit clearer.

It’s a Eliza Tinsley hinge with M10 Bolts
 

DIYnot Local

Staff member

If you need to find a tradesperson to get your job done, please try our local search below, or if you are doing it yourself you can find suppliers local to you.

Select the supplier or trade you require, enter your location to begin your search.


Are you a trade or supplier? You can create your listing free at DIYnot Local

 
Sponsored Links
Back
Top