Building my own cupboards (a beginner!)

Joined
12 Jun 2012
Messages
10
Reaction score
0
Location
Surrey
Country
United Kingdom
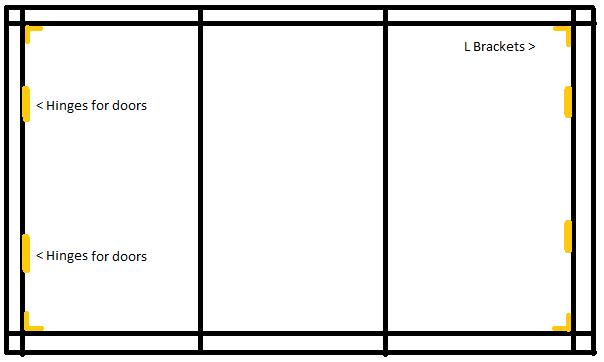
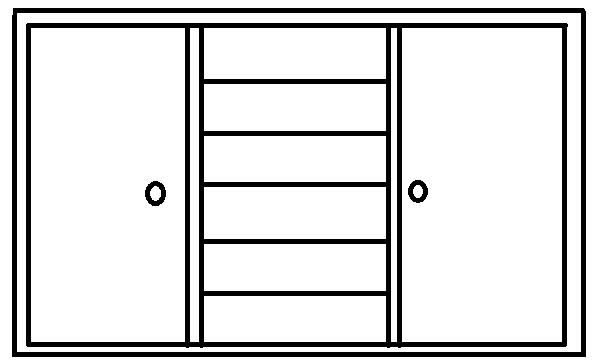
I am attempting to build a set of built in cupboards in one of our bedrooms. This really is my very first attempt at something like this but I know I have a common sense for things like angles and weak spots etc. I would just like a bit of guidance and suggestions if anyone has any. So to begin, ideally I would like two cupboards either side flanking a book shelf (which I have detailed in one of my diagrams). I would like to buy reclaimed pine doors, and to keep the timber on display old looking as our house is a character house from the 1800s. I would build the subframe out of standard studwork timber, however what would be the best size to use? I have seen that 38x38mm is best, but will that be appropriate with the relatively heavy doors? I would also like to hear any recommendations on how I should do the joins where the studwork crosses. I have also attached a diagram of roughly how I'd like to do the subframe - obviously it's not 3d but it's an idea. Lastly for now I'd like to ask how to fix the timber to the ceiling as it's an old lathe and plaster one. Would I need to find a joist above to fix to?

That's not loads of detail, but enough to start!
 
Sponsored Links
You would need to ensure doors are available to span the openings you have designed. Is this to be in an alcove or with one/ two exposed sides.
 
Hello,

Thank you for the quick reply! Thanks for the tip. Thet are to be built in an alcove, well, spanning the whole width of a six footish wide room. If I can't fit two doors it will only be one but I'm more looking for advice about the sub frame, the cupboard space can be worked out.

Thanks once again,

Sophie
 
you are going to need better than basic skills around £300 worth off cheap tools

my suggestion is start smaller like bed side cabinet book shelve or ssimilar and build up your skills
 
Sponsored Links
I have some experience doing creative but unplanned woodwork, so I'll be fine! I have access to a good chopsaw and a nailgun and have all the light power tools I need. I haven't done anything like this before but I just need a bit of input and I'll sort it pretty easily.
 
you really need to hone your skills to avoid the pitfalls
you may off course be very very good and make an excellent job if you are great at converting your skills 100% but if your not it could be a disaster
 
Thank you, I will bear that in mind. Any further thoughts on my requirements?
 
A bit of a task this one, but certainly possible....however, try not to disturb the ceiling in any way - it'll only end in grief.
Consider the bottom of the frame, which will be fixed to the floor.
Use a lap joint to help hold the uprights, which will need to have a good fixing to the wall.
The top plate can be similarly lap jointed to the uprights, and needn't at this time be fixed to the ceiling - but the timber sections you need to use should be strong enough to self support, say 70 x 30 or whatever your timber supplier stocks.
The structure would become stronger as the work progresses, especially when uprights are added to allow the doors to close onto - on either side of the book case.
Your big issue is to ensure that everything is perfectly square, vertical and equally spaced from the back wall - you'll need a 'marra' to give you a hand, ideally!
John :)
 
Hi John,

Thanks for the tips! Really helpful!

Firstly, can I ask what a marra is?! That one's a bit lost on me, I'm assuming you mean a buddy?

I certainly will stay clear of the ceiling, but when you say not "at this time" do you mean I'd need to fix to it after the subframe is set?

As I have said I am good at angles and things like that, I also have a pal who has a good stock of high quality tools that I can borrow, such as a circular chop saw, nail gun, screw gun, things like that. I think that always makes things a little more neat and tidy than struggling with a hand saw and manual tools.

Thank you once again for the suggestions,

Sophie
 
A marra, oh southern one, is indeed a buddy or helper :p
Regarding fixing to the ceiling, the framework will actually be strong enough on its own (hopefully) and will be tight up to, but not bulging the ceiling. Any gaps can be filled later or even covered up by a thin timber strip called a lath. If your luck is really in, you may be able to fix a screw or two through the ceiling into a joist, but locating one, unless you can see from the floor above this room, is guesswork.
Regarding the tooling, a chop saw is great for cutting things to length, but a sliding mitre saw will allow you to cut out indentations in the timber for joints.....remember though, that todays wood adhesives are very strong and some even fill gaps.
I wouldn't have too much emphasis on a nail gun - great though they are, I don't think they have much use here....screws can be undone, after all!
As your project progresses, you'll find that your walls and floor won't be absolutely square or perpendicular. Avoid the temptation to make your work out of square - it'll bite back later!
Do have a bash with manual tools - but make sure they are sharp! A good crosscut hand saw will certainly be helpful, and chisels like a razor are great. Drill a pilot hole before adding screws - it minimises splitting and gives greater accuracy.
When you buy the timber, sight along its length and you'll see if its warped (or like a dogs hind leg, as we say in the frozen North). If it is, put it to one side and choose another length.
Enjoy your project! You'll learn lots, and thats what its all about.
John :)
 
I forgot to mention - you'll need a decent spirit level (1m Stabila one, maybe) a try square and a decent quality folding metre rule..... :p
John :)
 

DIYnot Local

Staff member

If you need to find a tradesperson to get your job done, please try our local search below, or if you are doing it yourself you can find suppliers local to you.

Select the supplier or trade you require, enter your location to begin your search.


Are you a trade or supplier? You can create your listing free at DIYnot Local

 
Sponsored Links
Back
Top