Existing chamber is designed clearly to accept an inlet at that point, however it's not something I'd have imagined to work for foul drainage, for the simple reason it could allow solid matter to build up. It would partly depend on the velocity of the incoming flow, I've seen the bigger 450mm chambers where a stack is connected quite close to the chamber, and the resulting mess where the solids have hit the bend at the bottom of the stack and get flung into the chamber, and indeed have even known these setups to have to be replaced with a traditional brick chamber in order to alter the arrangement and prevent the issue, such were the number of issues they were having! (This was a Public Building though, so the WC(s) was (were) probably in much greater use and there's less control over whats put down them!)
If you're happy to risk it, then cut a hole to suit in the side of the current chamber, bring your new pipe in, and for belt and braces, I'd put a bend on the end to direct the flow towards the outlet, which should prevent too much 'spatter' on the opposite side. I'd probably be tempted to try this for a while and see how it fares. If you find you are having issues, then maybe time to look at altering the chamber setup.
You should be ok without venting, its perfectly acceptable to connect a WC directly to the drain provided the depth from the Crown of the WC trap to the invert (bottom edge) of the drain doesn't exceed 1.3m. I would be slightly more concerned if you connected to the stack in your situation as you're below the accepted connection point, which is 450mm above the invert of the drain at the bend at the foot of the stack.
To remove the chamber would mean digging around it, cutting through either the inlet or outlet to free one side off, and then pulling the chamber off the other end. To graft new chamber in, fit a stub of 110mm pipe to the required end, push it back onto the original stub you've pulled the current chamber off, then use a slip coupling to make the connection with the cut end of the other pipe. Connect in existing and new laterals as required.
")
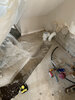
") . Withe the help of a plumber friend and two trusty philmac couplers the mains feed has been restored and hours leak free so far. Not in a hurry to concrete this over until satisfied that those joints are sweet. the secondary issue with the mains feed discovery was that it was right in the way of where the soil pipe is meant to go so i dug an extra bit down and to the side to remove material beneath the pipe to allow it to flex very gently over a wide radius to naturally now go below the soil pipe-to-be. So as far as im concerned that setback has now been resolved.
. Withe the help of a plumber friend and two trusty philmac couplers the mains feed has been restored and hours leak free so far. Not in a hurry to concrete this over until satisfied that those joints are sweet. the secondary issue with the mains feed discovery was that it was right in the way of where the soil pipe is meant to go so i dug an extra bit down and to the side to remove material beneath the pipe to allow it to flex very gently over a wide radius to naturally now go below the soil pipe-to-be. So as far as im concerned that setback has now been resolved.