
Top job Howie!

You are using an out of date browser. It may not display this or other websites correctly.
You should upgrade or use an alternative browser.
You should upgrade or use an alternative browser.
Constructing a vehicle Inspection Pit
- Thread starter redpis
- Start date
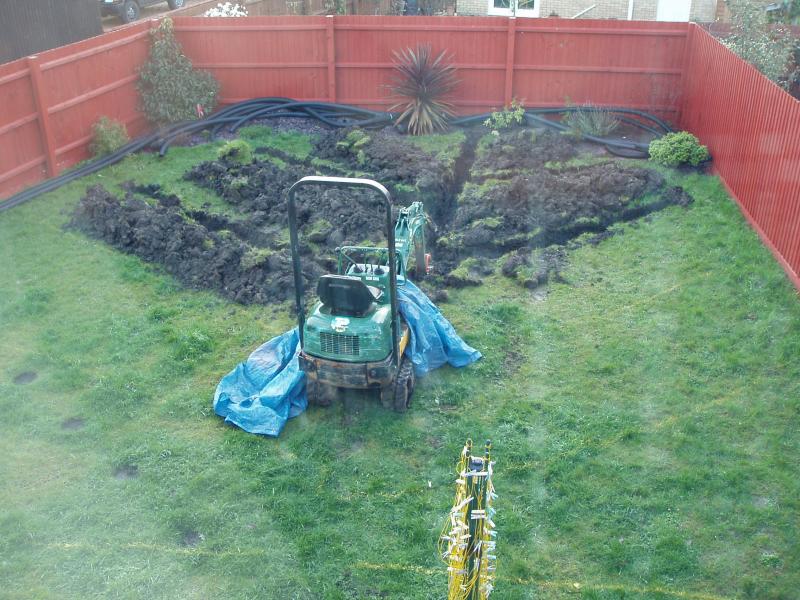
Thats looks a superb job, and you have given me some great info in the pics.
Put mine on hold through winter, looking at starting in the next few months when the water table is lower.
Costing out the option of using shuttering block or just shutter and pour, spent £200 on timber to cover the pit to stop be backing out of doing the job lol
Put mine on hold through winter, looking at starting in the next few months when the water table is lower.
Costing out the option of using shuttering block or just shutter and pour, spent £200 on timber to cover the pit to stop be backing out of doing the job lol
I read through this thread yesterday and from memory noted that some people who had made a pit had used mutiple layers of DPM. I am planning to waterproof a structure that will be exposed to a modest 300mm hydrostatic pressure. DPM are not designed to cope with any hydrostatic pressure since in practice they are likely to have small holes once in position.
I was planning to use internal tanking of my own design - using felt adhesive as a source of bitumen (not the Wickes stuff as it takes ages to set - read the reviews on the Wickes site) and one or two layers of high grade underfelt. You need to place over the tanking material a weight to provide pressure not less than imposed by the water head. So for 2m deep pit when the ground is saturated pressure from ground water at base = 2000kg/m2. If the density of concrete is taken as 2500kg/m3 then you would need 0.8m concrete slab!
In my case of 300mm water head this requires only a 120mm thick concrete slab.
your deep slab would be required if the floor slab was free to move up and down. But remember it will usually have the walls of the pit, and some of the garage floor, standing on it, in a rigid monolithic RC structure. The walls of the pit will put considerable extra weight on the floor slab.
Indeed, basement tanking concrete would also be reinforced concrete to resist the bending moment imposed on the floor and walls.
But in the OP's case he is building it outside. I wonder how many people have gone to the trouble and expense to build an outside pit just to paint the bottom of their camper home once a year? I work on my car but use ramps and axial stands when required.
But in the OP's case he is building it outside. I wonder how many people have gone to the trouble and expense to build an outside pit just to paint the bottom of their camper home once a year? I work on my car but use ramps and axial stands when required.
Wavetrain,
The pit project will be a welcome distraction from work, I enjoy reseaching and planning it out (apart from paying for it of course!!).
When it gets used it will be worth every penny, when not, it will be a waste of money")
Regarding the hydrostatic pressure, I plan to have a sump below the level of the pit on the outside of pit wall with perforated pipe from around the outer wall draining into the sump, a submersible pump will empy the sump when required, hopefully, the sump and inspection hatch will act as a relief channel for the water pressure, rather than heave to pit.
Within the pit will be a sunken gully with iso valve draining into the sump.
Funnily enough, I do have a set of ramps, but because of the gravel drive I keep chasing them in the vain hope of getting up them lol
Keep the tips and critisms coming though, it does help.
The pit project will be a welcome distraction from work, I enjoy reseaching and planning it out (apart from paying for it of course!!).
When it gets used it will be worth every penny, when not, it will be a waste of money
Regarding the hydrostatic pressure, I plan to have a sump below the level of the pit on the outside of pit wall with perforated pipe from around the outer wall draining into the sump, a submersible pump will empy the sump when required, hopefully, the sump and inspection hatch will act as a relief channel for the water pressure, rather than heave to pit.
Within the pit will be a sunken gully with iso valve draining into the sump.
Funnily enough, I do have a set of ramps, but because of the gravel drive I keep chasing them in the vain hope of getting up them lol
Keep the tips and critisms coming though, it does help.
I just came on this thread researching pit construction because we have a motorhome amongst other vehicles (small tractors,jcb, landrovers etc). And a 10m long garage that currently has a dirt floor but will be getting a concrete base when I get around to it. Ive worked in commercial hgv garages with full length pits and sliding pedestrian plates, and Ive used 4post ramps, and Id rather have the pit myself personally. Lord knows how much rebar its going to need to support 8 ton of jcb over it though but thats another thread.
But, why Im posting now is I have our mh up on ramps at the moment to replace the diff bearings, and its a pain to get the mh up onto them because the front spoiler the manufacturer fits hits the ramp before the wheel starts to lift it free. However, I found there was room behind the wheel under the cab area for the ramp, and I was able to kick the ramp edge under the wheel then reverse it onto the ramp like this, reverse being lower ratio also. Once it was up on the front ramps its easy to jack the back axle up and use your leveling chocks (we have those chunky fiamma ones) facing the opposite way to the ramps at the rear to get a bit more height there too and to come off the ramps one end or the other has to want to go uphill by itself, so adds a little more peace of mind for me...
Gravel is a nightmare to work on though, I feel your pain. I shovel and brush it all away and work on dirt in preference when we have to do something in the yard...
Job finally finished, some pics posted in the 'Your Projects' section to close this thread.
Thanks everybody for your comments and advice.
Thanks everybody for your comments and advice.
Photoshopped BadlyIf you cost this up, would it not be less hassle to go to a mechanic or upgrade the motorhome than ripping up that nice drive?
All sorts of services could be down there. (electrical, sewers, drainage etc)
Put some pics of last project:
[]

DIYnot Local
Staff member
If you need to find a tradesperson to get your job done, please try our local search below, or if you are doing it yourself you can find suppliers local to you.
Select the supplier or trade you require, enter your location to begin your search.
Please select a service and enter a location to continue...
Are you a trade or supplier? You can create your listing free at DIYnot Local
Similar threads
- Replies
- 5
- Views
- 1K