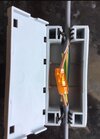
Were it me, dealing with this, I would solve it with a soldered repair.
Carefully split the outer grey, add a double length of adhesive type heat sleaving, to one end of the broken conductor. Strip both ends, then find an extra piece of the same sized conductor, long enough to overlap both of them. Bind the new bit of copper in place, along side both ends, along the entire length of bare copper, with 5amp fuse wire. Apply soldering iron and solder, then finally - heat shrink first length over the top, then a second long piece over the top of that.
Tuck other two cores, plus repaired core, back in place in the outer grey, then add a good wrap of PVC tape, overall.