
- Joined
- 23 Aug 2018
- Messages
- 40
- Reaction score
- 0
- Country

So I’ve posted on here before, I’m not a hobby diy person I’m a keep the mrs happy diy’er. With that in mind please forgive my idiotic mistakes which I can now understand but didn’t at the time..
So we bought a three mirrored wardrobe, did ring round a few flat pack experts and they all wanted £200 for the job of putting it up, two of them saying they charge a lot because they take the full day as they’re a ball ache..
Bought the wardrobe when I was awaiting spinal surgery in March. The first comedy element was me being cocky and telling the delivery guys to leave it in the hallway thinking me and the mrs could get it upstairs.. wow that was hard work with a wife who isn’t the strongest or most logical and me with a messed up disc herniation.. eventually managed it.
Then we unpacked it and I wanted to do the usual flat pack thing of get everything organised, I’m a stickler for the instructions and being prepped.. that’s where we find all the fixings and hardware dumped in a bag… no instructions.. qr code on the side of the box had turned up damaged so couldn’t get them. Got in touch with the company and a few days letter got the instructions.. printed those instructions when I would have probably been better using my phone as you can zoom in as the printout was really difficult to make out what is what..
So off we pop to try and get it going, not sure whether the sheer pain or whether the annoyance of flat pack was preventing me doing it but we didn’t get very far at all, none of the screws lined up for the metal bars that would house the doors and two screws broke off in the wood.. it was at this point that I realised I wasn’t in a good place to do it.
Had my surgery in June. The wardrobe sat there in the bedroom till last week..
Cue to the next embarrassment… I wasn’t aware how to put these wardrobes together and didn’t know that it needed doing on the floor. These are the instructions (https://mnfurnitures.co.uk/wp-content/uploads/2022/10/CHICAGO_MIAMI_VIKA_MANHATTAN-250.pdf) and for a complete novice I’m sure you’ll agree that it’s not clear.. we ended up doing half of it on the floor and then lifting it and doing the rest… I also didn’t know about making sure it’s square so that was a new one for me.
We had a problem moving it along the carpet and it felt like the front and back pieces of wood would snap so we ended up buying sliders for the corners… still wouldn’t shift.. we ended up putting smooth underlay we had left over under the wardrobe and finally we could move it!
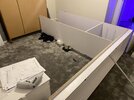
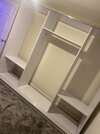
Now…. Not knowing about squaring it meant the the thin boards at the back were square and not perfect, few pins missed the wood and came through the wardrobe ffs. The connectors for the two middle boards weren’t all there so that was an issue so we divvied them up best we can..
Got the wardrobe back, put the doors on and felt accomplished….
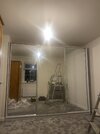
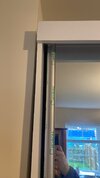
The doors had a gap in the upper left, after seeking advice I tried some make shift wood down one side.. hoorah the door was a nice snug fit.. oh maybe not, the other side now had the gap and was too far away from the wall to try the same…
Bit more faffing this evening and thought we’d nailed it but suddenly the doors are catching on the front bar tearing them up at the bottom, can’t understand why other than something I’ve done has changed the balance of the whole thing.
So now I haven’t got a clue what to do. We have sliders in each corner and the back still has some underlay under it which I’m guessing is contributing to the problem but without it under we weren’t able to move it.
Right now I’m feeling like throwing the 600 quid down the toilet and buying another and using my mistakes to get it right but that’s one hell of an expensive mistake. So any ideas between the ridicule would be massively welcomed.
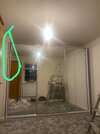
Oh and I measured it…
Top left to bottom right (this was with wood in place) 3.28m. Top right to bottom left 3.32m.
I’ve attached some pictures for amusement and hopefully help.
So we bought a three mirrored wardrobe, did ring round a few flat pack experts and they all wanted £200 for the job of putting it up, two of them saying they charge a lot because they take the full day as they’re a ball ache..
Bought the wardrobe when I was awaiting spinal surgery in March. The first comedy element was me being cocky and telling the delivery guys to leave it in the hallway thinking me and the mrs could get it upstairs.. wow that was hard work with a wife who isn’t the strongest or most logical and me with a messed up disc herniation.. eventually managed it.
Then we unpacked it and I wanted to do the usual flat pack thing of get everything organised, I’m a stickler for the instructions and being prepped.. that’s where we find all the fixings and hardware dumped in a bag… no instructions.. qr code on the side of the box had turned up damaged so couldn’t get them. Got in touch with the company and a few days letter got the instructions.. printed those instructions when I would have probably been better using my phone as you can zoom in as the printout was really difficult to make out what is what..
So off we pop to try and get it going, not sure whether the sheer pain or whether the annoyance of flat pack was preventing me doing it but we didn’t get very far at all, none of the screws lined up for the metal bars that would house the doors and two screws broke off in the wood.. it was at this point that I realised I wasn’t in a good place to do it.
Had my surgery in June. The wardrobe sat there in the bedroom till last week..
Cue to the next embarrassment… I wasn’t aware how to put these wardrobes together and didn’t know that it needed doing on the floor. These are the instructions (https://mnfurnitures.co.uk/wp-content/uploads/2022/10/CHICAGO_MIAMI_VIKA_MANHATTAN-250.pdf) and for a complete novice I’m sure you’ll agree that it’s not clear.. we ended up doing half of it on the floor and then lifting it and doing the rest… I also didn’t know about making sure it’s square so that was a new one for me.
We had a problem moving it along the carpet and it felt like the front and back pieces of wood would snap so we ended up buying sliders for the corners… still wouldn’t shift.. we ended up putting smooth underlay we had left over under the wardrobe and finally we could move it!
Now…. Not knowing about squaring it meant the the thin boards at the back were square and not perfect, few pins missed the wood and came through the wardrobe ffs. The connectors for the two middle boards weren’t all there so that was an issue so we divvied them up best we can..
Got the wardrobe back, put the doors on and felt accomplished….
The doors had a gap in the upper left, after seeking advice I tried some make shift wood down one side.. hoorah the door was a nice snug fit.. oh maybe not, the other side now had the gap and was too far away from the wall to try the same…
Bit more faffing this evening and thought we’d nailed it but suddenly the doors are catching on the front bar tearing them up at the bottom, can’t understand why other than something I’ve done has changed the balance of the whole thing.
So now I haven’t got a clue what to do. We have sliders in each corner and the back still has some underlay under it which I’m guessing is contributing to the problem but without it under we weren’t able to move it.
Right now I’m feeling like throwing the 600 quid down the toilet and buying another and using my mistakes to get it right but that’s one hell of an expensive mistake. So any ideas between the ridicule would be massively welcomed.
Oh and I measured it…
Top left to bottom right (this was with wood in place) 3.28m. Top right to bottom left 3.32m.
I’ve attached some pictures for amusement and hopefully help.
Attachments
-
 IMG_3200.jpeg158.2 KB · Views: 306
 -
 IMG_3207.jpeg312.4 KB · Views: 288
 -
 IMG_3216.jpeg246.1 KB · Views: 324
 -
 IMG_3231.jpeg215.4 KB · Views: 267
 -
 IMG_3252.jpeg167.6 KB · Views: 303
 -
 746cc097-98da-4b4f-8277-f51c670a47b1.jpeg182.8 KB · Views: 297
 -
 3F6323A0-B3D3-42A5-893D-ED67DA424B69.jpeg132 KB · Views: 297
 -
 AA84569B-9A46-4EC5-8217-4B95038B0688.jpeg157.7 KB · Views: 329
