Floorboard transition between rooms

Joined
16 Dec 2022
Messages
33
Reaction score
1
Country
United Kingdom
Hello everyone. Happy friday.

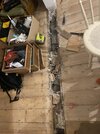
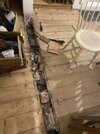
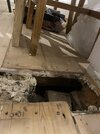
I am looking for advice on how to finish this strip between two exposed floorboard rooms…

There used to be a raised tradition strip that was a trip hazard. I would ideally like to keep the new transition level with the floor.

I was thinking to trim the edges of the board straight. Then removing a a brick every 40cm or so and fixing some timber between the joists, on top of the brick, giving me a level. Then get my floorboard cut and in…..

This is a best guess and possibly wrong so really eager to hear how it should be done correctly.

Having a raised transition isn’t an option! Also not keen on trimming the boards back enough to rest the new piece on the existing joist- a thought that crossed my mind but think it’s asking for trouble.
What do you all think?
 

Attachments

  • A1714123-43EF-4154-B2B7-53157C26FE70.jpeg
    A1714123-43EF-4154-B2B7-53157C26FE70.jpeg
    375.5 KB · Views: 78
  • 711F79B6-6C0F-4928-A48C-86F6A615C8F6.jpeg
    711F79B6-6C0F-4928-A48C-86F6A615C8F6.jpeg
    378.9 KB · Views: 77
  • 83C63F23-0D0C-4974-A763-3E434DAE35B1.jpeg
    83C63F23-0D0C-4974-A763-3E434DAE35B1.jpeg
    287.6 KB · Views: 73
Sponsored Links
Long as you can live with the 'bridging' board running at 90° to the rest of the floor it'll be fine.
You can get rid of all that top course of bricks (they're not doing anything now). Yes bridge the gap with treated 2x 2 or 3 x 2 at intervals fixed underneath existing boards, drop new board in, shim (or sand) to height, done.
WTF is a tradition step anyway?
 
Thanks for the reply.
Yep I can live with it.

Not sure if I have called it the right thing but it was basically a bit of timber that didn’t sit flush and stuck up about an inch either side . And rested on the floorboards rather than inbetween them
 
Thanks for the reply.
Yep I can live with it.

Not sure if I have called it the right thing but it was basically a bit of timber that didn’t sit flush and stuck up about an inch either side . And rested on the floorboards rather than inbetween them

was that originally a wall there?
 
Sponsored Links
Yes. Think was knocked though at some point in the 80s. Why’d you ask? Cheers
 
Thanks for the reply.
Yep I can live with it.

Not sure if I have called it the right thing but it was basically a bit of timber that didn’t sit flush and stuck up about an inch either side . And rested on the floorboards rather than inbetween them
Ah, a bodge then :)
 
Stuck down with expanding foam and newspaper in 1986 on closer inspection. The finest of bodges- like the rest of the house
 
WTF is a tradition step anyway?
Transition strip (aka threshold strip) is my guess... aural sound of the word is quite similar.

Whole floor needs ripping up and relaying ;) <joking> That all depends on the final floor finish(es) planned.
 
Just leaving exposed boards as final finish will sand and oil. Might be a little tricky to get the strip to fit nicely in the middle mind. See how my cutting goes.
 
Not sure if I have called it the right thing but it was basically a bit of timber that didn’t sit flush and stuck up about an inch either side . And rested on the floorboards rather than inbetween them
Raised threshold?
 
That sounds about right mate, yes either way it was a mess
 
I've made a few bespoke ones up in the past - basically a big lump of hardwood with rebates on the underside down both edges and tapered on-off top surfaces. Sometimes they had to accommodate a change in floor level as well
 
OP,
1. Are the floors level with each other? If they are then:
2. As above, drop the remains of the brick coursing down about three or four courses.
3. On either side of the "strip" you have joists running parallel with the strip - check the nail patterns.
4. You can screw fix 2 x 4's (or 2 x 6's) to each joist, or use noggins across the strip, to support a length of polished wood as a transition piece.
5. Cut back any split floor boards, & search the property for other boards that could be sourced from under the stairs or in a back bedroom etc.
6. The polished wood is your template for making cut lines on either side of the strip.
7. Cut with a circular saw after forensic removing of all nails & screws.

FWIW: whats happening top right in the pics - a hearth?
 

DIYnot Local

Staff member

If you need to find a tradesperson to get your job done, please try our local search below, or if you are doing it yourself you can find suppliers local to you.

Select the supplier or trade you require, enter your location to begin your search.


Are you a trade or supplier? You can create your listing free at DIYnot Local

 
Sponsored Links
Back
Top