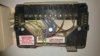
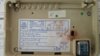
The EP is a bit unusual because it is a Programmer and Wiring Centre combined. The terminals marked A B C & D are just provided for convenient use by the installer. They are not connected to the programmer functions in anyway. Your biggest problem is that the Heatlink does not have this 'junction box' facility to accommodate them. So, to get around this, I would normally sink a single gang flush mounting socket box in the wall behind the Heatlink to house some additional new terminals to replace them.
This extra wiring whilst not "rocket science" does mean that you need to be competent with electrical installation procedures to do this safely. If you feel unsure, please get someone professional to do it for you.
If you are competent to proceed, you will need 2 new extra terminals to replace EP terminals C & D. The unused green / yellow wire presently contained in 'C' put into one of the new terminals and the two blue wires from 'D' go into the second new terminal.
Then there's a sight problem with your installation, because there are two green / yellow wires, which normally indicate earth wires, contained in the EP terminal on the left marked 'N'. Probably the wrong terminal has been used by the original installer. [They should have been put in the one on the right marked with an earth symbol] So, please check that they are actually used as earths first. Once you have confirmed this, connect them to the Heatlink earth terminal, and add a new an additional earth wire to connect to the aforesaid new single gang socket box if it's metal. You may have to put them into a separate new terminal first with a new single wire going the Heatlink as you won't easily get them all into the Heatlink earth terminal.
Neutrals from the EP 'N' terminal (the one to the right of terminal D) go to the Heatlink N, and the Live from the EP 'L' terminal goes to the Heatlink L.
Then it is a matter of moving the remaining wires from the main switching terminals as defined on the back of your EP. Terminal 3 is 'hot water call for heat' and goes to Heatlink terminal 6. EP terminal 4 is 'Heating call for heat' and goes to Heatlink terminal 3.
The Heatlink 'Live' terminal will also need linking to the two Heatlink 'Common' terminals 2 and 5, you can use the brown wire link removed from EP terminals L and 5 for this.
Finally if you have an existing wired room thermostat, that should either be left in place and set to its maximum setting to prevent it overriding the Nest, or decommissioned properly by removing it and inserting a link between the two switching wires. You cannot simply remove it, as the heating wiring would be let open circuit and will not operate. If you do have an existing room thermostat and need help removing it, post back the details.