Here we go again.... Ikea PS 2014

Joe,
Seeing your photo and as your not happy to cut wire to length and put into existing ceiling rose, I would do what you first suggested.

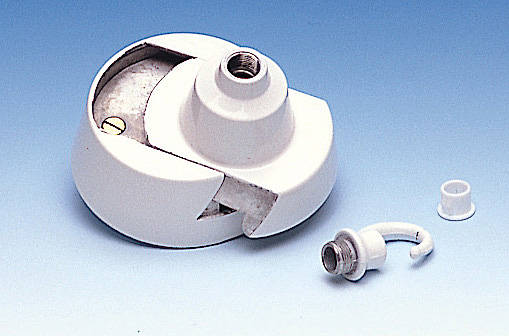
1) Buy some 6A Terminal Blocks and Buy the hook plate.
https://www.screwfix.com/p/6a-terminal-strips-pack-of-10/60804
2) Mark the cables so you know which is Switched Live (Right Black) and Neutral (Left Black) and Live Loop (Middle Reds)
3) Remove your ceiling rose.
4) Screw Hook plate to Ceiling (or use your hook if you feel it is string enough, but I would think it will not screw into ceiling securely enough to take the weight).
5) Join the Two live red wires (loop) together using 1 Terminal Block.
6) Join the Two Ground wires together using 1 Terminal Block.
7) Push Switched Live (Right Black) into the Lamp "L" terminal
8) Push Neutral (Left Black) into the Lamp "N" terminal
9) Put Lamp on hook
10) Slide White cup up to hide it all.

Looking at your photo, is your Ceiling rose actually/currently screwed into your ceiling. I cannot see any screws in the Screw holes??
SFK
 
Last edited:
Sponsored Links
Joe,
Seeing your photo and as your not happy to cut wire to length and put into existing ceiling rose, I would do what you first suggested.


5) Join the Two live red wires (loop) together using 1 Terminal Block.
6) Join the Two Ground wires together using 1 Terminal Block.


Looking at your photo, is your Ceiling rose actually/currently screwed into your ceiling. I cannot see any screws in the Screw holes??
SFK

Do you mean put each red wire into opposing holes so they are facing each other or both wires into the same hole? Forgive my ignorance.

The ceiling rose is screwed into my ceiling, I'd removed the screws to take a look at the fitting.
 
Joe,
For joining cables using terminal strips, it does not matter if put in opposing holes or same hole - it is a single lump of brass with two screws in.
But preference is to put one red wire in one side and screw down and put other red wire in otherside and screw down.
For your earth wires are already twisted together, put into one side and screw down.
Important rule to stop any bare wires causing issues is to push all the bare copper in to terminal strip up to the red insulation so none or little bare wire showing outside brass.
SFK
 
Sponsored Links
OOI, does anybody else here have the preference of stripping the conductors enough so that they go all the way through the terminal and each one is held by both screws?
 
Ban,
I confess that on occasion I do have a preference for that when I want double security.
But then I kick myself when I what to remove one side and I have to remove both screws :>
SFK
 
Joe,
For joining cables using terminal strips, it does not matter if put in opposing holes or same hole - it is a single lump of brass with two screws in.
SFK

Doh! Obviously. Anyway, all up and running following your instructions above. Thanks for taking the time to assist, it really is very much appreciated.
 
just come across this thread and have been racking my brains as I know there is a ceiling rose with a cord grip that would have been ideal for this task.

and after a bit of searching(might help some one in the future) the crabtree 5850 is what you need
 
ASPCR2000.JPG
ASMB2.JPG
The klick is cheaper, around £6 against £19.50 but the whole unit is a big lump on the ceiling, nearly every ceiling rose is rated 5 kg, to be frank I would not be happy with 5 kg hanging on flex, in fact although ceiling rose may take weight, think there would be a problem if hung off plaster board, not sure screws would hold.

The ceiling rose is the only thing in the house where you can access live terminals without use of a tool, you can simply unscrew the lid, however having a shroud which is simply a friction fit over the electrical connections to my mind is going a step too far.

I fitted one of these
LDMC11E.JPG
as it looked better, in my case there is some decorative chain and wanted the hook to look right, it is a solid unit and so much easier fitting the ceiling rose with no weight to hold, only slide in place after all wired.
 
Eric,
Fully agree with you, I love using the Klik and the Maestro whenever I can. Although the price always makes me wince as I leave the shop, I am more than happy when I am wring a heavy Lamp at ground level and then simply slotting it in place when finished, rather than holding a heavy lamp above my head in one hand whilst trying to get cables in place with the other.

However, I do also find that normal ceiling roses can take a lot of weight (or rather are used to hang very heavy lamps even if they should not be), and I find that the failure point i snot the ceiling rose but is the screws into the ceiling holding the ceiling rose up. Hence when putting up ceilings I now try and remember to put a lump of wood to be later screwed into between the joists where the lamp is going to be. I also try and do this on walls where I expect toilet paper holders will be.
SFK
 
You wouldn't need to do the latter with proper walls.

And isn't the traditional way to fix ceiling roses to screw into a joist, with the rose positioned so that the cable entry hole is right by the edge of it?
 
Ban,
You are 100% correct on both points.
Unfortunately in my DIY experience proper walls are never in the right place (or when they are they in right place they are not 'proper' enough) to take any load, and previous installers have not put ceiling roses in the correct place and there is not enough cable slack to get them to right place.
:>
SFK
 
Hi, my top plastic thing doesn’t have a hole hence looks difference to the picture in this thread. I am struggling to fix this to ceiling as it’s top white box keeps falling and not fix to the ceiling. Appreciate if someone could help. Thank you.
 
This thread is over a year old, you should start your own thread for new question. In the UK we use the ceiling rose as a junction box, rest of Europe tend to use the switch as a junction box, and it seems Ikea is designed for Europe not UK, so often we need to adapt Ikea stuff to work in UK.

However I am sure if like the original poster you put up pictures some one will help.
 

DIYnot Local

Staff member

If you need to find a tradesperson to get your job done, please try our local search below, or if you are doing it yourself you can find suppliers local to you.

Select the supplier or trade you require, enter your location to begin your search.


Are you a trade or supplier? You can create your listing free at DIYnot Local

 
Sponsored Links
Back
Top