Hive Dual reciever & combi boiler

Joined
9 Jan 2019
Messages
4
Reaction score
0
Country
United Kingdom
i have Valiant Ecotech pro 24 ( 2011 ) model boiler and Hive dual receiver i wired up however heating wont switch off i assume its because of wiring and its not controlling boiler.
my old relay box to wireless thermostat was wired up like picture attached.

the Hive Reciever is wired up with Live / Neutral / Earth and common in 1 and Switch live in 3.

any ideas on why the boiler will now no longer switch off via hive unless i switch boiler off manually myself.

Thanks
 

Attachments

  • IMG_7071.JPG
    IMG_7071.JPG
    162.1 KB · Views: 2,235
Sponsored Links
Well i spoke to friend who works for british gas and suggested wiring up the way i did as i was given the hive hub so didnt get the choice in single reciever , however it wont switch boiler off
 
You would have wired it correctly if you had a single channel Hive:
1 = Common
3 = Heating on

But as say that you have a dual channel Hive you have actually made the connections to
1 = Hot water off
3 = Hot water on

hive.jpg


The single channel version of the Hive is for combi boilers and provides control of the heating only.

The dual channel version of the Hive is for heating systems with control of the heating and separate stored hot water.
 
Sponsored Links
yes i am aware that its not single reciever however i know its also possible to use dual reciever i just need to understand where common and switch live need to go as its been done incorrectly ‍♂️
 
The correct solution would be to exchange the dual channel for a single channel and leave the wiring as you have installed it. However, if you really must, you can use the Dual channel for just heating, but it's unprofessional and you will have hot water control that won't do anything. However, you ask.....

i just need to understand where common and switch live need to go as its been done incorrectly

I refer you to the above drawing of the dual channel receiver, where you will see that unlike the single channel, there isn't a "common". With the dual version, that connection is permanently made inside the Hive so to advise you further, I would need to know which of the wires in your photo below is the permanent live and which is the switched live to the boiler. If you don't know, they can be tested with a multimeter.

wires.JPG


With your existing thermostat and the single channel Hive (both of which do have a common connection), it doesn't matter which which way around the wires go. As the dual channel Hive has the common connection made internally, it does matter where they go.
 
yes i am aware that its not single reciever however i know its also possible to use dual reciever i

You cannot use a dual channel receiver in place of a single channel receiver if the boiler uses ELV ( 24 volt ) switching. If you do then 230 volts will be put on the 24 volt control input of the PCB and that will damage the PCB

0x56.jpg
 
The OP has already wired a 'dual channel' up as a 'single channel' and the boiler is working. [by working, I mean that it is coming on, albeit permanently] If it had been 24v he would have blown it up :eek:. He's fortunate!

However, when he checks it with a multimeter as I suggested, that will confirm.
 
Hmm good point. The ecoTEC Pro can be wired to have 24v or 230V control and the use of separate wires without the link as was done on his original thermostat could be used with either so is inconclusive.

The few occasions where I have seen boilers with 24v wired to 230V didn't work at all afterwards and the PCB had been damaged. I don't remember any of them being a Vaillant though...

Lets see what he says about the wires that were in A & B when he comes back.

Good diagram BTW, explains it far better than words.
 
The boiler is ok it can be switched on/off via the button on boiler and seems the hive is having no control over boiler, However i spoke with friend and he's going to drop single channel receiver over so i can use the original way i started :) thanks for the diagrams and help :)
 
Ok, so there has been some very usefull information on this page which has led me to investigate how to get a dual channel hive working as a single channel system.

As mentioned previously, the reason why it's not a straightforward swap of wires is that a single channel receiver works as a switch between two contacts,
But the dual channel receiver works as a 240v supply from the contacts, not as a switch.

However, thankfully HIVE like to save money and the internals are almost exactly the same for both !
Just that there is two wires connected either in single mode or dual mode.
And best of all it seems only 1 single wire needs to be moved.

** DO NOT ATTEMPT THE FOLLOWING.
THIS WILL VOID ANY WARRANTY, AND IS MESSING WITH VOLTAGES.
IT IS STRONGLY RECOMMENDED THAT YOU PURCHASE THE CORRECT RECEIVER TO USE **

that said, im just going to document what i did.

Basically youre looking to do the following...
ZomboDroid 23102022093849.jpg


And all it takes is moving 1 single wire which is currently connected to live, over to PIN 1...

20221023_094248.jpg
this is the common of both relays currently connected to L

20221023_094345.jpg

This is where it needs to be disconnected from L and reconnected to 1

20221023_094421.jpg

This is the finished change.

Notice i have simply connected it to the existing wire going to pin 1.

Two reasons- keeps job simple, no need to disconnect the wire already at PIN 1, since in normal state its NC and so basically looping on its self.
And so that i could easily unsolder it and move it back to L if in the unlikely even i want to chnage it back.

So i wasn't too worried about the connection since its only going to be switching a low level 24v signal, rather than a 240 feed.


Once this is complete, you can wire the backplate to pins 1 and 3 just like on a single channel receiver. However pin 3 on dual channel is actually controlled as HOT WATER. So app, thermostate and button at front would all be wrong.
So its better to.connect backplate wiring to PIN 4, which is controlled as CH.

Just be sure you leave yourself a little message tucked behind the hive receiver explaining what you have done, and why pin 4 not pin 3!!

Good thing with this is that should receiver be reconnected to a old style central heating system without changing it back, electrically its "safe" and will simply not work. No risk of damaging anything.


Again, this is not recommended to try, even though it works. And cannot be liable for any damage or injury caused.
 
Super helpful post - thank you! Like the OP, I was curious to know whether I could use a dual channel receiver and use it for heating only (whilst having the option to wire in the hot water at a later date). Having looked at the wiring layouts, I wasn't sure I could use the same pins in the dual channel receiver as in the single channel because the dual channel receiver lacks a Common terminal.

@abua - your workaround is ingenious but a bit too advanced for me, so I have gone for a single channel receiver which has the same terminal layouts as the Drayton Digistat SCR receiver it replaces, so I'm confident it will work. Okay - the single channel won't let me remotely control my hot water, but remote heating control is my main goal, and besides, re-wiring for the hot water in my configuration would involve a lot more time and effort.

Again - many thanks to all contributors on this post.
 
Ok, so there has been some very usefull information on this page which has led me to investigate how to get a dual channel hive working as a single channel system.

As mentioned previously, the reason why it's not a straightforward swap of wires is that a single channel receiver works as a switch between two contacts,
But the dual channel receiver works as a 240v supply from the contacts, not as a switch.

However, thankfully HIVE like to save money and the internals are almost exactly the same for both !
Just that there is two wires connected either in single mode or dual mode.
And best of all it seems only 1 single wire needs to be moved.

** DO NOT ATTEMPT THE FOLLOWING.
THIS WILL VOID ANY WARRANTY, AND IS MESSING WITH VOLTAGES.
IT IS STRONGLY RECOMMENDED THAT YOU PURCHASE THE CORRECT RECEIVER TO USE **

that said, im just going to document what i did.

Basically youre looking to do the following... View attachment 283447


And all it takes is moving 1 single wire which is currently connected to live, over to PIN 1...

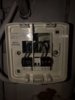
View attachment 283448this is the common of both relays currently connected to L

View attachment 283449
This is where it needs to be disconnected from L and reconnected to 1

View attachment 283450
This is the finished change.

Notice i have simply connected it to the existing wire going to pin 1.

Two reasons- keeps job simple, no need to disconnect the wire already at PIN 1, since in normal state its NC and so basically looping on its self.
And so that i could easily unsolder it and move it back to L if in the unlikely even i want to chnage it back.

So i wasn't too worried about the connection since its only going to be switching a low level 24v signal, rather than a 240 feed.


Once this is complete, you can wire the backplate to pins 1 and 3 just like on a single channel receiver. However pin 3 on dual channel is actually controlled as HOT WATER. So app, thermostate and button at front would all be wrong.
So its better to.connect backplate wiring to PIN 4, which is controlled as CH.

Just be sure you leave yourself a little message tucked behind the hive receiver explaining what you have done, and why pin 4 not pin 3!!

Good thing with this is that should receiver be reconnected to a old style central heating system without changing it back, electrically its "safe" and will simply not work. No risk of damaging anything.


Again, this is not recommended to try, even though it works. And cannot be liable for any damage or injury caused.
Looks like a complex solution to a non problem? If the boiler is 230v input then just use the existing L as common as it's already internally wired, or as the switch on 1 is normally closed, cut the link out and use it as common if need be?
 

DIYnot Local

Staff member

If you need to find a tradesperson to get your job done, please try our local search below, or if you are doing it yourself you can find suppliers local to you.

Select the supplier or trade you require, enter your location to begin your search.


Are you a trade or supplier? You can create your listing free at DIYnot Local

 
Sponsored Links
Back
Top