Hive install

Joined
15 Jul 2015
Messages
10
Reaction score
0
Country
United Kingdom
Hi,
I have a normal boiler with hot water tank and want to install a Hive controller system. When I removed the existing timer, 'heating on' and 'hot water on' are wired but there are no wires on 'heating off' and 'hot water off'.
Do you think I can just stick the new controller onto this wiring?
Thanks.
 

Attachments

  • IMG_20171118_145421.jpg
    IMG_20171118_145421.jpg
    178.7 KB · Views: 339
  • IMG_20171118_200349.jpg
    IMG_20171118_200349.jpg
    111.9 KB · Views: 260
Sponsored Links
There are lots of programmers that use the same backplate, but not all use the same terminals for the same function. But unfortunately you haven't stated the make & model of the existing programmer.

If you have a three port motorised valve, you will need a 'hot water off' connection and I suspect that it is the green /yellow wire, because the the original installer thought (incorrectly) that it would be OK to use an earth wire as a live wire as long as they put a red sleeve on it to identify it as such.

So, it is likely that the connections will be the same, but you need to check to be sure. If you look at the details of the wiring terminals for your existing programmer which will be in the installation instructions, or printed on the back of it, and find that:

Terminal 1 is 'Hot water off, or hot water satisfied'
Terminal 3 is 'Hot Water on or Hot water call for heat'
Terminal 4 is 'Central heating on or central heating call for heat'

Then the Hive is compatible with what you have.

Of course the Live and Neutral terminals will need to correspond also.

If you have an existing room thermostat somewhere that must be decommissioned to prevent it interfering with the operation of the Hive. It cannot simply be disconnected otherwise the heating control wiring will be 'open circuit' and the heating will never come on. This means that the existing thermostat switching wires will need to be bridged out by connecting them together at the wiring centre or some other convenient point.
 
Thank for your reply. It's a Danfoss FP715 and looks to have the wiring as you describe so I'll give it a go when I can get to it in daylight.
 
As Stem says likely you can use it, however there is a long list of boilers that you can't use hive with. The problem is when hive controls domestic hot water, they don't have volt free contacts, some boilers need volt free contacts as control is 24 volt not 230 volt or even uses a bus. Since you don't give the boiler, or the control system, or originally thermostat or programmer we can only guess.

Also as pointed out:-
514.4.2 Protective conductor
The bi-colour combination green-and-yellow shall be used exclusively for identification of a protective conductor and this combination shall not be used for any, other Purpose.
Single-core cables that are Coloured green-and-yellow throughout their length shall only be used as a protective conductor and shall not be over-marked at their terminations, except as permitted by Regulation 514.4.3.

It could be argued it is not a single core cable so it does not count, but that is really clutching as straws, and since it is fixed installation it requires a earth cable even if not used.
 
Sponsored Links
full
It would same same wiring diagram. So should be straight swap. Although likely you will need to set the thermostat to maximum remember if thermostat is shorted out, still need something to show where the wires run to comply with safe zones.
 
You are swapping like for like, they both have the same electrical connections and the FP715 has internal connections to 230V exactly the same as the Hive.

Danfoss FP715
danfoss.JPG

Hive Dual Channel Version
Hive.JPG
 
Since you don't give the boiler, or the control system, or originally thermostat or programmer we can only guess.

No need to guess. The photo of the wiring to the existing programmer backplate posted by the OP identifies it as a 'Y Plan' system with a three port motorised valve. The connection to the 'Hot water off' terminal gives it away.
 
I had a look at decommissioning the thermostat. There are 4 wires (blue, brown and 2 blacks) and it looks like the 2 black wires are already connected together at the wiring centre. The boiler does fire up when the temperature is changed so I'm not sure how to proceed.
Thanks
 
Post details of your thermostat, it's make & model and where the wires are connected. A photo of the wires and their connections would be useful.

For the time being if you leave the existing thermostat on its highest setting that will prevent it overriding the Hive.
 
It is a danfoss but can't see a model number.
Reading left to right the terminals are numbered 4,5,1,3,2 and the connected wires are: 4 = blue, 5 empty, 1= both blacks, 3 = empty, 2= brown.
I don't think it would help to add a pic of the wiring box at the other end as it's a proper mess!
 

Attachments

  • IMG_20171121_072733.jpg
    IMG_20171121_072733.jpg
    191.2 KB · Views: 232
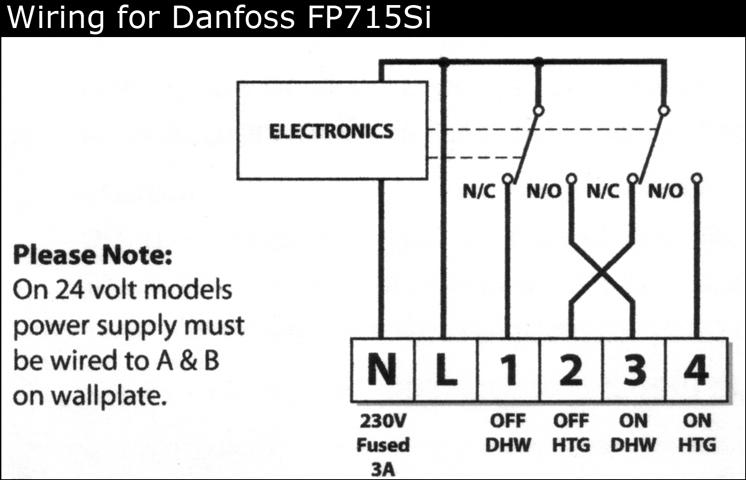
Unfortunately I don't recognise that model, and unless I know what each of the wiring terminals does, I can't help you. The wire colours don't help either as they would have been chosen by the original installers personal preferences. It may well follow the same format as the newer models, but it's risky to assume that.

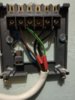
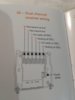
I'm assuming you don't have the instructions for it, and the best way to find out what each wire does, would by testing them with a multimeter but I can't do that on a forum. (unless you have a multimeter and can use it) Is there not a wiring diagram inside the lid? or a legend somewhere saying what each terminal is for? Failing that, if you could post a photo of the front of the cover, someone might recognise it.

Having said that, if you can't find anything else and you can do the following safely, here is something that you can try. Start with the heating cold so that the boiler will fire up when asked.

1. Remove the blue wire from terminal 4 and insulate it safely. With the heating set to be 'on' so that turning the Danfoss up and down would normally operate the boiler, try it. does it still operate it now? When completed, put the blue wire back in terminal 4

2. Remove the two black wires from terminal 1, and reconnect them together away from the thermostat. With the heating set to be 'on' so that turning the Danfoss up and down would normally fire up the boiler, try it. does it still operate the boiler now? When completed, put the two black wires back in terminal 1

3. Remove the brown wire from terminal 2 and insulate it safely. With the heating set to be 'on' so that turning the Danfoss up and down would normally fire up the boiler, try it. does it still operate the boiler now? When completed, put the brown wire back in terminal 2

I would expect that in two of the above tests, that the heating won't operate and in one that it will.
 
I think you may be right. Here's a confirmed RMT230 picture.

65015377.jpg

Also, the use of terminals 4, 1 and 2 would be correct. My hesitation was because I'm fairly sure that RMT230 has it written on it somewhere, and the OP's looked somewhat darker, but that's just probably the angle of the photo.
 
Last edited:

DIYnot Local

Staff member

If you need to find a tradesperson to get your job done, please try our local search below, or if you are doing it yourself you can find suppliers local to you.

Select the supplier or trade you require, enter your location to begin your search.


Are you a trade or supplier? You can create your listing free at DIYnot Local

 
Sponsored Links
Back
Top