
Its the laser fluid extractor,also used it a few times to shove down pipes to extract water b4 soldering,great piece of kit,its a vacuum pump so connect it give it a few pumps and let it suck oil through to the container.Would that be the 'oil suction gun' approx £7-50. Looks ideal for the job.

You are using an out of date browser. It may not display this or other websites correctly.
You should upgrade or use an alternative browser.
You should upgrade or use an alternative browser.
How to re-prime Worcester Danesmoor 20/25 oil system?
- Thread starter pjmallinson
- Start date
Its the laser fluid extractor,also used it a few times to shove down pipes to extract water b4 soldering,great piece of kit,its a vacuum pump so connect it give it a few pumps and let it suck oil through to the container.
I knew there was a better way than taking the tube off the U-gauge and sucking the water out myself...................
I used to use an outboard engine fuel line with the priming bulb for obstinate oil pump priming.
Fit the suction tube to the oil pump inlet line from the tank and pump like hell to draw the oil up the pipe. Refit the line to the pump and there you are!
Fuel line can also be used to suck out spillage and drain other containers of oil.
Simples!
Oh and make sure you really have opened the tank outlet valve. Remember those with the heat sensitive fire valve spindles don't always do what you think they have!! Easy to be caught out.
Hi all you guys who were so helpful yesterday. Armed with your ideas I first took the opportunity of the empty oil feed line to install a tee and stop tap at the tank end. Even if I don't need it now I know I'll kick myself for not doing it at some point in the future. I then, lo and behold, found some of the kit I'd used years ago and attached a slave pipe and mini header tank to the inlet to the tigerloop (which is adjacent to the boiler) and filled tank with a pint of oil or so to give a head of nearly a metre above the pump. Then opened the shut off valve on the pump line, cracked the bleed nut on the rear of the pump body (ie not the nut with the adjusting slot in its centre), pressed the control box button.
The motor whirred away, which I presume means the pump HAS to be turning, but not a dribble of oil was enticed from the header to the tigerloop chamber. I tried a few more times but all seemed remarkably unresponsive. This was both surprising and disappointing.
While scratching my head something drew my thoughts to the solenoid shut of valve on the pump. I suspect these can suddenly die a death after for no real reason? I could just about detect a tiny amount of magnetism holding a gently balanced screw driver blade close to the centre pole but it seemed far too weak so I also tried it detached from the pump and with the system running. A little better but still pretty feeble. I know it isn't supposed to be a strong force but how can I check if it's working well enough? If it isn't will a replacement still be available and where would be the cheapest source? It has been working fine till now.
Hi all you guys who were so helpful yesterday. Armed with your ideas I first took the opportunity of the empty oil feed line to install a tee and stop tap at the tank end. Even if I don't need it now I know I'll kick myself for not doing it at some point in the future. I then, lo and behold, found some of the kit I'd used years ago and attached a slave pipe and mini header tank to the inlet to the tigerloop (which is adjacent to the boiler) and filled tank with a pint of oil or so to give a head of nearly a metre above the pump. Then opened the shut off valve on the pump line, cracked the bleed nut on the rear of the pump body (ie not the nut with the adjusting slot in its centre), pressed the control box button.
The motor whirred away, which I presume means the pump HAS to be turning, but not a dribble of oil was enticed from the header to the tigerloop chamber. I tried a few more times but all seemed remarkably unresponsive. This was both surprising and disappointing.
While scratching my head something drew my thoughts to the solenoid shut of valve on the pump. I suspect these can suddenly die a death after for no real reason? I could just about detect a tiny amount of magnetism holding a gently balanced screw driver blade close to the centre pole but it seemed far too weak so I also tried it detached from the pump and with the system running. A little better but still pretty feeble. I know it isn't supposed to be a strong force but how can I check if it's working well enough? If it isn't will a replacement still be available and where would be the cheapest source? It has been working fine till now.
Regardless of the solenoid being faulty the pump should still pull oil in and you should have been able to bleed it no problem. The pump builds fuel pressure before the solenoid opens so should still have bled.
If the motors turning sounds like the pumps goosed or it may be completly dry in which case they have trouble pulling in oil.
Personally I would try this
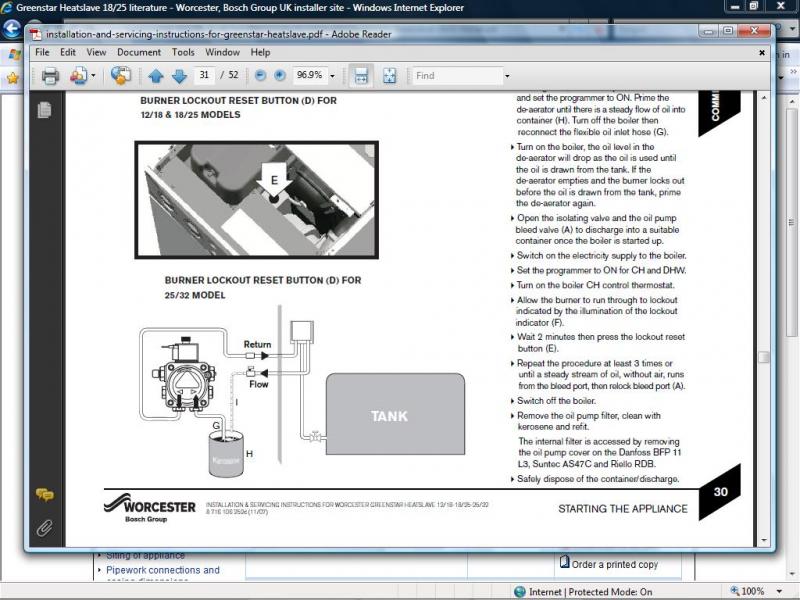
Many thanks APHS. Spot on I'm sure, ie that the pump is dry as I had emptied ALL the oil lines as matter of deliberate overkill as I wanted to be absolutely sure there could be no dirt or water anywhere. I've printed a copy of the priming regime you recommended and will go forth try again. Very useful to know that the cut off won't prevent it priming too. Thanks again
See you've not had much luck yet!
As I see it, you've now got a posative head of oil, but the air in is still trapped in the line.
The bleed screw is on the output side of the pump, which means air has to pass through the pump gears to get rid of it. That's where the problem lays!
You need to release the trapped air.
You could slacken off the inlet pipe connection to pump till oil weeps out.
I looked at a illustration of a sunstrand pump, which showed 3 plugs on the body.
They were for pump adjustment. Bleed screw/pressure gauge and a alternative inlet pipe.
If you have this alternative inlet plug, then you need to open it up to allow air in pipe to escape, it will be followed by oil now you tank is higher than pump.
Once you have oil there it should start. or at least the nozzle should deliver oil.
MANDATE";p="1393363 said:See you've not had much luck yet!
Thanks Mandate. The 'not much luck' continues! I tried the small header idea above the tigerloop connected to the normal central tank inlet but couldn't get oil to flow anywhere ie to the bleed nut or by disconnecting the return flexible So this afternoon I've been trying APHS' suggestion. That is to follow the priming procedure from the installation manual ie interrupting the pump inlet line and putting the two ends into a small pot of oil. This of course is for a sub-gravity setup so I removed the header and reconnected the tank line. I tried runnning it from lockout 6 times with no luck and reckoned if the pump was turning it HAD to draw oil up. (I was also a bit worried about pump wear if there's little or no oil in it. Is this so?). If this is true logic says the pump can't be turning! I then wondered how this could possibly be and did notice that the motor was rather warmer than I would have expected after this! Racking my brain for possible explanations; is it possible that if even a small amount of water reached the pump and sat there for say months that something could corrode enough to seize the pump? I should point out again that this system has worked fine for years and has primed without trouble in the past. There has also never been a check valve on the tank line so although that therefore can't be relevant I wanted to fit one for good measure but it seems 10mm check valves are like hen's teeth. I can't even find one on the web. Should I use a 15mm valve with reducers? That doesn't seem right to me. Any ideas where to source them? I'll try the secondary connection point idea tomorrow as you suggest.
I fear I am almost at the hair tearing out stage as it now seems to be defying logic. being an engineer I'm now even thinking of dismantling and checking the pump. I'm sure a 'normal' person would be handing over to a professional by now but of course it has become something of a personal challenge. I can't afford it anyway. And it's probably something really simple. Sorry about this long ramble. Regards, PeterM
pjmallinson";p="1393615 said:See you've not had much luck yet!
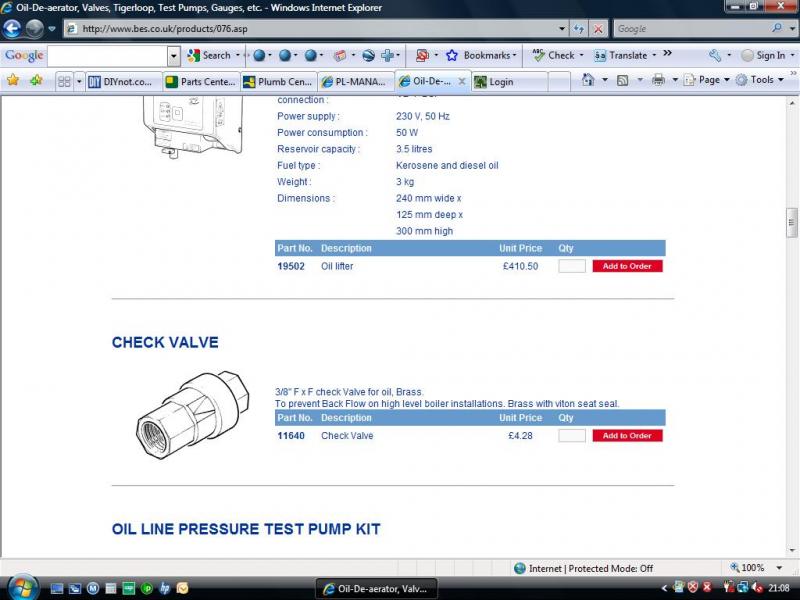
I wanted to fit one for good measure but it seems 10mm check valves are like hen's teeth. I can't even find one on the web. Should I use a 15mm valve with reducers? That doesn't seem right to me. Any ideas where to source them?
http://www.bes.co.uk/products/076.asp
Half way down the page you will also need 2 3/8" x 10mm straight males.
Hi Peter, Without taking the pump off, you could remove the end plate.
Behind is a filter which you can remove and behind that are the gears.
There's no point dismantling further. What you can do is use fingers inside burner housing to turn fan to make sure gears move.( I did have one that didnot due to pin that had sheared off)
Also by removing the end plate the inlet of the pump is open to atmosphere. So there should be no reason why you can't get oil to that point if your small tank is level or above. (providing there is no blockage)
Try not to damage the plate gasket (if there is one)
Also you can apply lubricant to the gears.
Like you I wanted a check valve, which I inserted about 12 ins below pump. When refilling I left the bottom connection loose until I had oil at that point, that was using the mini tank.
My check valve does appear to be a bit chunky, looks threaded at each end, then reduced to 10mm compression fittings.
Very much like the one at www.bes.co.uk part No 11640.
Hope this helps.
You can get a check valve from toolstation,either call in at a branch or order from them part number 54244 price £7.71.the company i work for covers gloucs area so if you reach end of your tether and need it sorted i can give you their details.
MANDATE";p="1393955 said:Hi Peter, Without taking the pump off, you could remove the end plate...etc
At last I think I've got somewhere mainly because to cut a long story short it looks like it's the motor that's a fault after all. I took the pump apart and all seemed perfectly fine although I noticed the crescent piece that fits between the gears only has one locating pin even though there are drillings for another, but suspect this is correct. Checked it was all turning okay via the fan as you suggested, took the opportunity to fill up the pump and delivery line with oil, reassembled, fired it all up 6 times... nothing. Noticed the motor getting hot again and this time put 2&2 together and got the right answer, ie motor not turning. So, is it worth or even possible to pull it apart if it might just be brushes or is it new motor. If the latter, where to get one from? I'm new to this forum business but have tried to load a few photos that might help to ID things so I hope you an view them. The level of help that's forthcoming is amazing especially from your good self. Thanks again. PeterM
The motor is easily removed after removing the wiring connections.
You'll find it will be a brushless motor, with capacitor start. Could be the capacitor at fault.( but you need capacitance meter)
Not sure of the burner model You said it was 'selectos' but I've seen a couple of others beside mine which is a D42.
Nu Way do a motor for the D42 and so do EOGB.
Neighbour had motor problem, which I removed for bench test.Found some resistance in bearings applied some oil, soon became easy. run motor on bench. replaced motor, everything ok. that was over a year back.
Don't forget the motor and pump are connected using a coupling.
So you could have a good motor that is not driving the pump if coupling faulty.
So remove motor and test on bench.
just looked at your photos, motor has capacitor I see.
Can't quite make out if wattage is 75, replacement will probabley 90 watt.
2800rpm 240v single phase. I think the nu way one is £48 +vat, but it may only have two securing holes.
Can't quite make out if wattage is 75, replacement will probabley 90 watt.
2800rpm 240v single phase. I think the nu way one is £48 +vat, but it may only have two securing holes.
just looked at your photos, motor has capacitor I see.
Can't quite make out if wattage is 75, replacement will probabley 90 watt.
2800rpm 240v single phase. I think the nu way one is £48 +vat, but it may only have two securing holes.
Thanks Mandate. I'll have look at the motor tomorrow. I'll check bearings, coupling etc. If it needs replacing I'll have to pin down more accurately exactly which it is. I think you are saying it would be the same as for D42? The burner is a Selectos D11034/02/85/359760 if that helps (looks like that might be 1985 vintage!?) so may get back to you on that. I'll put up another photo of whole burner if I can. Cheers, PeterM
DIYnot Local
Staff member
If you need to find a tradesperson to get your job done, please try our local search below, or if you are doing it yourself you can find suppliers local to you.
Select the supplier or trade you require, enter your location to begin your search.
Please select a service and enter a location to continue...
Are you a trade or supplier? You can create your listing free at DIYnot Local
Similar threads
- Replies
- 17
- Views
- 8K
- Replies
- 12
- Views
- 10K
- Replies
- 18
- Views
- 12K
- Replies
- 3
- Views
- 3K