
That's where the fun could start, if pipe diameters/connections and alignments don't match. Good luck.slipping its sewer connection into the old sewer hole

You are using an out of date browser. It may not display this or other websites correctly.
You should upgrade or use an alternative browser.
You should upgrade or use an alternative browser.
How to replace a leaky WC Cistern syphon
- Thread starter siliconeseal
- Start date
- Joined
- 28 Nov 2023
- Messages
- 53
- Reaction score
- 2
- Country

Question: There must have been a time when old model WCs like mine were replaced with the modern ones. Surely the modern ones are made to be backward compatible with the old WC sewer connections, or did they replumb the entire sewer drainage system?That's where the fun could start, if pipe diameters/connections and alignments don't match. Good luck.
@dilly :Yes, you too were right, bless your 'airy arse.

Sometimes you can get onto the old cast iron soil inside... Sometimes you have to do it outside and run a new 4" soil through the wall to the pan.
- Joined
- 28 Nov 2023
- Messages
- 53
- Reaction score
- 2
- Country
Right guys, I have accepted Alec_t's point about the danger of mismatch in the sewer connection. This kills the replace the WC idea and I'm back to mending the old one. But I have a new idea. To fix the syphon exit tube versus cistern exit hole mismatch I plan on using a expansion bushing like this one

 flow-technology.co.uk
The bushing's inner female hole will mate with the Turbo88's 1 1/2" BSP exit tube. The bushing's OD is the same as the old syphon's exit tube. I will use the bushing with its hex part inside the cistern. I will use PTFE (water) thread sealing tape wrapped around the Turbo88's exit tube to make the Turbo88 - Bushing thread water-tight. I will need a thinnish 2" BSP ID neoprene washer to seal the bushing to the inside of the cistern hole. Please give me a link to a vendor which can supply me with such a washer.
On the outside of the cistern hole, I will use the following seal
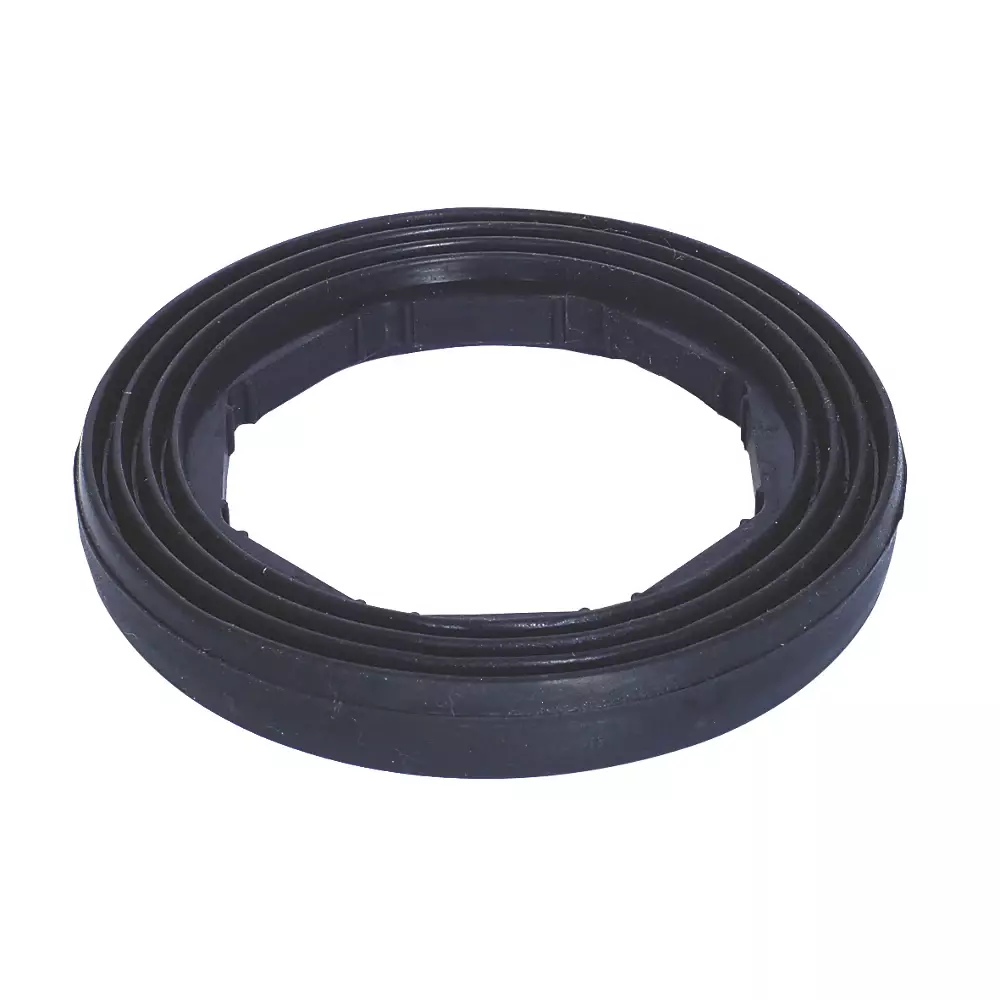
 pipescenes.co.uk
Finally I will use the retaining nut which I took off the original syphon's exit tube to secure & seal the bushing exitting out of the cistern.
What do you think?
EDIT: For the inner washer I will use this one:

 www.mpmoran.co.uk
Can this washer be used for the outside too?
2" X 1 1/2" BSP HEX RED BUSH 316 - Flow Technology LTD
Available in Stainless Steel 316. - In Stock,
flow-technology.co.uk
The bushing's inner female hole will mate with the Turbo88's 1 1/2" BSP exit tube. The bushing's OD is the same as the old syphon's exit tube. I will use the bushing with its hex part inside the cistern. I will use PTFE (water) thread sealing tape wrapped around the Turbo88's exit tube to make the Turbo88 - Bushing thread water-tight. I will need a thinnish 2" BSP ID neoprene washer to seal the bushing to the inside of the cistern hole. Please give me a link to a vendor which can supply me with such a washer.
On the outside of the cistern hole, I will use the following seal
Wirquin 2" Ribbed Toilet Doughnut Washer – Close Coupled Cistern Pan Seal - Pipescenes
Buy the Wirquin 2" Ribbed Doughnut Washer. High-quality rubber cistern-to-pan seal for close-coupled toilets. Stops leaks and ensures a secure, watertight fit.
pipescenes.co.uk
Finally I will use the retaining nut which I took off the original syphon's exit tube to secure & seal the bushing exitting out of the cistern.
What do you think?
EDIT: For the inner washer I will use this one:
VIVA Doughnut Washer Foam 2"
Features: Foam sealing washer for between toilet cistern and pan. Technical data: Material - Foam Colour - Black Thickness - 10m...DISCLAIMERThis product qualifies for next working day delivery provided it is in stock and your order is placed by 1pm Monday to Thursday. For full T&C's read...
www.mpmoran.co.uk
Can this washer be used for the outside too?
Last edited:
Not necessarily. There are various adapters, offset bends and flexies available.This kills the replace the WC idea
- Joined
- 28 Nov 2023
- Messages
- 53
- Reaction score
- 2
- Country
Yes Alec. But to select the right one for a particiular job needs a trained and experienced Plumber, which I am not. I just want to finish the job with my limited skill set.Not necessarily. There are various adapters, offset bends and flexies available.
Last edited:
- Joined
- 28 Nov 2023
- Messages
- 53
- Reaction score
- 2
- Country
Okay, I understand. Replacing the WC is the best option. I have selected a new one:
 www.wickes.co.uk
which is slightly better spec than the Screwfix option selected earlier.
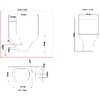
We come now to attaching the new WC to the sewer. Attached to this post are two images. The photo is of the existing sewer connection and the drawing is from the Wickes website detailing the new WC's outline. I draw your attention to the red boxed section of the drawing. Question: Where does the sewer connector pipe end, at B or at C?
In both cases B or C, the midpoint of the sewer pipe is 180mm from ground level.
Now look at the photo. I have placed a ruler on the ground next to the existing WC's sewer exit pipe. I have drawn a purple line horizontally to the right, at the 180mm mark. We can see that the adapter, labelled A, will either have to be removed and/or replaced with another adapter which is angled more counter-clockwise (in the direction of the drawn red arrow) to mate with the sewer pipe of the new pan.
Question: Where are adapters such as A available?
Question: Using the info given here, which adapter should I buy?
Question : Do I need a sealant to seal the WC's sewer pipe into the existing sewer connection/or into the adapter and the adapter into the sewer connection to prevent water/gas leakage? If yes then what sealant do you recommend?
Many thanks for your patience and assistance.
Wickes Cleveland Easy Clean Close Coupled Toilet | Wickes.co.uk
Wickes Cleveland Easy Clean Close Coupled Toilet
www.wickes.co.uk
which is slightly better spec than the Screwfix option selected earlier.
We come now to attaching the new WC to the sewer. Attached to this post are two images. The photo is of the existing sewer connection and the drawing is from the Wickes website detailing the new WC's outline. I draw your attention to the red boxed section of the drawing. Question: Where does the sewer connector pipe end, at B or at C?
In both cases B or C, the midpoint of the sewer pipe is 180mm from ground level.
Now look at the photo. I have placed a ruler on the ground next to the existing WC's sewer exit pipe. I have drawn a purple line horizontally to the right, at the 180mm mark. We can see that the adapter, labelled A, will either have to be removed and/or replaced with another adapter which is angled more counter-clockwise (in the direction of the drawn red arrow) to mate with the sewer pipe of the new pan.
Question: Where are adapters such as A available?
Question: Using the info given here, which adapter should I buy?
Question : Do I need a sealant to seal the WC's sewer pipe into the existing sewer connection/or into the adapter and the adapter into the sewer connection to prevent water/gas leakage? If yes then what sealant do you recommend?
Many thanks for your patience and assistance.
Attachments


Pan Connectors | Wickes
Shop Wickes pan connectors for reliable connections between your toilet and plumbing, ensuring a tight, durable fit.
www.wickes.co.uk
But this looks like your best bet:
FloPlast Soil Pan Connector 14° - White | Wickes.co.uk
FloPlast Soil Pan Connector 14° - White
www.wickes.co.uk
Andy

- Joined
- 28 Nov 2023
- Messages
- 53
- Reaction score
- 2
- Country
Thanks Andy, very helpful. Will the cistern have a side inlet like the existing cistern (see photos in post #32) or will I need a flexible hose like one of these? https://www.screwfix.com/c/heating-plumbing/compression-hoses/cat831678Pan Connectors | Wickes
Shop Wickes pan connectors for reliable connections between your toilet and plumbing, ensuring a tight, durable fit.
But this looks like your best bet:
FloPlast Soil Pan Connector 14° - White | Wickes.co.uk
FloPlast Soil Pan Connector 14° - White
Andy
Finally, please answer the question which I asked in post #52, namely
We come now to attaching the new WC to the sewer. Attached to this post are two images. The photo is of the existing sewer connection and the drawing is from the Wickes website detailing the new WC's outline. I draw your attention to the red boxed section of the drawing. Question: Where does the sewer connector pipe end, at B or at C?
- Joined
- 28 Nov 2023
- Messages
- 53
- Reaction score
- 2
- Country
Wickes will deliver the Toilet and sewer adapter tomorrow. I will then unpack everything & will have to determine which flexible hose to order for the water inlet. It will be my first potty installation and I am looking forward to it. Three years ago I fixed my central heating system following the advice from yourselves. It now works like a dream. I installed the following new items:
Drayton RTS2 1-Channel Wired Room Thermostat,
a two channel ProgramaStat TRT036N 7 day digital programmer in place of the old analogue Landis & Gyr RWB2 unit,
a DAB Evosta 3 60/130 Central Heating Circulator Pump in place of an old Grundfos unit which produced grating sounds,
two Honeywell 2 port normally closed zone valves (one each for HW & CH),
Potterton Kingfisher Boiler PCB.
I also repaired & pressurised the expansion vessel. The system now works like clockwork, and should last for at least another 8 years without any issues. YOU LOT WERE A BIG HELP IN ALL OF THIS.
This time around I have detached a close coupled cistern from its seating and tomorrow will instal my first potty. Incrementally, I will increase my knowledge of DIY plumbing.
Drayton RTS2 1-Channel Wired Room Thermostat,
a two channel ProgramaStat TRT036N 7 day digital programmer in place of the old analogue Landis & Gyr RWB2 unit,
a DAB Evosta 3 60/130 Central Heating Circulator Pump in place of an old Grundfos unit which produced grating sounds,
two Honeywell 2 port normally closed zone valves (one each for HW & CH),
Potterton Kingfisher Boiler PCB.
I also repaired & pressurised the expansion vessel. The system now works like clockwork, and should last for at least another 8 years without any issues. YOU LOT WERE A BIG HELP IN ALL OF THIS.
This time around I have detached a close coupled cistern from its seating and tomorrow will instal my first potty. Incrementally, I will increase my knowledge of DIY plumbing.
Last edited:
- Joined
- 28 Nov 2023
- Messages
- 53
- Reaction score
- 2
- Country
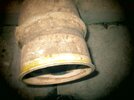
Well the old WC is out and the new one is in. But there's a problem. The OD of the pan's drain pipe is 100mm, which snugly fits the inlet gasket of the Floplast connector of post #53. But the exit side of this connector has a concertina gasket with OD = 110mm, whereas the ID of the sewer pipe is 130mm. IMG_9509 shows the sewer inlet, IMG 9508 shows the gap between the Floplast adapter's exit end and the sewer inlet. The photo NoAdapter shows what it looks like when the pan's drainage tube is abutting with the sewer inlet WITH NO ADAPTER IN PLACE.
IMG9510 is an overhead view of the sewer inlet and IMG9511 is a shot of the pan drainage tube. I looked for a 130mm OD EPDM gasket to fit inside the sewer pipe but found nothing. Other than that I am thinking of using the following connector
www.wickes.co.uk
Although it may be too long to allow the cistern to abut the wall as it should.
Your advice please gentlemen.
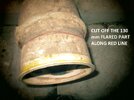
EDIT: Closer inspection of IMG 9509 shows that 130mm flared part of the sewer tube is topmost part. Further into the pipe, the ID drops to the standard 110mm sewer diameter. I am thinking of using a hacksaw to cut off this flared part, (as in photo IMG_9510_MODIFY. Then I will use the above mentioned
www.wickes.co.uk
. This will allow me to avoid using a 130mm sealing gasket AND allow the cistern to closely abut the wall. Is this feasible?
IMG9510 is an overhead view of the sewer inlet and IMG9511 is a shot of the pan drainage tube. I looked for a 130mm OD EPDM gasket to fit inside the sewer pipe but found nothing. Other than that I am thinking of using the following connector
Fluidmaster White Flexible Short Toilet Pan Connector 200-350mm | Wickes.co.uk
Fluidmaster White Flexible Short Toilet Pan Connector 200-350mm
www.wickes.co.uk
Your advice please gentlemen.
EDIT: Closer inspection of IMG 9509 shows that 130mm flared part of the sewer tube is topmost part. Further into the pipe, the ID drops to the standard 110mm sewer diameter. I am thinking of using a hacksaw to cut off this flared part, (as in photo IMG_9510_MODIFY. Then I will use the above mentioned
Fluidmaster White Flexible Short Toilet Pan Connector 200-350mm | Wickes.co.uk
Fluidmaster White Flexible Short Toilet Pan Connector 200-350mm
www.wickes.co.uk
Attachments



Last edited:
Shove the pan con past the flange...
If need be, cut the flange off!
It's the throat size that is what matters!
Else get a mcalpine DC fitting to convert to 110mm.
If need be, cut the flange off!
It's the throat size that is what matters!
Else get a mcalpine DC fitting to convert to 110mm.
- Joined
- 28 Nov 2023
- Messages
- 53
- Reaction score
- 2
- Country
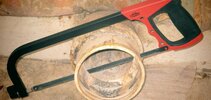
Well, Thanks to you Andy (post #53) & Dilalio (post #58), I've made a lot of progress. I sliced off the flange IMG9509 in post #57, IMG9515 & IMG9516 in the current post. This is because it serves no useful purpose and simply acts as a stand-off spacer in connecting the new pan to the sewer. With the flange off and the adapter Andy recommended, plus the shoving that Dily suggested, the pan is now shoved up right next to the wall and the adapter-connector is rammed down the throat of the cast iron sewer pipe. I have also connected the water inlet to the cistern to the old compression fitting in the water inlet pipe of the previous cistern, using 900mm flexible hose.
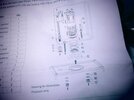
I then proceeded to place the cistern on the pan. There is an 11mm thick foam neoprene washer which is placed on the cistern's water outlet pipe's nylon retaining nut (item 12 in the assembly drawing IMG_9523). But this washer is much too thick at 11mm (IMG-9522). With this washer in place, the cistern is too far above the pan and wobbles from side to side about the washer. Previous constructors have also pointed this out in the Wickes Product Reviews for this WC (see the Attachment labelled Gasket Problem). I have laid out the gasket in IMG_9524. Its OD = 92mm, ID = 63mm, thickness = 11mm. I need a washer with the same dimensions but 5mm thick. Where can I get it? Can I omit this gasket since it seems to be sealing nothing. In IMG_9523 item 9 is a neoprene washer, item 10 is a plastic washer and item 8 is the Flush valve rubber seal.
Many thanks in advance!
I then proceeded to place the cistern on the pan. There is an 11mm thick foam neoprene washer which is placed on the cistern's water outlet pipe's nylon retaining nut (item 12 in the assembly drawing IMG_9523). But this washer is much too thick at 11mm (IMG-9522). With this washer in place, the cistern is too far above the pan and wobbles from side to side about the washer. Previous constructors have also pointed this out in the Wickes Product Reviews for this WC (see the Attachment labelled Gasket Problem). I have laid out the gasket in IMG_9524. Its OD = 92mm, ID = 63mm, thickness = 11mm. I need a washer with the same dimensions but 5mm thick. Where can I get it? Can I omit this gasket since it seems to be sealing nothing. In IMG_9523 item 9 is a neoprene washer, item 10 is a plastic washer and item 8 is the Flush valve rubber seal.
Many thanks in advance!
Attachments




Last edited:
Do you have through bolts that go through the cisten and through the toilet, are they plactic bolts?
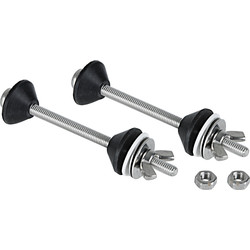
If so throw them away and buy these:
 www.toolstation.com
And keep the washer you have, it will squash down.
Andy
If so throw them away and buy these:
Bolt Through Cistern Connector Kit
Stainless steel bolts, nuts and washers. For connecting toilet cistern to bowl.
www.toolstation.com
And keep the washer you have, it will squash down.
Andy

DIYnot Local
Staff member
If you need to find a tradesperson to get your job done, please try our local search below, or if you are doing it yourself you can find suppliers local to you.
Select the supplier or trade you require, enter your location to begin your search.
Please select a service and enter a location to continue...
Are you a trade or supplier? You can create your listing free at DIYnot Local
Similar threads
- Replies
- 21
- Views
- 7K
- Replies
- 0
- Views
- 2K
- Replies
- 1
- Views
- 3K
- Replies
- 4
- Views
- 6K
- Replies
- 3
- Views
- 6K