Ideal response 120 boilers - ignition problems

Presuming that there is actually pressure in the boiler your wtr pressure switch is blocked.

Drain boiler from drain nipple on isolation valve. Remove 3 connections on switch (Turn power off 1st). Unscrew switch clear hole in switch (gently) and also hole on the pipe. Refit.

Reattach wires Pink to terminal 1, brown to the neon terminal 2, brown to overheat stat terminal 3. Refill boiler to 1 bar turn on and it should work.
 
Sponsored Links
Trying not to sound too stupid here BDL but where is the isolation valve. There are a seris of 6 pipes connected to the boiler underneath i.e CH flow, gas inlet, ch return, safety valve, dhw out, dhw in (from right to left)
There is pressure in the boiler and I always tried to keep that at about 1 bar when cold acting on previous advise given, sounds like this may have been borderline too low Agile I take it that 1.8 bar is the correct pressure.
 
I always recommend 1.5 to 1.6 Bar cold for your model. As they get older they sometimes switch off as high as 1.2 Bar.

The instruction to increase to 1.8 bar was to speed up its resetting and warm you up. Often reset within 2-4 hours at that pressure. You could increase it to 2.2 Bar if its not reset within 2 hours.

Apart from the blockage which slows the reset time to hours, they seem to need more pressure to reset as they get older.

Tony
 
Well I've increased the pressure to 2 bar and I think I'll let the boiler sleep on it Agile. Really appreciate the Advice from all of you.

If you need advice on any groundworks or concrete structures problems then give me a shout : [email protected]
 
Sponsored Links
I try to drain some water from the system using a drain cock on a pipe now, the built-in drain point is very slow, and they put a sharp metal bracket around it to make it hard. Has to be showing no pressure.
Really you need a crow-foot 22mm spanner
42265.GIF

to take the switch out, takes a few seconds with one of those.
You need a 4mm screwdriver to clear the hole in the boiler bit, and get a new washer when you buy a new switch, they don't come together any more!
These (again) will help, if you don't have a crow-foot.
th_longbentpliers.jpg

The top board, by the way, is No37 on the early ones and No40 on the later.
 
Ah, groundworks and concrete structures.
Comments would be welcome:
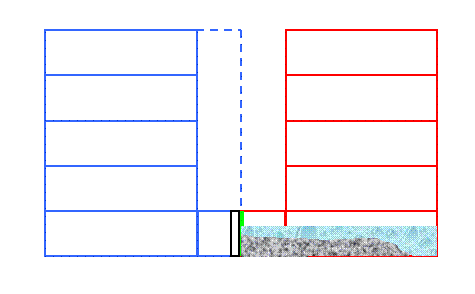
Mr Blue decided to extend above the utility room in the basement to the dotted line.
So he needs a strong wall at the bottom
So he pours concrete into reinforcing bar structure shown by the black box.
But the party wall, green, wasn't strong enough to hold it, despite Red and Blue's surveyors saying it was.

The grey stuff is concrete, the bluey stuff is water, after the pour was stopped.

Ok so the surveyors got it wrong. Turns out that the green wall, is/was a Victorian garden wall, 9" but 2 skins hardly bonded together at all, about 8 metres long. The hole is about Ford Fiesta size.

I can't help wondering whether anyone could have been able to be certain enough to pour concrete aganst it. (16 tonnes, when they stopped)
What do you think?
Wall.gif
 
ChrisR said:
Ah, groundworks and concrete structures.
Comments would be welcome:
Mr Blue decided to extend above the utility room in the basement to the dotted line.
So he needs a strong wall at the bottom
So he pours concrete into reinforcing bar structure shown by the black box.
But the party wall, green, wasn't strong enough to hold it, despite Red and Blue's surveyors saying it was.

The grey stuff is concrete, the bluey stuff is water, after the pour was stopped.

Ok so the surveyors got it wrong. Turns out that the green wall, is/was a Victorian garden wall, 9" but 2 skins hardly bonded together at all, about 8 metres long. The hole is about Ford Fiesta size.

I can't help wondering whether anyone could have been able to be certain enough to pour concrete aganst it. (16 tonnes, when they stopped)
What do you think?
Wall.gif


I think ..... WTF has this to do with an Ideal Response 120 :LOL: :LOL: :LOL: :LOL: :LOL: :LOL: :LOL: :LOL: :LOL: :LOL: :LOL: :LOL: :LOL: :LOL: :LOL: :LOL: :LOL: :LOL: :LOL: :LOL:
 
I think we covered his question, and he did offer:
If you need advice on any groundworks or concrete structures problems .....
 
ChrisR said:
I try to drain some water from the system using a drain cock on a pipe now, the built-in drain point is very slow, and they put a sharp metal bracket around it to make it hard. Has to be showing no pressure.
Really you need a crow-foot 22mm spanner
42265.GIF

to take the switch out, takes a few seconds with one of those.
You need a 4mm screwdriver to clear the hole in the boiler bit, and get a new washer when you buy a new switch, they don't come together any more!
These (again) will help, if you don't have a crow-foot.
th_longbentpliers.jpg

The top board, by the way, is No37 on the early ones and No40 on the later.

they arent usually on too tight, a pair of grips on the metal bit round the outside of the switch will remove it.....just be gentle.
 
I take it that the intended new retaining wall is a fully storey height ..say 2.7m heigh. The weight on the wall next door is directly proportional to the height poured. The safest way to treat that situation would have been to pour the wall in stages at about a meter in height each time leaving a couple of hours lapse between each pour or 24 hours if the programme allowed. Expansion board should also have been put between the new retaining wall and the old wall.
The answer to your question is you can never be certain about pouring concrete against an existing structure unless you have done extensive exploratory work or have a copy of the plans of the existing structure. Personally I have come up against this situation many times and would never have poured the wall full height in one pour especially against brick work or block work
Incidently what is the water?
 
The wall "went" at a bit under half the 3.5m ceiling height. No spreader board iirc (I'll check), just a thick plastic membrane they said was expensive (!).
They were doing it in one pour, afaik. How do you work out the lateral pressure? Presumably it's the same as the head of "liquid" above it? I find that wet concrete density is about 2.5 x that of water.
So at a mere 2 metres deep thats about 100kg per brick, sideways. Coo!
(5m water = half a bar
going imperial..
0.5 x 15psi x 9 x 3 inch brick = 200+lbs + some for mortar)

On the other side of the wall used to be a 65kW boiler, a 42mm gas pipe, a 500L water cylinder (all instantly scrap) fed from a 600L loft cistern down a 42mm feed.
Had to don rubble bags to get to the gas meter. (It hadn't leaked!!) The water had all run away but the concrete was still half a meter deep when I arrived (Saturday evening). It went a long way laterally in the house next door because it couldn't go the full length of the wall being poured. Just the kitchen. The sort of kitchen you get, in an £11m house.
 
Oh yeah Agile, it was the pressure switch was at fault, wasn't sure the correct way to drain down the boiler so I got Barry - plumber- around. He drained it down, took off the pressure switch, cleaned it out etc. but when he put it all back together it still didn't work. I by-passed the switch just to get it going(probably not too wise) but now I've got a new one so I'll fit it tomorrow.

as I said, really appreciate the help

Chris R - can't believe any engineer/Architect would approve of pouring direct against a brick wall at thoes height...or that any chippie would attept it either. The lateral loading at the bottom of the wall would have been 2.4 x 1.7 tonnes = ca. 4 T, 8T if they had achieved full height. We use specialist wall formwork to resist does kind of loadings. Sounds like it wall a big clean up operation. Was the brick wall load bearing i.e. did it support a roof?
 
Failing that, Kieran D, you could buy yourself an Isar, if you like paying out more money,,,

PCB, constant failing,
Fan , failing,
Constant leaking via Hydroblock seals

Need i say more,

Dave. :(
 

DIYnot Local

Staff member

If you need to find a tradesperson to get your job done, please try our local search below, or if you are doing it yourself you can find suppliers local to you.

Select the supplier or trade you require, enter your location to begin your search.


Are you a trade or supplier? You can create your listing free at DIYnot Local

 
Sponsored Links
Back
Top