Installation of Nest 3rd Generation (Vaillant ecoTec Pro 28)

Sponsored Links
Hi,

Ive got a Valliant EcoTec Pro30. I believe its the same board/controller. Ive made a wiring diagram if anyone can double check it for me?

Professional, i know.
Boiler wiring.png


Does anyone know how the timer control on the front of the boiler effects the Nest? Does unplugging the rt/24v terminal disconnect/disable the timer?

Thanks,
 
I have the EcoTec Pro 28, also with the Digistat SCR, so my existing setup/wiring was identical to the photos in the first post.
Following the advice below (and double checking with the Nest and Digistat manuals) I just wired up the Heat Link without any issues.
It was actually quicker to do the wiring than it has been to set up the thermostat/create a Nest account etc.

Cheers
Thanks so much for the guidance.

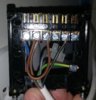
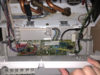
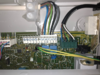
So just to confirm - I'll just connect the two Lives and two Neutrals together and run them into their respective terminals on the heat link, black wire to T2 and grey to T3. There's no earth terminal in the Heat Link so should I just join the two Earths and wrap some insulation tape around the join?

Thanks again.
 
Sorry to ask another question like this.
Can someone help with mine? It doesn't look like any other setup pictures.
The live is looped from 2 to 3 and the black is going into 3 (not sure what that wire does exactly, it's marked "call")

It's from a Drayton Digistat SCR going into the Vaillant eco TEC pro 28.

Any help will be greatly appreciated.
 

Attachments

  • IMG_20171205_111040.jpg
    IMG_20171205_111040.jpg
    347.7 KB · Views: 934
Sponsored Links
Yours is the most standard set up, presently:

N = Neutral
L = Live
1 = Common side of the switch contact connected to the live terminal
3 = Normally open side of the switch contact, is the switched live supply to the boiler

So, if you are installing a Nest, it's exactly as the diagram in the post above yours.

N and L are self explanatory
Nest 2 (common) link to Nest L
Nest 3 (call for heat) to the boilers switched live
 
Nice one! That's a great help.

You'd think they'd put a place for the earth to go (rather than loose), everything else has been designed well enough.

Also, what's the grey wire?
 
Eh?...There is a place for the earth, third terminal from the right.

heatlink.jpg

Regarding the grey wire, it doesn't look to be connected to anything as far as I can see, so it is just an unused spare core that has been safely insulated and tucked out of the way.
 
Yes, my bad. Wired it up this morning and saw the symbol.
Thanks for your expertise.
 
Hi,

I am trying to set up a Nest Gen 3, and had the same stat as the first photo in this thread. I have a Vaillant ecoTec Plus 831 boiler and the circuit board is shown below:

upload_2018-1-1_16-31-7.png


upload_2018-1-1_16-31-30.png


I have wire it up as per the advice shown on this thread:

upload_2018-1-1_16-31-45.png


However, the Nest thermostat still isn't controlling the boiler (no, it's not in manual). Is there something else I need to do regarding wiring? Such as removing something? Disconnect a programmer?

Sorry if there is already a thread on this, I have spent most of the day trying to do this.

Thanks.
 

Attachments

  • upload_2018-1-1_16-26-47.png
    upload_2018-1-1_16-26-47.png
    520.3 KB · Views: 593
  • upload_2018-1-1_16-27-18.png
    upload_2018-1-1_16-27-18.png
    522.7 KB · Views: 913
  • upload_2018-1-1_16-28-19.png
    upload_2018-1-1_16-28-19.png
    296 KB · Views: 567
Hi Johnc89

Ideally you should have started your own new thread. Adding yours on to an existing one often means that no one sees it as it's buried away. It is also called 'hijacking' and is against the forum rules. However don't start a new one now on the same subject as that is also against the rules ;)

OK, so back to your question. If the grey and black wires in terminals 2 and 3 at the Heatlink are the same as those in boiler terminals 3 and 4 then the wiring is correct.

Are there any other existing controls anywhere? Does the boiler have any integral time control? if so that needs to be set to be 'on' permanently, otherwise it will override the Nest. Is there an existing thermostat that is still in circuit?

However, the wiring at the Heatlink is very poor, and that maybe the problem. First of all, are the wires fully inserted in the terminals and the copper securely fixed under the screws? Then there shouldn't be all that copper on show, you are risking a short circuit. The insulation should go right up to (but not inside) the terminals. Just as you have done at the boiler terminals. That end of the cable is spot on!

Finally the entire cable sheaths should be under the cable clamps, not just the wires.
 
Last edited:
Need some expert help. I'd rather just double check before going ahead and wiring a NEST 3 in.

I've understood the L, N and Earth. Just confused with Grey and Black.

Currently have a Salus and replacing with NEST.

Does Black and grey stay in the RT ports as pictured and hook in Black to T2 and Grey to T3 on nest? or are they removed entirely?

OR do I just connect a black from T3 on NEST to the purple RT block on PCB and remove existing white block RT connections?

Any help really appreciated!

Pics attached of current wiring layout on boiler and salus.
 

Attachments

  • Eco tech 28 pro PCB.JPG
    Eco tech 28 pro PCB.JPG
    384.9 KB · Views: 2,659
  • Salus thermostat.jpg
    Salus thermostat.jpg
    230.9 KB · Views: 783
Why not read the instructions twice? Or perhaps the 3 million other posts on the same thermostat on the same boiler.

It is a sodding switch on a basic boiler both of whom have instructions a child could follow.

This forum is being spammed daily by the same sodding questions. It's is annoying and makes it less likely that a professional with actual knowledge is going to reply.


In your case, considering the boiler, I hope you have a calibrated FGA to carry out the requisite checks of your appliance as well as the knowledge to perform the 26 9 checks required now that you have taken the front off.


:rolleyes:
 

DIYnot Local

Staff member

If you need to find a tradesperson to get your job done, please try our local search below, or if you are doing it yourself you can find suppliers local to you.

Select the supplier or trade you require, enter your location to begin your search.


Are you a trade or supplier? You can create your listing free at DIYnot Local

 
Sponsored Links
Back
Top