
Insulating my ancient living room

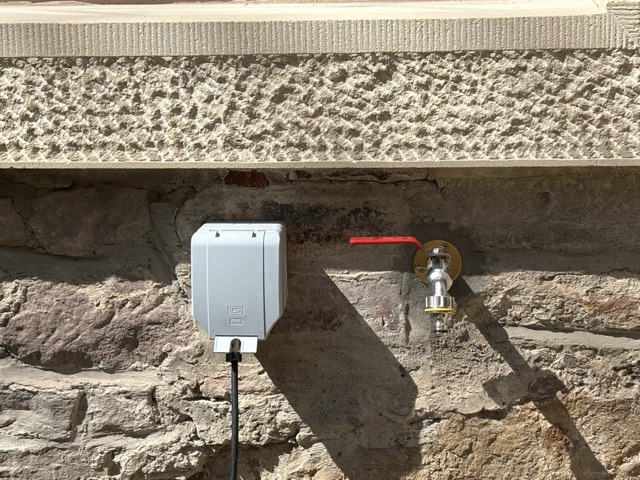
My first job after the new sill was installed was to fit an outside tap and socket:
IMG_0127 Medium.jpeg


These outside sockets are amazingly badly designed. As reported by about a thousand screwfix reviews, the socket is off-centre because of the switch, but the waterproof flex outlet is central. No plug with any sort of strain relief has any chance of fitting. So why did I fit it? Well, SF have 4 brands for under about £10, all of which have the same issue. Then they have an MK one for £34.99 that also has this problem. There is an unswitched MK one for £24.99 that shouldn't have this problem, but people say its flap snaps off easily. Et cetera. So, since the extension lead that I use outside doesn't have a strain relief on its plug and does fit, I bought this one.

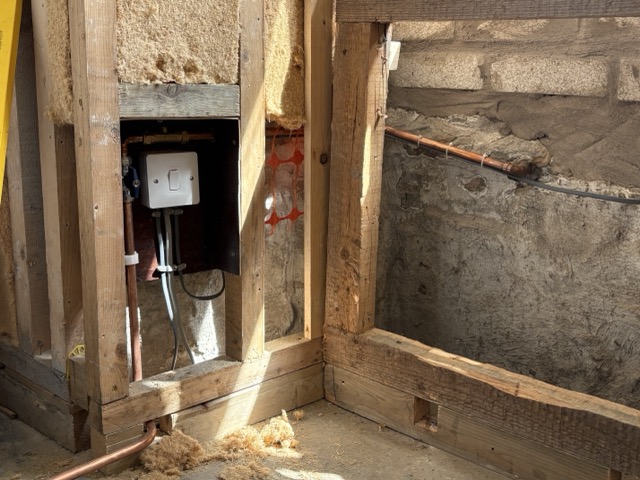
Inside:
IMG_0126 Medium.jpeg


The isolation switch and valve are going to be behind an access panel when it's finished. Note my favourite cable installation method, "cable-tied to a copper cold water pipe".

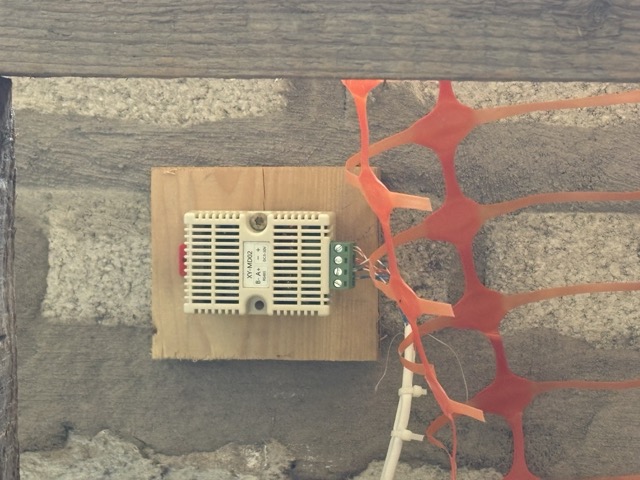
The other thing I've fitted to the wall before the insulation and plasterboard goes on is this:
IMG_0128 Medium.jpeg


It's a temperature and humidity monitor. The idea is to be able to plot pretty graphs of the conditions inside, outside, and in the wall; then maybe I can worry less about whether the insulation is making the walls damp etc. The modules communicate using RS485 (MODBUS) which I'm running over two-pair phone wire, with 5V DC power on the other pair. At 9600 baud this works fine over the sort of cable lengths you get inside buildings.
 
Looking good to me.
Don't think your project is going so slow, mine tend to take a decade+ from start to almost finished.
I too have thick stone walls (slightly thicker than yours) and insulating the living room and our bedroom are plans for the next time er indoors decides she wants to decorate them.
I also have a 6"+ thick stone floor downstairs, massive slabs with cellar space underneath so I have to insulate them in the cellar at some point - however going down the cellar is not so easy as it's been an 18 year dumping ground lol.

I like the sensor idea.
Keep up the good work and the photo's.
 
Insulation, plasterboard and radiator pipes fitted:

IMG_0133 Medium.jpeg


Panelling, using old floorboards, behind where the radiator will go:

IMG_0135 Medium.jpeg


Stained white and oiled, like the other one; grain is raised again, hmm:

IMG_0136 Medium.jpeg


And radiator fitted:

IMG_0137 Medium.jpeg


Soon I'll be able to get someone to fit the new boiler - that's the next major milestone.
 
I like the idea of reusing a table top.

I can't wait to see what you made out of the legs :)
 
I can't wait to see what you made out of the legs :)

I don’t have the legs.

I think that whoever dumped it managed to post the legs into the bin, but the top wouldn’t fit, so they left that leaning against the bin from where I acquired it.
 
The main job recently has been getting the new boiler fitted - see my posts in Plumbing about that, I won't repeat it here. But the boiler is now in the North West alcove of this room, with new plumbing under the floor to the two radiators.

Having got that done I could press on and finish the floor. It's mainly 75mm PIR; the pipes run in a 55mm channel with 20mm of PIR below. On top of that there's 18mm T&G OSB. The middle of the room was quick & easy, but the alcoves, windows and doors took me ages. But I did it without any serious mistakes!

The result is a room that is still half-full of building materials and has no finished surfaces, but is still better than the cupboard that we've been using as a living room for fractionally more than a year. So today I've moved the sofa back into this room:

IMG_0197 Medium.jpeg


What next? Well one major job is to connect the new boiler to the radiators in the rest of the house, which I'll not post about here. I'd like to get the other radiators functional before the winter. In this room, I need to tidy up the wall in the middle of the photo where I plan to make some built-in shelves, and then there's the wood panelling.

Oh, on the subject of the panelling, remember my white-stained wood behind the radiators? Unfortunately tiny gaps have opened up between the boards:

IMG_0198 Medium.jpeg


This may have happened when we turned the radiators on for the first time for testing, or it may have been earlier during the warm weather. It's not too conspicuous here but I would be less happy to have a whole wall of it. Any thoughts about that?
 
That's a double one, not a single.

The MK switched single may be less problematic than some of the other brands, but there are still reviews saying that being offset makes it impossible to use with some plugs.
 
I only have experience of the previous generation, older-style Masterseal sockets.

It would not surprise me at all to learn that MK have cheapened the product to the extent that it was now shtty.

Sadly an inevitable consequence of people buying on nothing but price.
 
Latest update:

I have connected the plumbing from the new boiler to the rest of the flat, so I should have central heating in the bedroom this winter, yay!

I’ve rebuilt the stud wall where the soil pipe and new boiler condensate pipe are (see post 38 above) with an “IKEA Hack” billy bookcase with glass shelves nicknack unit built in:

IMG_0670.jpeg


I’ve hung the curtains. These were bought by a previous owner and probably cost more than I would have paid. I like the medieval feeling they have which suits this old building:

IMG_0671.jpeg


I’ve posted that photo so that you can offer advice about what shade of flooring (etc.) would be the best match. Not that you lot are much good at that sort of question…

And finally, I’ve connected my controls to the boiler. This box started off connected to the old boiler with a simple on/off relay and a wireless receiver, much like most traditional wireless thermostats. But radio doesn’t work well in a building with metre-thick internal stone walls, so at some point I started running wires as and when I had floors and walls open, and replaced the wireless receiver with a Modbus (RS485) device, using a microcontroller board. The modbus wiring also goes to room temperature sensors (post 31 above). The new boiler has OpenTherm, so I’ve added an opto-isolated OpenTherm interface and updated the software to talk to the boiler via that. The main functionality that this gives is reading values from the boiler and making pretty graphs, but it does also turn the CH on and off as needed, and unlike the old boiler it can adjust the flow set point. I felt pleased with myself when my code for all that worked first time!

IMG_0590.jpeg


Soon I need to do something with the only bit of original wall left, which is where the glass bricks are in the first photo. It’s the only bit of modern brick in this room, with plaster and painted lining paper. I’m probably going to strip the remaining lining paper, fill any dints, sand, and paint. But I worry about residual wallpaper paste disagreeing with the new paint. Maybe I need to hang new lining paper? Any thoughts about that?
 
I’ve now tidied up the wall with a glass block window and started on the panelling:

IMG_0675.jpeg


This is the only modern brick wall in the room. The plain part took longer than it should have done; I stripped some manky old lining paper to reveal some scratched and dented old plaster, and then also worried about the left-over wallpaper paste and its effect on new paint etc. I ended up basically skimming it with a thin layer of the jointing compound that I’ve used on the plasterboard walls, and sanding it a lot. I’ve mist-coated it all and it seems fine.

Then there’s the panelling, made from the old floor, which I’ve started to fit. In the photo above it has had one coat of the white wood dye. Is it going to look good, or will I regret the crazy idea???

The photo below is while I’m applying the dye. The right-hand board is untreated. The second-from-right is the one that I’ve just done, and that’s more or less what I’d like it to look like - but it very quickly fades as the dye is absorbed into the wood, as you can see in the left two boards.

IMG_0673.jpeg
 

If you need to find a tradesperson to get your job done, please try our local search below, or if you are doing it yourself you can find suppliers local to you.

Select the supplier or trade you require, enter your location to begin your search.


Are you a trade or supplier? You can create your listing free at DIYnot Local

 
Back
Top