KITCHEN SINK WASTE

Joined
1 Jan 2010
Messages
211
Reaction score
20
Location
Yorkshire
Country
United Kingdom
Hi Folks

My daughter has replaced her kitchen sink.

Her old sink was a 1 1/2 bowl single drainer in resin and has been replaced with a stainless steel 1 1/2 bowl single drainer.

The washingmachine drains into the same waste as one of the bowls via a spigot (is that correct?)

A "plumber" took out the old sink but couldn't plumb the new sink in immediately.

I have fitted the sink and connected up the hot& cold taps (both work) and the cold feed for the washing machine.

BUT, I have tried to refit the old waste onto the new sink but it has got me completely stumped.

There seem to be three different pipe sizes 40mm, 38mm and 32mm.

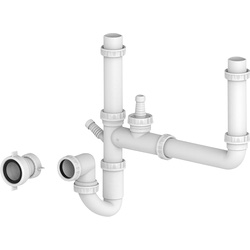
This diagram explains what I've got and there are also two pictures.

Kitchen Sink Waste.jpg


I have pipes to connect to the sinks A and B.

I have the spigot (?) to connect the washing machine waste.

I need a trap to fit at C and D and some sort of joint (I've called it a 'T' joint) to join both sinks and washing machine to the grey push-fit waste pipe at W.

Can someone please explain what fittings I need to achieve this - preferably using either Toolstation (preferred) or Screwfix SKU/Part Numbers so that I can get this fixed up ASAP.

She has two small children (one 4 and one 6) and curretly can't use the sink or washing machine (obviously) nor the upstairs bath or hand basin (as water leaks out of the grey waste pipe at W)!

THIS IS URGENT!

She has been without a kitchen sink for the last week and today was the first day that I could go round to try to sort this out for her.

She has tried local plumbers but nobody could come out before 11 Nov (leaving her virtually two weeks without use of the kitchen sink and/or upstairs bath & basin.

Here are the pics of what is already under the sinks:

Sink Waste (1).JPG


and

Sink Waste (2).JPG


'E' in the picture above leads off to the washing machine waste pipe.

Please bear in mind that whilst competent at DIY, I don't pretend to be a plumber so please explain in simple terms what I need and where, and, if possible, using Toolstation or Screwfix SKU/Part Nos. so that I can get this sorted for her.

Any help gratefully received.

Many thanks,

Dave
 
Sponsored Links
I`m concerned about the pipe that peeks out through the wall in photo #1 ( lower right hand corner) and looks small in size?
Is it copper?
 
Put a washing up glove over the pipe and wrap duck tape around to seal off the open pipe for now to allow using the basin & bath.
 
Sponsored Links
The grey pipe, (W-Waste), is obviously connected to the bath and wash basin upstairs if water comes out the open end when they are used.
To me, (also a diy'er and not a plumber but have limited experience), this is going to need changing because once the sink is connected, water from upstairs may back flow into your kitchen sink and possibly washing machine.
I would suggest taking the top, (grey), elbow off and fitting an end stop. This should allow the bath and basin to be used safely.
Under the sink you could fit the arrangement that Notch7 has suggested but you will need to fit a separate waste pipe through the back wall to the outside and then run it to the grid outside.
 
Don’t you just need a double sink waste kit?

I`m concerned about the pipe that peeks out through the wall in photo #1 ( lower right hand corner) and look
@Notch7

I thought I'd seen something like that somewhere - couldn't see it in the Toolstation catalogue however. Thanks

@just pumps

The pipe on the lower right of picture 1 is a push-fit waste (approx 40mm in diameter). There is a grey "straight coupler" (if that is the correct term) which fits onto a manky black waste pipe that is covered in cr*p. It definitely isn't copper.

There are two 15mm copper pipes (both 'L' shaped) - one for DHW (with a stop-end) and the other for cold that feeds the washing machine (cold-fill only) and has a brand-new blue-colured cold water feed pipe.

The two braided hoses are for the monobloc(k) tap.

Dave
 
Put a washing up glove over the pipe and wrap duck tape around to seal off the open pipe for now to allow using the basin & bath.
Sounds a good idea but I can imagine the glove filling with water and expanding until it either pops off or bursts.
 
The grey pipe, (W-Waste), is obviously connected to the bath and wash basin upstairs if water comes out the open end when they are used.
To me, (also a diy'er and not a plumber but have limited experience), this is going to need changing because once the sink is connected, water from upstairs may back flow into your kitchen sink and possibly washing machine.
I would suggest taking the top, (grey), elbow off and fitting an end stop. This should allow the bath and basin to be used safely.
Under the sink you could fit the arrangement that Notch7 has suggested but you will need to fit a separate waste pipe through the back wall to the outside and then run it to the grid outside.
@conny

Agreed - that would be ideal.

However much in this house is, for want of a better description, "non-standard".

As the arrangement worked before with no back-flow into the washing machine or sinks, I think it should be okay as it stands.

Will try the "washing up glove" idea posted by @just pumps if I can't resolve this using @Notch7 's solution.

Dave
 
Personally, I'd get rid of all that pushfit stuff, put a 40mm compression waste elbow onto the end of the black waste and redo from there.

Take off 'E' and '67', and fit a 1 1/2 bowl waste kit such as this, https://www.screwfix.com/p/mcalpine-double-1-bowl-sink-kit-white-40mm/71787

Outlet from the waste kit, run to a bend directly above your compression elbow on the black pipe and connect the bends, job done. This will also ensure there won't be any issues with backflow from the bathroom as the pipework rises immediately after coming into the cupboard.
 
Although the Toolstation one that Notch linked to will very likely do the job ,I prefer to use McAlpines . Screwfix code 71787. Its more expensive but you can't beat their stuff for quality.
 
Personally, I'd get rid of all that pushfit stuff, put a 40mm compression waste elbow onto the end of the black waste and redo from there.

Take off 'E' and '67', and fit a 1 1/2 bowl waste kit such as this, https://www.screwfix.com/p/mcalpine-double-1-bowl-sink-kit-white-40mm/71787

Outlet from the waste kit, run to a bend directly above your compression elbow on the black pipe and connect the bends, job done. This will also ensure there won't be any issues with backflow from the bathroom as the pipework rises immediately after coming into the cupboard.
That's a couple of good ideas there Hugh (love the play on words for your username btw).

I agree that the McAlpine stuff is very good - I've used some of their fittings before.

Although the Toolstation one that Notch linked to will very likely do the job ,I prefer to use McAlpines . Screwfix code 71787. Its more expensive but you can't beat their stuff for quality.

Thanks Terry.

That's three votes for the McAlpine waste kit then!

I'll update this thread once I've fixed (hopefully!) the sink waste.

Thanks to all for the input - most appreciated.

Dave
 
No. 4 .... Always use McAlpine where you can, it's the best available IMO. Worst comes to the worst and you can't fit the sink waste kit then get a 40mm McAlpine compression blank and fit that onto the black pipe and that will allow upstairs to be used without concern.
 
@Madrab

A good suggestion (better than the zip tied/cable tied/Duck Taped glove imho) but totally unnecessary as the job is complete!
(just realised that @conny had also suggested this earlier in post #5 of this thread - my apologies for overlooking this).

Following @Notch7 's suggestion (and seconded by @Hugh Jaleak and @terryplumb) I bought the McAlpine kit from Screwfix.

I also followed Hugh's idea about replacing the push-fit waste fittings with McAlpine elbows as can be seen in the photos below.

New Sink Waste (1).JPG


and

New Sink Waste (2).JPG


Also replaced the isolating valves on the hot and cold feeds (can be seen in the pics in post #1) with new. Whoever had put them on must have had at least 3 Weetabix for breakfast as they were on so tight, I couldn't shift them. I had to cut through both pipes in order to fit new olives & nuts for the replacement valves.

A lovely neat job if I say so myself - well chuffed!

Tested fill & drain of the washing machine, both half and full sink bowls and the upstairs wash basin - only a minor leak from the black waste (bottom right) as can be seen by the small puddle.

Unscrewed, wrapped in a short length of PTFE tape & re-tightened - voila!

Many, many thanks to all those folks that contibuted to this solution - @Notch7 , @conny , @Hugh Jaleak , @just pumps and @Madrab. You guys are gold!

Kind regards

Dave
 
@XrayDave, looks very neat and tidy but I am a bit concerned about the layout.
The half sink and washing machine set up looks ok but you don't have a water seal for the main sink until it flows to the S trap on the left. It then has to rise up the outlet to the right angled elbow, flowing back in the direction it came from along the rear horizontal pipe, before dropping to the main outlet. However, any waste will stop flowing once the level in the vertical pipe from the trap reaches the lowest edge of the horizontal run. This also means the level will be just above the compression lock ring under the main sink. I think you should fit a shorter S seal so it reduces the height of the rear horizontal outlet so it runs parallel to the fron horizontal, and thereby lowers the water height in your main sink waste pipe but still maintains the seal from the main outlet side.
 

DIYnot Local

Staff member

If you need to find a tradesperson to get your job done, please try our local search below, or if you are doing it yourself you can find suppliers local to you.

Select the supplier or trade you require, enter your location to begin your search.


Are you a trade or supplier? You can create your listing free at DIYnot Local

 
Sponsored Links
Back
Top