Need Help With Project

Joined
18 Aug 2008
Messages
3,834
Reaction score
275
Location
Devon
Country
United Kingdom
Hi all this is my first post.

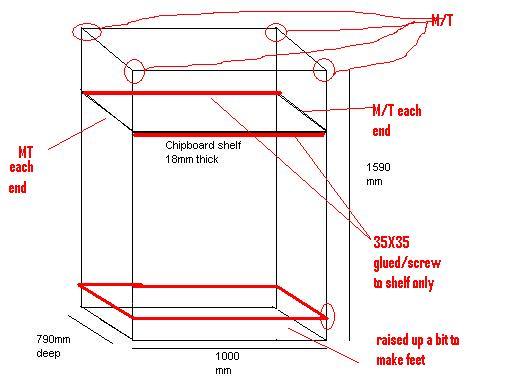
I want to make a wooden frame. Its going to be free standing. I basically want to know :-

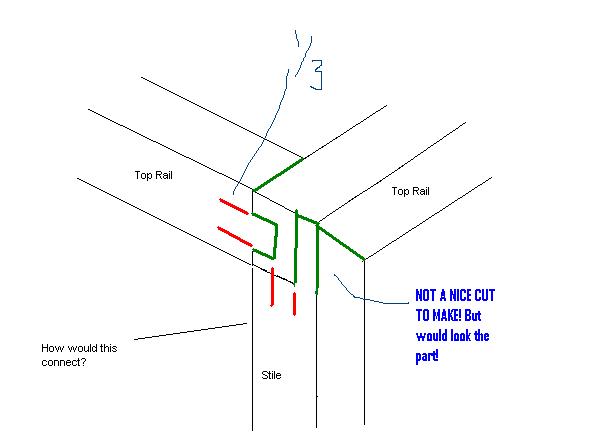
What joints should I use to connect the stiles to the bottom and top rails?
How should I connect the shelf to the stiles? I have drawn a picture to better explain what I mean.

If the terminology is a little off I'm sorry about that. I've made doors/cabinets at college but I don't have any work based experience so when it comes to actually building my own I'm not at all sure.

I'm going to buy the wood at Wickes so I'm hoping I can get some 35mm by 35mm planned softwood and then cut to size.

Need as much help as possible. Cheers. Pictures below


Sponsored Links
Another option would be to use mortice and tenon joints (if unsure google, mortice and tenon joint). they would produce strong joints, and if made a bit on the 'loose' side can be tightened up small wedges cut from the off-cuts, and pushed in when gluing up.

Depending on how much weight you plan to put on the shelf, it would also be worth running supports between the uprights to catch the edges of the shelf. Chipboard is likely to bow under the weight, plywood would be better.
 
If I was to use mortise and tenon joints would one tenon on each rail be enough or would I need two tenons? I'm assuming I will only need one because the wood is only 35mm by 35mm. Would it need to be through or stopped? The frame may have to support around 30-40kgs.

Your right chipboard does bend. What do you mean by 'uprights' and what sort of support for the shelf. Illustrations would be most helpful
 
Sponsored Links
i would have 1 tennon, stopped at about halfway. You could go further and put a haunch on both tenons so they lock together.

I would also put the self on a rail between the stiles/legs - also M'T'd then run a length along the front and back of the shelf, glued and screwed to stop the shelf bending.

If you raised the bottom rails up a bit you have feet, rather than the complete edge of the frame on the floor - hope that makes sense...

i'll try and modify you picture, but don't hold your breath - never uploaded pics before :)
 
That helps alot man cheers. Few questions though.

I was going to make the top rail like this in the picture.


But how would I attach the stiles?. Picture below.


For the middle rail (shelf support) why would I only screw/glue the front and back rails to the shelf? Would this really stop the shelf from bending?

How long would you have the feet?
 

thats probably how i would join the top to the stiles, same joint you've got but turned 90 degrees -IMO, better at holding the weight.

Feet could be as high as you want, but the higher you make them the more 'top heavy' it would likely become.
just depends on what you like the look of! - the lower they are the stronger they would be, the higher - the more stuff you could stuff underneath :)

by glueing and screwing the supports to the shelf and not the stiles would stop it bending by pushing against them (sideways), that said it would mean that 90% of the downward force was taken by the stiles (athough the joints would be strong enough as the tenons could be meatier)
 
Where would the fittings go, screws e.t.c to fix the stile in? That is a super noob question.

Also could I use pocket hole screws on the inside face of the stile maybe? Like this


Would it even be possible to leave out the angled joint and use a pocket hole joint to connect the stile to the rail? So therefore I could make the entire top rail and then attach the stiles using just pocket hole joints maybe..
 
there wouldn't be any fixings, the whole lot would be glued.

if you want to use pocket hole screws you could use your original design.
 
35 x 35 Wickes crap timber supporting a load of 40kg ( forty bags of sugar almost two bags of cement) with out additional upright supports.

In your dreams, cloud cuckoo land.

Think again about your design in respect of the materials that are to be used.
 
35 x 35 Wickes rubbish timber supporting a load of 40kg ( forty bags of sugar almost two bags of cement) with out additional upright supports.

In your dreams, cloud cuckoo land.

Think again about your design in respect of the materials that are to be used.

:eek: A bit harsh! There are nicer ways to put it!

Athough i must admit, he has a point!

Double check the weight, or consider using something bigger. I quite often use lengths of 3X2 CLS, and plane it down and square it off, only 59p p/m. Although sometimes they can be a bit ropy.

Harsh yes but it makes you think. Every one was going on about M & T joints etc but know look at the timber section size and the weight it is expected to carry.

Why are you encouraging the OP to use a timber that is not at all suitable for the job? CLS Stud work timber not joinery grade timber.

CLS;- "Canadian Lumber Standard" CLS studding timber is produced from kiln dried spruce (whitewood), planed and finished with eased edges to precise tolerances.

Have a look at this guide I have produced regarding timber grading
 
If your suggesting I go and find completely different timber its a no.This is what I have I'm afraid. I'm learning how to make joints and put things together out of wood. This will do for me. It will do. If Wicks softwood is **** then its **** I really am not that bothered. It will serve its purpose in this project. I do appreciate that link, I've bookmarked it for when/if it ever becomes relevant to me. Please try to keep in mind that I am a newb so talking about more advanced stuff is just in one ear and out the other. Even if I did try to understand it and then go about finding materials e.t.c I really wouldn't have a clue what I should be doing with it. Or how to use it properly and I doubt anyone here will help me with that seeing as an amazing ONE person has helped me in this entire forum. What morrik has suggested is useful to me and if anyone posting here or anyone reading has any suggestions on how I can make this frame a little stronger. If I should need to make it a little stronger. Then that would be just fine. And how I should go about doing that precisely.


I'm keeping with what morrik has suggested except I won't be adding the legs at this stage. So the frame will be on the floor. There is another rail added in green going down the middle. I was simply going to use dowel joints at both ends of the added frame or some sort of halving joint. Would this help with strenghtening the structure?
 
I'm keeping with what morrik has suggested except I won't be adding the legs at this stage. So the frame will be on the floor. There is another rail added in green going down the middle. I was simply going to use dowel joints at both ends of the added frame or some sort of halving joint. Would this help with strenghtening the structure?

Speaking as a professional cabinet maker In a word NO It needs intimidate supports or constructed from a size and quantity of timber to do the job.

A 1000 x 750 shelf whit is to carry 40kg, constructed from 18mm chipboard with a 35 x 35 with white wood edging will sage 68mm. I you are happy with your shelf sagging this amount then fine.

If the shelf is 12mm chipboard then the sag will be 116mm

I didn’t see chipboard so I used OSB it as the same strength as chipboard.

If you used joinery grade timber with a 18mm plywood shelf then the sag would be 46mm.

To have no sag or very little then the self supports will need to be 120 x 25

BTW if you want to check my calculations then all you need to do is visit this site.
 

DIYnot Local

Staff member

If you need to find a tradesperson to get your job done, please try our local search below, or if you are doing it yourself you can find suppliers local to you.

Select the supplier or trade you require, enter your location to begin your search.


Are you a trade or supplier? You can create your listing free at DIYnot Local

 
Sponsored Links
Back
Top