- Joined
- 8 Mar 2016
- Messages
- 11
- Reaction score
- 0
- Country

First of all, sorry for a new post on this topic but on trying to join an existing thread I was advised from existing members I should start a new post myself so here goes.
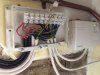
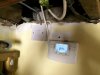
I currently have an Ideal Logic Heat 15 boiler installed on what I believe to be an S-Plan system. The boiler is located in the basement, the hot water tank is on the first floor and the header tanks are in the loft. I currently have a Honeywell relay unit wired into the junction box and a wireless thermostat located on the ground floor. The system is controlled by a Honeywell programmer.
I have purchased a Nest thermostat and, depending on the answers I get on here, would like to install it myself.
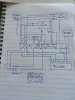
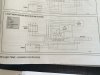
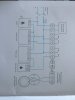
I have included the Honeywell wiring diagram, the wiring diagram I have done of the current installation (trying to keep it as similar to the Honeywell as possible) in an attempt to highlight the differences and the Nest S Plan wiring diagram.
I have traced all the wires in the junction box to the timer, valves, boiler etc and in the main the system is very similar to the Honeywell installation diagram. Where it differs, or where I don't quite understand is the wiring on the hot water system which is slightly different from what I can make out.
I can soon take the timer out of the system and feed the L and N straight into the junction box and onto the Nest Heatlink, I also presume that I can take the existing Honeywell relay out and wire the Nest into the heating valves wiring from the same connections. As I mentioned, where I am strugging is the heating side of things. If anyone can help I would be most appreciative.
Also, I would also be interested if people think I shouldn't touch it and get a professional in. If I can I would like to attempt the job myself and save the installation fee.
If there's anything I've missed please let me know and I'll try and get it added.
Thanks in advance
Incrediblechunk
I currently have an Ideal Logic Heat 15 boiler installed on what I believe to be an S-Plan system. The boiler is located in the basement, the hot water tank is on the first floor and the header tanks are in the loft. I currently have a Honeywell relay unit wired into the junction box and a wireless thermostat located on the ground floor. The system is controlled by a Honeywell programmer.
I have purchased a Nest thermostat and, depending on the answers I get on here, would like to install it myself.
I have included the Honeywell wiring diagram, the wiring diagram I have done of the current installation (trying to keep it as similar to the Honeywell as possible) in an attempt to highlight the differences and the Nest S Plan wiring diagram.
I have traced all the wires in the junction box to the timer, valves, boiler etc and in the main the system is very similar to the Honeywell installation diagram. Where it differs, or where I don't quite understand is the wiring on the hot water system which is slightly different from what I can make out.
I can soon take the timer out of the system and feed the L and N straight into the junction box and onto the Nest Heatlink, I also presume that I can take the existing Honeywell relay out and wire the Nest into the heating valves wiring from the same connections. As I mentioned, where I am strugging is the heating side of things. If anyone can help I would be most appreciative.
Also, I would also be interested if people think I shouldn't touch it and get a professional in. If I can I would like to attempt the job myself and save the installation fee.
If there's anything I've missed please let me know and I'll try and get it added.
Thanks in advance
Incrediblechunk