New copper light fitting to old wiring (no earth)

Joined
9 Mar 2021
Messages
45
Reaction score
0
Country
United Kingdom
Hi all

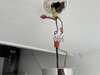
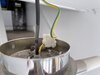
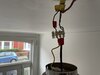
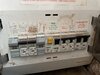
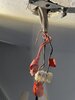
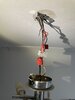
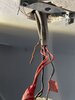
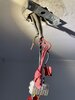
First time attempting to replace a light fitting. I have unscrewed the current metallic light fitting only to find what appears to be old wiring with the earth not actually connected to anything?

The new light I have is copper and the instructions state in bold that this light must be earthed. Is there a way to fit this light safely and how?

I have no idea if the existing fitting is double insulated, but given that it is metallic and includes an earth wire, I would assume it isn’t?!

pics attached
 

Attachments

  • F8511F9A-0884-4343-B3F5-2866086423CC.jpeg
    F8511F9A-0884-4343-B3F5-2866086423CC.jpeg
    173 KB · Views: 467
  • 9175C941-D923-4430-9C6D-796366CFC5B4.jpeg
    9175C941-D923-4430-9C6D-796366CFC5B4.jpeg
    178.8 KB · Views: 246
  • 5AF028A9-EC61-4D31-95D1-3C2B7D187FE7.jpeg
    5AF028A9-EC61-4D31-95D1-3C2B7D187FE7.jpeg
    127.5 KB · Views: 273
Sponsored Links
Existing fitting requires an earth connection, it has been installed incorrectly.

Unless the wiring is ancient, there should be some earth connections there, either under that mess of yellow tape or cut off by the previous blunderer who installed the light fitting.
 
Existing fitting requires an earth connection, it has been installed incorrectly.

Unless the wiring is ancient, there should be some earth connections there, either under that mess of yellow tape or cut off by the previous blunderer who installed the light fitting.

The house is 100+ years old, so the wiring may well be ancient. Is there any way to tell? I’ve attached a pic of consumer unit…
 

Attachments

  • E7FB83E5-461C-498E-A7AA-6C991C4664B1.jpeg
    E7FB83E5-461C-498E-A7AA-6C991C4664B1.jpeg
    295.9 KB · Views: 228
  • 5D372398-B8D8-499F-98F6-B7F135394110.jpeg
    5D372398-B8D8-499F-98F6-B7F135394110.jpeg
    396.6 KB · Views: 221
  • 2D552656-9DAF-4994-B0BD-91E000776F40.jpeg
    2D552656-9DAF-4994-B0BD-91E000776F40.jpeg
    487 KB · Views: 215
Switch off the supply, remove the yellow tape and see what is there.

That cabling is PVC so is nowhere near 100 years old.

Consumer units are a mess and in need of replacement.
 
Sponsored Links
Existing fitting requires an earth connection, it has been installed incorrectly.

Unless the wiring is ancient, there should be some earth connections there, either under that mess of yellow tape or cut off by the previous blunderer who installed the light fitting.
However if there is bodgery in one place there is likely to be bodgery in others. I would not want to rely on an earth wire in such an installation without testing it was actually connected back to the CU.
 
However if there is bodgery in one place there is likely to be bodgery in others. I would not want to rely on an earth wire in such an installation without testing it was actually connected back to the CU.

How do I test it is connected back to CU?
 
The method used by most electricians is the loop impedance meter, to trip a B6 MCB it needs 5 x rated current plus 5% to allow for volt drop so 7.28Ω Max the other method is a low ohm meter which must use at least 200 mA to do the test so it will be 7.28 - supply earth loop impedance so around 6.9Ω Max.

Until 1966 it was permitted to have lighting without an earth, however before 1966 the use of rubber insulated cable was common, which by now is well past its use by date, so there are very few properties today still with pre 1966 wiring. There are a few where separated extra low voltage (SELV) wiring has been reused for low voltage not complying with regulations without an earth, i.e. G5.3 MR16 lamps swapped for GU10.

In the main the DIY guy does not have the equipment to do his own inspection and testing, so in theory he should not be doing electrical work, we all know he does, but since he should not do it, there are no procedures laid down as one would expect on how to DIY without test equipment.

It seems you have two lighting supplies, one with and one without RCD protection, although you can still get a shock with a RCD protected circuit where it is RCD protected the risk is reduced, and if you use all double insulated lamps and switches the risk is low, but other wise it will be cheaper to get an electrician to test for you to buying the test equipment to DIY.

Thanks Eric. So is this consensus here that the current fitting has been done incorrectly. If there is an earth wire amongst the yellow tape then it is possible to fit the new light, however the safety might be questionable. Alternative option is to get a double insulated fitting.

Also, I need to get get an overall health check on the state of the wiring? Is that what I’d ask for?
 
hi flameport. I finally got the yellow tape off and there looks to be some exposed wires, is this my earth? Pics attached


Switch off the supply, remove the yellow tape and see what is there.

That cabling is PVC so is nowhere near 100 years old.

Consumer units are a mess and in need of replacement.
 

Attachments

  • 2890A8F0-0863-4688-9FAD-040D65CDA257.jpeg
    2890A8F0-0863-4688-9FAD-040D65CDA257.jpeg
    217.7 KB · Views: 163
  • EA7C5A48-B371-4E44-8428-9BEE45365747.jpeg
    EA7C5A48-B371-4E44-8428-9BEE45365747.jpeg
    222.4 KB · Views: 161
  • D0611C9C-3E4B-4E30-A37C-DE2F2B6844AA.jpeg
    D0611C9C-3E4B-4E30-A37C-DE2F2B6844AA.jpeg
    218.3 KB · Views: 180
So I have took the yellow tape off which has revealed some exposed copper wires. Could these be my earth?
 

Attachments

  • 63C831D7-0323-453B-8E84-8427350E9638.jpeg
    63C831D7-0323-453B-8E84-8427350E9638.jpeg
    217.7 KB · Views: 81
  • B84D6671-2683-4FEF-9DEC-755FA201A28A.jpeg
    B84D6671-2683-4FEF-9DEC-755FA201A28A.jpeg
    222.4 KB · Views: 108
  • 9D925B30-210B-4C46-82FF-92E7DFD73AA2.jpeg
    9D925B30-210B-4C46-82FF-92E7DFD73AA2.jpeg
    226.1 KB · Views: 81
Those do indeed look like earth wires and at least they are joined together albiet not in an approved way.

I'd still want to test continuity back to the main earth terminal and/or an earth on a different circuit before relying on it though.
 
I had same problem, previous owner had bodged a ceiling rose in our outhouse (first one from consumer unit!) so all downstairs lights and switches had no earth.

Only realised when we fitted metal fronted light switches (nice 70v ac across those!).

I pulled down every downstairs rose and inspected wiring, checked continuity to earth using the plug socket earth's and a multimeter.

It's a radial circuit so a break of earth in any of the ceiling roses will affect all the ones after that.

Don't assum you have a good earth!.

I checked all upstairs too (continuity between socket earth and light switch face screws), luckily bodgers hadn't been working upstairs.
 
thanks Keith.

I’ve had look online and it’s not completely clear. please could you talk me through how I would test the continuity of the earth in this instance? Assume I need to get myself a multimeter?

I had same problem, previous owner had bodged a ceiling rose in our outhouse (first one from consumer unit!) so all downstairs lights and switches had no earth.

Only realised when we fitted metal fronted light switches (nice 70v ac across those!).

I pulled down every downstairs rose and inspected wiring, checked continuity to earth using the plug socket earth's and a multimeter.

It's a radial circuit so a break of earth in any of the ceiling roses will affect all the ones after that.

Don't assum you have a good earth!.

I checked all upstairs too (continuity between socket earth and light switch face screws), luckily bodgers hadn't been working upstairs.
 
Use the Top pin of your Plug Socket (or just the mounting screw) on one lead of the multimeter, use the other lead to test the earth of your light fittings (on the actual fitting itself, or the earth wire joint inside (normally a bundle of 3 bare wires hopefully with a bit of green/yellow sheath.

Put multimeter in resistance mode (or forward diode test with the beep) and check the reading.

OL or a very high number means NO earth continuity, and problems.

A low number (2 ohms or less) means you have a good earth, ideal 1 ohm or less.

So to recap you are grounding one lead on the plug socket mounting screw or top pin, you are then using the other lead to check the ground on the ligh fittings and switches.

I'd check all ceiling rose earths and all switch front screws (proves the back box is earthed).

You'll need a long length of wire. 2 people is easier as one can hold on the socket face screw and one on the ladder.

Turn light circuit off first mind!.
 
this is great thanks Keith.

Use the Top pin of your Plug Socket (or just the mounting screw) on one lead of the multimeter, use the other lead to test the earth of your light fittings (on the actual fitting itself, or the earth wire joint inside (normally a bundle of 3 bare wires hopefully with a bit of green/yellow sheath.

Put multimeter in resistance mode (or forward diode test with the beep) and check the reading.

OL or a very high number means NO earth continuity, and problems.

A low number (2 ohms or less) means you have a good earth, ideal 1 ohm or less.

So to recap you are grounding one lead on the plug socket mounting screw or top pin, you are then using the other lead to check the ground on the ligh fittings and switches.

I'd check all ceiling rose earths and all switch front screws (proves the back box is earthed).

You'll need a long length of wire. 2 people is easier as one can hold on the socket face screw and one on the ladder.

Turn light circuit off first mind!.
 

DIYnot Local

Staff member

If you need to find a tradesperson to get your job done, please try our local search below, or if you are doing it yourself you can find suppliers local to you.

Select the supplier or trade you require, enter your location to begin your search.


Are you a trade or supplier? You can create your listing free at DIYnot Local

 
Sponsored Links
Back
Top