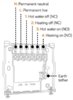
The EP2002 is a bit unusual because it is a Programmer and Wiring Centre combined. The terminals A B C & D are just terminals provided for convenient use by the installer. They are simply used to connect wires together and are not connected to the programmer functions.
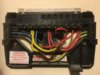
Your biggest problem is that the Hive does not have this 'junction box' facility to accommodate so many wires. To get around this, I would normally sink a single gang flush mounting socket box in the wall behind the programmer to house some additional new terminals used to replace them. If it's a metal socket box don't forget to connect it to earth.
The Hive backplate can then simply be screwed onto the socket box.
Stage 1 Install the Nest Receiver
N and L are straightforward they are the same for the Potterton and the Hive.
All of the wires that are in the block on the top far left of the EP2002 marked 'N' are Neutrals and should remain connected together and connected to the Hive 'N'
Top far right green / yellows are the earths. They should be connected together in the Hive earth tether, (with a new wire connected to any metal socket box if applicable)
The two yellow wires that are in C should also be connected together in a separate terminal as they are now
There looks to be a solitary? blue in D. If so that should be terminated separately also.
A and B look to be unused.
The link between L and 5 on the EP2002 does not need to be retained, this connection is made internally by the Hive
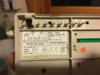
Potterton Terminal 3 is the 'Hot Water On' which corresponds nicely to Hive terminal 3 'Hot Water Call for Heat'
Potterton Terminal 4 is the 'Heating On' which corresponds nicely to Hive terminal 4 'Heating Call for Heat'
Some systems (Y Plan with a 3 port motorised valve) require a connection to the EP2002 terminal 1, but I don't see one in your photo so will ignore it. if there is one please say so.
I can't see if the EP2002 switch is set to 'pumped CH / gravity HW' or 'fully pumped' The Hive standard setting is 'fully pumped' but it can be set to 'pumped CH / gravity HW' if your system is such.
Stage 2 Remove the Existing Thermostat
Because the Hive carries out the functions of the room thermostat, the old wired thermostat needs to be decommissioned to prevent it overriding the Hive. It can't simply be disconnected as this would leave the heating wiring 'open circuit' and it will not operate. The thermostat can be decommissioned in three ways, in order of preference, they are.
1. Find the origin of the thermostat cable and disconnect it. Then link the terminals where the two switching wires were connected to together
2. Remove the existing thermostat and replace it with a junction box, connect the two switching wires together and isolate the neutral (if there is one)
3. Leave the existing room thermostat in place and set it to the highest setting. (Or put both of the switching wires in 'L' terminal)
If you need any further assistance with this, post back details of your existing thermostat make / model and what wires are connected to which terminals.