Potterton EP2002 to Hive Active heating and hot water

Joined
11 Nov 2016
Messages
4
Reaction score
0
Country
United Kingdom
Hi everyone

First time poster and DIY enthusiast.
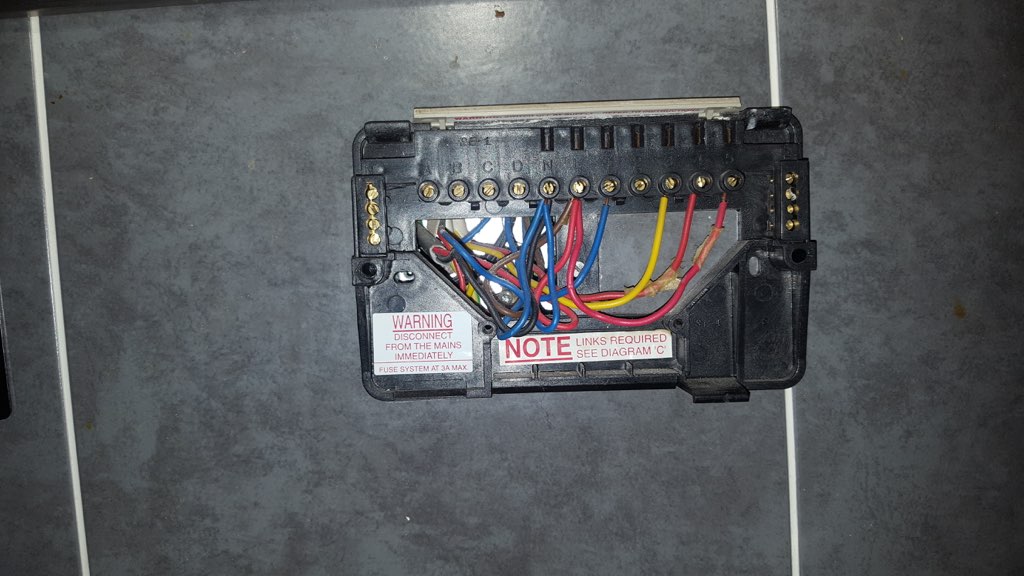
I'd like to install a hive heating system to replace a Potterton EP2002 programmer.

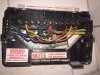
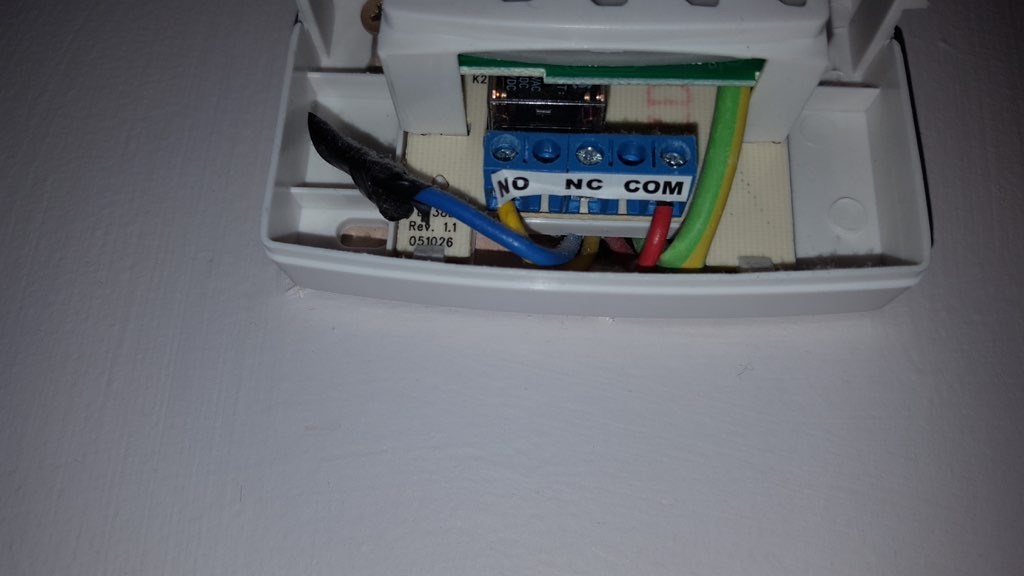
The EP2002 back box looks quite daunting with loads of wires - nearly put me off the idea of doing this myself.

I'm looking for advice on how to install the Hive Active heating and hot water system.

Any help is very much appreciated.

Photos attached include:
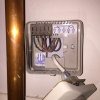
Programmer back box (EP2002)
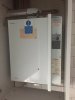
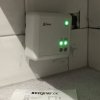
Boiler (Potterton Suprima)
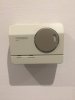
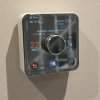
Room stat (Potterton PRT2)
 

Attachments

  • IMG_1713.JPG
    IMG_1713.JPG
    212.2 KB · Views: 7,906
  • IMG_1716.JPG
    IMG_1716.JPG
    76.6 KB · Views: 2,693
  • image.jpg
    image.jpg
    63 KB · Views: 3,079
Sponsored Links
The wiring is the easy bit, but you may have problems fixing the hive receiver back to the wall as it will not cover the existing 2gang back box. You will probably have to swap the back box for a 1gang box, then fill in the gap that is left, or mount the hive on a 2gang blank plate fitted over the existing box is one other option. Can you currently select heating and hot water separately?

This programmer was designed to double as a wiring centre, so you will have to join some of the additional wires in some extra connector blocks and tuck them into the back box. The terminals N, L, 3 and 4 are the same for the old programmer and the hive. The link from L to terminal 5 is no longer needed as it is made inside the hive. The wire going out of terminal 5 will go with the other wires in L. The 2 wires in B connect together in a connector block, the 2 wires in D connect together in a separate connector block. All the wires in the N terminals go to N on the hive, the terminals in the hive are only designed to take 2 wires I count 3 live and 3 neutral wires, these should be fitted into 2 connector blocks with a wire coming out of each one to the hive, one for live one for neutral.

The next part is finding where the room thermostat is wired back to, (probably near where the heating valve is) disconnecting the cable and putting a link between where the room stats live and switched live were connected.

I took longer to type this than to do it, if you are not confident, call a decent electrician or heating engineer who will be able to do it for you.
 
Sponsored Links
Ha I saw it earlier but didn't have time to reply. Thanks for saving me having to type all that.
 
Echo thanks for the detailed response - very thorough and clear even for a novice like me!

Yes I can currently select hot water and heating seperately with the EP2002. - But I haven't checked that it actually only turns on the one I selected.

I'll give it a go with installing the hive and report back how I get on.

Thanks again!
Dan
 
Echo can I run a quick question by you?

The 4 wires (2 light blue and 2 dark blue) that can be seen on the far left of the controller - these are also marked as N at the top.

Just to check - Are they internal wires that should be connected together in a connector block and tucked away with none of these wires going to the hive system?

My hive system is arriving tomorrow so will be attempting the install then.

Thanks
Dan
 
Thanks for everyone's advice.

The hive system is now up and running! (Pictures attached).

I have one more question as I'm not sure if one further step is required to complete the instal.

Next to my hot water tank there is an additional stat, looks like it just controls the hot water tank. Pictures are attached. Do I need to do anything with it?

Thanks!
 

Attachments

  • IMG_1766.JPG
    IMG_1766.JPG
    89.4 KB · Views: 1,656
  • IMG_1765.JPG
    IMG_1765.JPG
    112.4 KB · Views: 1,810
  • IMG_1768.JPG
    IMG_1768.JPG
    95.2 KB · Views: 1,579
  • IMG_1769.JPG
    IMG_1769.JPG
    68.2 KB · Views: 1,529
Hi All, first time posting here. Reading this post gave me the confidence to attempt the install of my new Hive today and I have hit a stumbling point. I would really appreciate a pointer or two. I hope you dont mind me adding to this post.

I have the same Potterton EP2002 but with less wires attached. See image1.
I added each wire connected to the relevant Hive label using blocks as advised where I have 3 wires into the Hive.

When I reconnected the power, the test to push the CH button on the Hive boiler control worked, the boiler fired up. This was with old stat in the lounge still connected.

After I have disconnected the old stat and added the new Hive Stat, all the Hive stuff looks great and I can fire the hot water and the boiler kicks in. However, when I try to turn on the CH by increasing the temp, the Hive boiler connector registers that the CH is on but the boiler doesnt fire up.

I think it's something to do with the advice Echo gave regarding the stat connection.
The next part is finding where the room thermostat is wired back to, (probably near where the heating valve is) disconnecting the cable and putting a link between where the room stats live and switched live were connected.

All I have done is disconnect the stat wires (NO & COM) (connected here in image2) from the old stat and safely blocked them out separately and sat them inside the wall. Have I missed a step or done anything stupid? It wouldnt be the first time! I have not added a link anywhere, I am a bit confused.

Thanks for your advice...

Oh, and I also have a connection to terminal 1 from the potterton, unlike Dan so I have connected that to the Hive term 1 too. I hope that is correct.

 
All I have done is disconnect the stat wires (NO & COM) (connected here in image2) from the old stat and safely blocked them out separately and sat them inside the wall. Have I missed a step or done anything stupid? It wouldnt be the first time! I have not added a link anywhere, I am a bit confused.
You need to find the junction box where the heating wiring goes back to, as said it will almost certainly be right near the 3 port valve, disconnect the old room thermostat cable and fit a link in it's place. If you post a clear photo of the wiring we can tell you what goes where.

Oh, and I also have a connection to terminal 1 from the potterton, unlike Dan so I have connected that to the Hive term 1 too. I hope that is correct.
Yes that's correct, it's the hot water off signal required for Y Plan systems.
 
Ah, thanks so much for the prompt reply, I really do appreciate it. I will see if I can spot the location of the junction box. I think there is one in my airing cupboard.

Thanks again.
 
OK. I have this junction box in the airing cupboard. All the right hand terminals are the pump, 3 port valve and the tank thermostat.

Image3.jpg

Is this enough to go on?

Thank you.
 
Yes, disconnect the red yellow and blue wires from the same cable as the yellow circled, and shove them safely out of the way in one of the unused terminals. Then move the white wire from the valve, into the next terminal up, the one that currently has 2 red wires in, but when you disconnect the room stat cable there will be only one red in the terminal.
Image3 heat.jpg
 
Last edited:
Thank you SO much.

It is all working very nicely now. I really would not have known what to do without your clear instructions. I know you did say "get help if not confident", so I'm much obliged (and so is my wife who was getting a bit edgy for a moment with all the bits everywhere :))

New wire layout attached for any others that come across this post.

Cheers again.
 

DIYnot Local

Staff member

If you need to find a tradesperson to get your job done, please try our local search below, or if you are doing it yourself you can find suppliers local to you.

Select the supplier or trade you require, enter your location to begin your search.


Are you a trade or supplier? You can create your listing free at DIYnot Local

 
Sponsored Links
Back
Top