Problems with leaking shower, any advice appreciated!

Joined
11 Nov 2008
Messages
53
Reaction score
0
Location
Lincolnshire
Country
United Kingdom
Hello everyone,
I'm hoping someone will be able to advise me on this.

Several months ago the shower unit began to cause us some problems in that water was dripping into the kitchen directly below. I found a similar problem on this site and I followed the advice given; removed all the sealent from around the edge of the tray and replaced it, likewise around the waste. I put a couple of heavy items in to simulate weight when one of us was actually showering as suggested. Everything seemed fine for a couple of weeks but then it happened again.

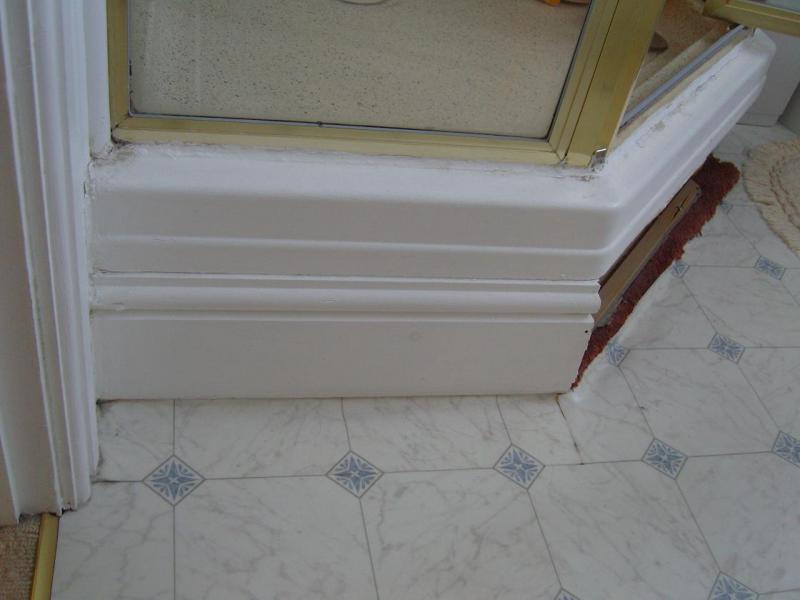
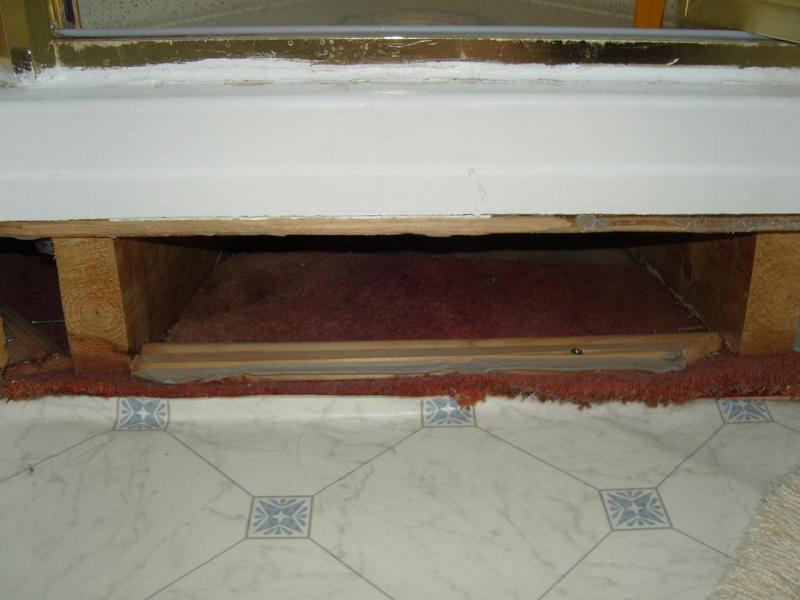
So, I then removed the skirting to look under the tray. The whole unit has been built above the floor and is held up by two large supporting blocks of wood on top of which is a sheet of hardboard and then the shower tray on top of that. I think that there is a gap between the hardboard and the base of the shower tray, but I can't confirm without taking the whole unit apart.

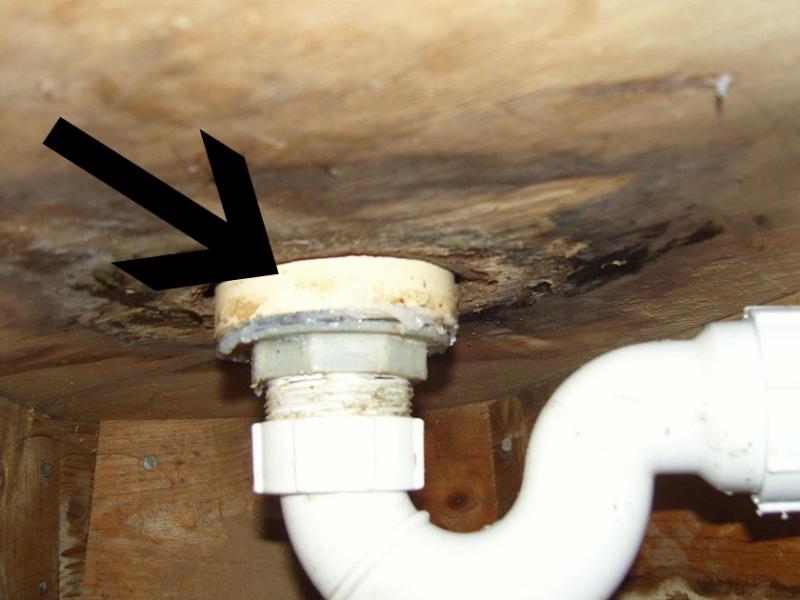
After taking the skirting off I discovered that the problem was that some idiot, had simply shoved one bit of plastic pipe up another bit of, slightly larger, pipe and this is what passed for the trap!
Oh, how we laughed... Err, well no, actually. So, off to the local builders merchant where they didn't have a shallow trap. Off to toolstaion where they did but of the wrong size. Luckily a new B&Q had (almost literally) just opened and we managed to find a shallow trap that would fit the existing waste and was shallow enough to fit between the base of the tray and the floor. Excellent!

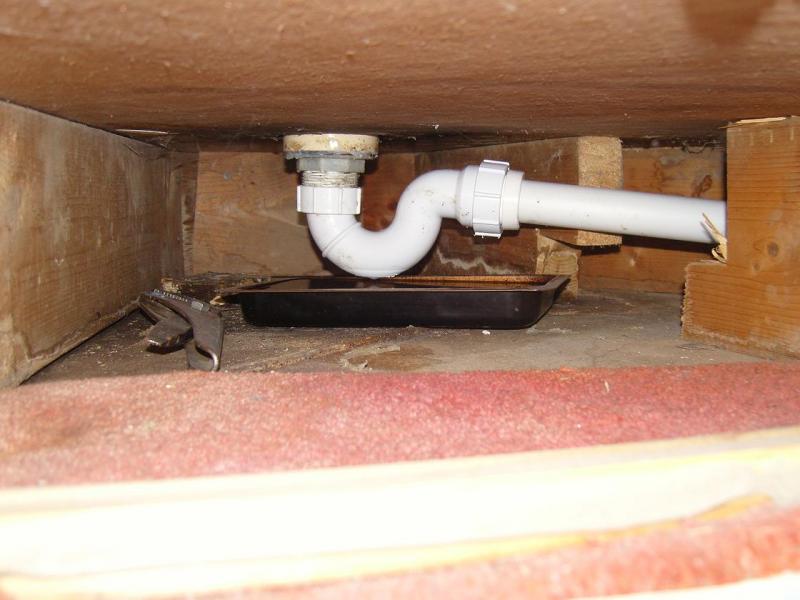
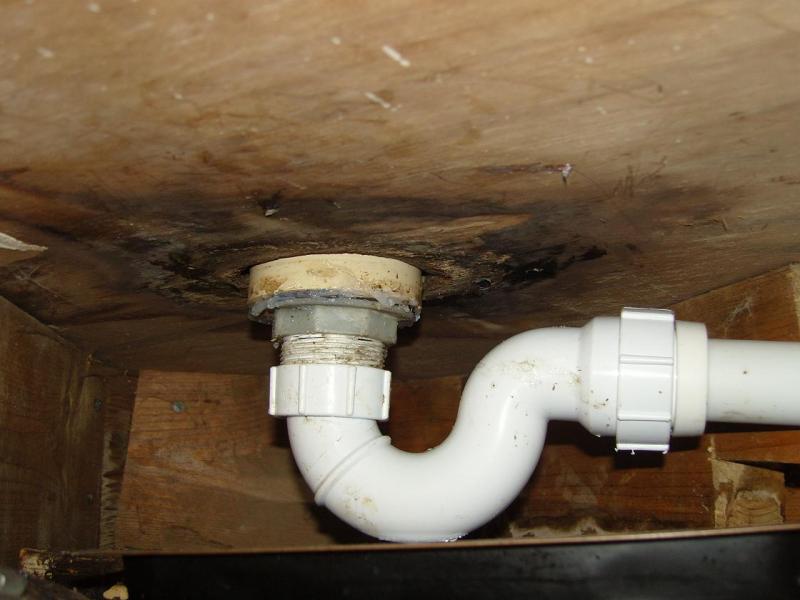
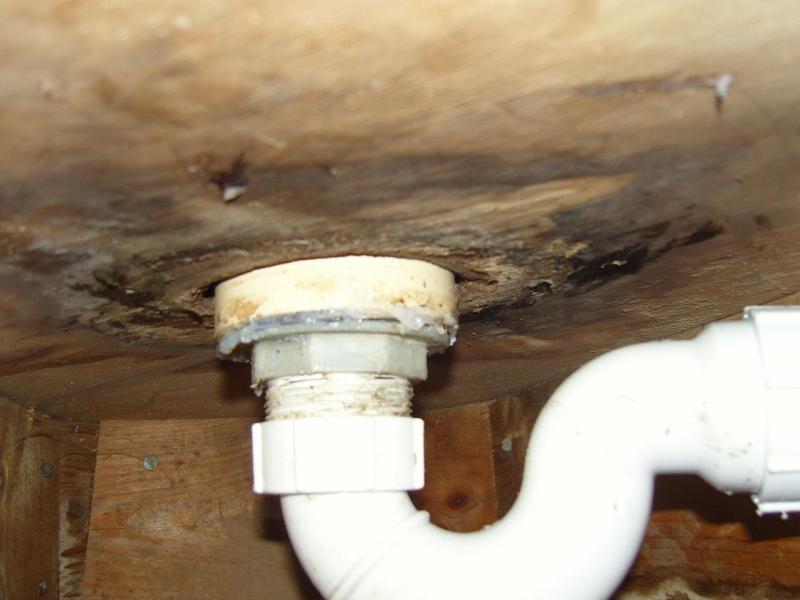
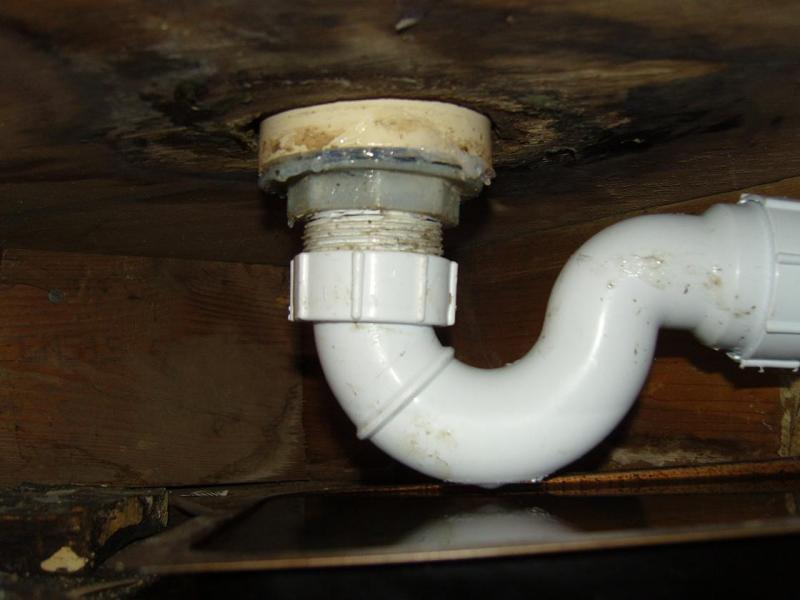
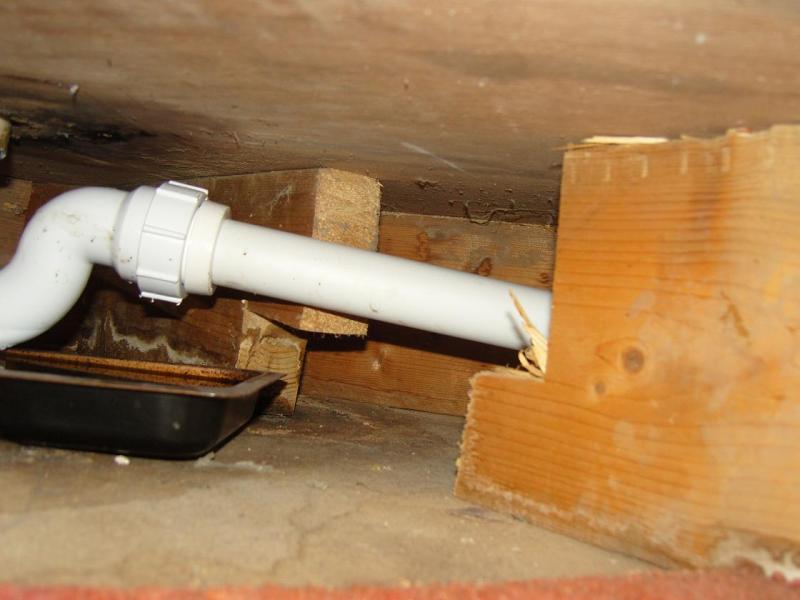
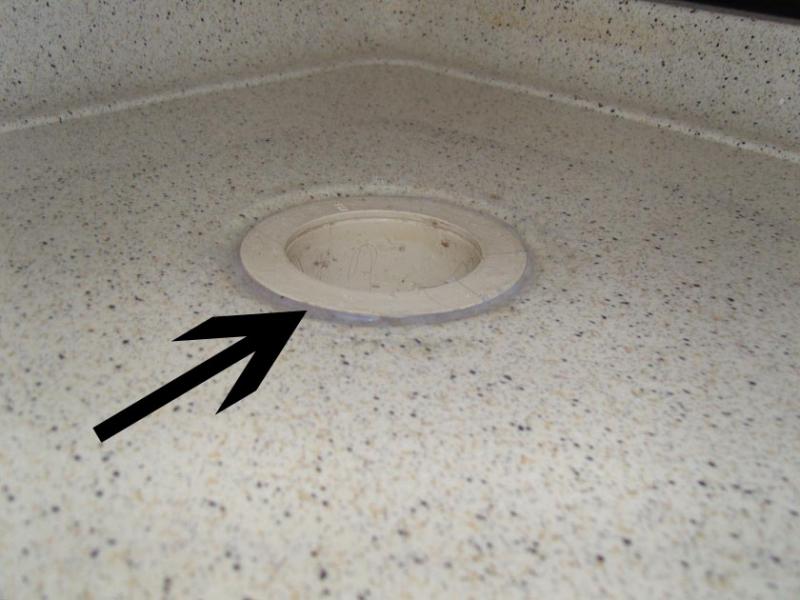
Fast forward a couple more weeks, leaking again! This time, not from the trap, but from somewhere else I wasn't sure of. Re-sealed all possible bits. Held for a few more weeks until I discovered that it was again leaking this time from a bit that... Oh, this may be difficult to explain. OK, you know in most shower units the waste is level with the base? Well, in this one it sort of drops down. So there's a tube, as it were, with a neck that's level with the tray, but the actual waste in dropped down by about 3". Hope that makes sense? So, I found that it was leaking from that bit. I assume water was getting under the "neck" part and running down the outside of the tube, which is where it was dripping onto the floor... again!

Out with the sealant again. This time I decided to have a proper nose under the "neck" and found that the rubber washer had perished. I did try and get the tube bit out, but it wouldn't come. It's got a screw thread on it but doesn't actually screw onto anything. So, as I couldn't remove it I just had to seal it again as best I could. It seemed to be working fine until the day before yesterday when it was dripping through the kitchen ceiling again.

So, that's it. I have now come to a stand still and I have no idea what I should do next. I was hoping someone on here would have some ideas about where I'm going wrong! Would it be possible, for instance, to buy the right side rubber washer and stretch it across the "neck" to get it in place? Not ideal, but since I can't remove it I don't know how else to get a washer in place. Is there a recommended brand of sealant that I would be better off using? Should I just take the whole lot down and chuck it out the bathroom window? Any advice would be greatly received!

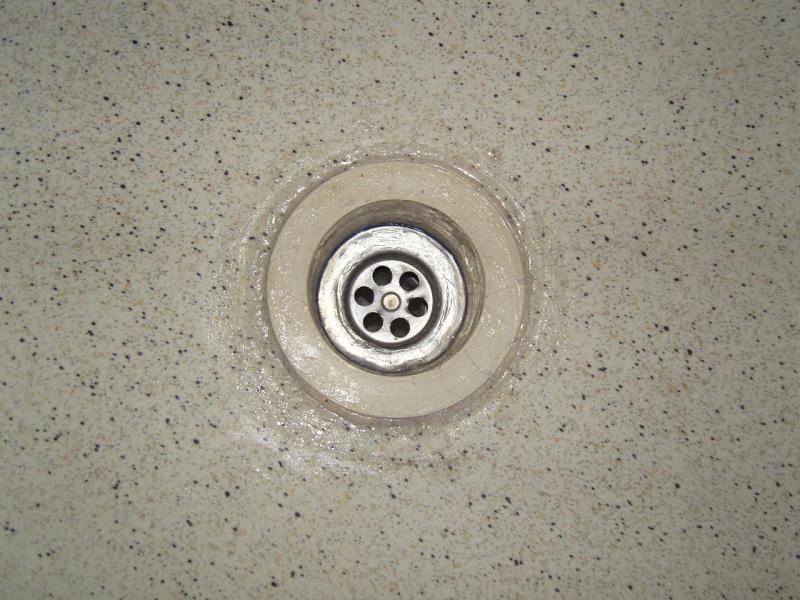
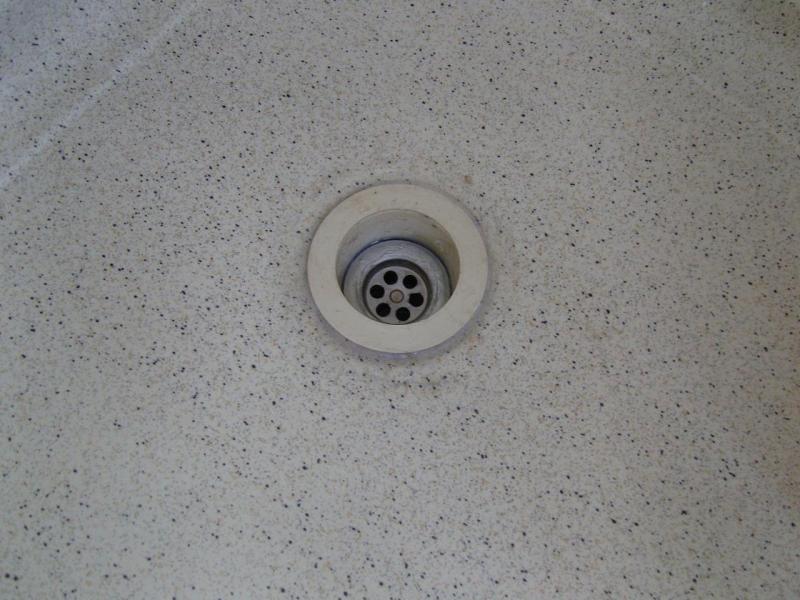
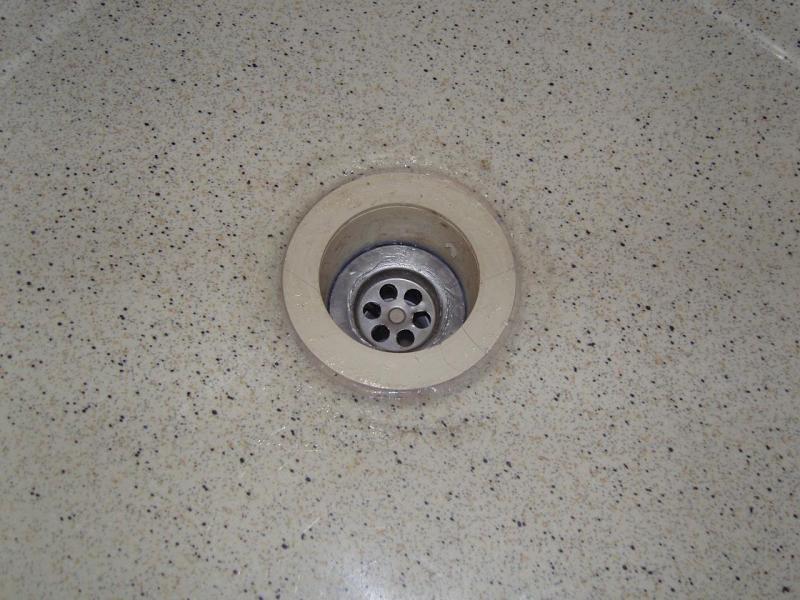
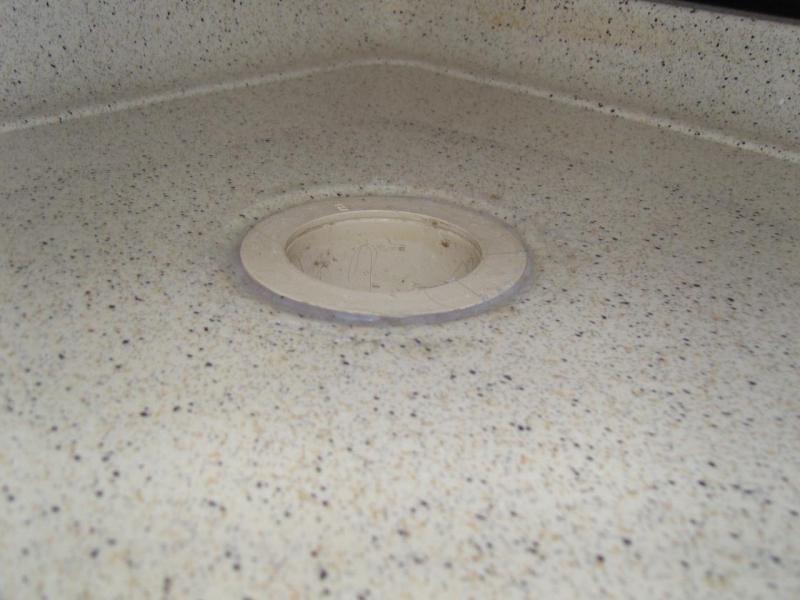
I can upload some pictures of the shower-tray-from-hell if that'd help?

Many thanks in advance,
Ex.
 
Sponsored Links
Ok, here you go:


As you can see from the pictures taken underneath the tray, the waste pipe and trap are not quite level. I've tried to level it by cutting a bit off the pipe that leads away from the trap, but it still ends up wonky.

I've taken a couple of pictures of the skirting so you can see how it's been installed.

We think it's been leaking for years; my mum moved into this house in 2002 and, apparently, the owner before last was a big DIY fan; I'm assuming, in his case, that the acronym actually stands for, "Distroy It Yourself" due to the amount of problems we've had to correct since my mum moved in. Anyway, you might be able to see where water's seeped up the wood risers and you can certainly see it around the waste on the hardboard. It's just a nightmare.

I have to say that I've been a touch liberal with the sealant! I've only got short arms and it's been really difficult trying to seal under the tray which is why it's looking a bit shabby. :oops:
 
Thanks for the pics.

Woudl it be possible to mark on the photos where you think to water is getting out, your description is a little confusing.

Cheers
Rico
:cool:
 
Sponsored Links
get rid of all that mess including the tube measure the diameter of the hole in the tray. and fit a descent shower waste looking at it you might get away with a 90mm waste.
 
Thanks for the pics.

Woudl it be possible to mark on the photos where you think to water is getting out, your description is a little confusing.

Cheers
Rico
:cool:

OK, I have pointed to where I think the water's coming from. From underneath it seems to be running down the outside of the tube bit. From the top I think it's getting under the lip where I've indicated. Hope this helps! I find it confusing enough so I can see why it's not coming over as well as I'd hoped.


get rid of all that mess including the tube measure the diameter of the hole in the tray. and fit a descent shower waste looking at it you might get away with a 90mm waste.

That is an option I have considred but it's not as easy done as said. The tube is quite large and I cannot find anything to replace it. Besides, I'd be back to square one as I'd just have to fit an identical tube part. As I said before I can't even remove it and I think if I forced it out I'd end up breaking the tray and I really don't want to do that! There's no way we could find an identical tray and even if the Gods smiled on us and we did somehow find one we couldn't afford it! So, unfortunatley, we have to work with what we have.
 
As serco says you best start from scratch.

Some how you will have to get the waste out and perhaps clean it all up and make sense of what you have got. Perhaps then you could take it to a good plumbers merchant who could advise an alternative new trap etc.

The board the tray is sitting on will have flexed at some point braking the seal. As water finds its way into the 'hardboard' it will have weaken any strength it had. If successful in resetting existing trap you will need to introduce some strength and support under the tray, to stop it flexing again, especially around the trap where it has got wet. More timber joists/bearers as already under there, wedging them in.


From the photo, you may get one of those rubber band gripping tool thingy (Boa constrictors?) around the pipe to undo it. although I suspect it has been glued on :rolleyes:
 
OK, think I need to reitterate a few points:

1) The trap is new; it's what I bought from B&Q and what I put on. Before that it was just 1 pipe shoved onto the waste one end, elbow joint the other, no trap at all. The trap seen in the pics is fine and there's no leaking from the connection either to it or from it.

2) It's not glued on at all. There's some sealant that's squeezed through from resetting the waste. That's what you can see in the picture. The reason it looks iffy is that I've had it on and off at leat 4 times so far and I have great difficulty reaching it so it's getting a bit scuffed.

3) The waste is original, but is in pretty good shape.

4) I cannot replace the tube part as it would leave a hole far bigger than any replacement waste I could get. And that assumes I would be able to remove the tube, which I can't without cracking the tray.

I know my original post was quite long but I wanted to make it clear what had been done. I have covered everything in it so please do read it so you don't waste your time advising me of something I've already done. :D I don't wish to be rude, but it's quite frustrating for both parties!

So, other than the above, are you suggesting I put more supporting struts under the already ruined hardboard? I'm just unsure what you mean by, "The board the tray is sitting on will have flexed at some point braking the seal" What seal would that be? The one around the tube part? Or is there another seal under the tray that I'm unaware of?

I have considered just taking the whole unit down in order to rebuild it properly, but this is a big job and it's a last resort really.
 
It looks to me that the chrome screen of the waste is to small, it should be large enough to go across the white plug. Looking down the hole you can see the edge of the black seal that is also seen from the underneath with the nut bearing on it but the nut doesn't appear to have anything to bear on, its not bearing on the tube you say the leak is coming from, it all just appears to be held in place by silicon.
 
That is an option I have considred but it's not as easy done as said. The tube is quite large and I cannot find anything to replace it. Besides, I'd be back to square one as I'd just have to fit an identical tube part. As I said before I can't even remove it and I think if I forced it out I'd end up breaking the tray and I really don't want to do that! There's no way we could find an identical tray and even if the Gods smiled on us and we did somehow find one we couldn't afford it! So, unfortunatley, we have to work with what we have.

stop mucking about.
measure the tube undernearth the tray that will give us an idea the size of the hole in the tray.

how would you be back to square one with fitting another tube ?
you don't need a tube the waste will screw straight to the tray.

RN_68_MN.gif
 
It looks to me that the chrome screen of the waste is to small, it should be large enough to go across the white plug. Looking down the hole you can see the edge of the black seal that is also seen from the underneath with the nut bearing on it but the nut doesn't appear to have anything to bear on, its not bearing on the tube you say the leak is coming from, it all just appears to be held in place by silicon.

Yeah, the whole thing's just stupid really. I'll try and explain in more detail how the whole thing fits together:

There's a large hole in the tray. Into which is placed a tube with a lip. Under the lip there was, and should be, a rubber washer. This was then sealed with silicone sealant.

Inside the tube, near it's base, is a silicone ring. This is intigrated into the tube.

On this silicone ring, inside the tube the chrome waste sits. The chrome waste has an intigrated black rubber washer (which is what can be seen in the picture). It is not removable from the waste itself.

Moving under the tray now. You can see the thread of the chrome waste. Onto this thread fits another large, rubber washer. This and therefore the waste itself, is held in place by a plastic nut. Obviously, if one tightens the nut too much it'll just pull the waste through the silicone ring on the inside of the tube.

The trap then connects directly to the end of the chrome waste.

But, having said that, I must agian point out that the leak is not coming from this arrangement; it is coming under the lip of the tube and running down the outside of the tube, not the inside.

stop mucking about.
measure the tube undernearth the tray that will give us an idea the size of the hole in the tray.

how would you be back to square one with fitting another tube ?
you don't need a tube the waste will screw straight to the tray.

RN_68_MN.gif

I think I can see where you're getting confused here; you're assuming that the tray is flush with the hardboard and, as I've previously said, there is a gap between the base of the tray and the hardboard. Let me see if I can explain:

Assuming you've read my explanation of the way all the parts fit together (see above) you will notice I say that the waste sits on a silicone ring which is inside the tube. This basically means that the top of the waste is level with the bottom of the hardboard. Do you follow? Assuming that this is the case, the trap you pictured will not fit; it's thread is not long enough. It will not, as you say, screw straight to the tray. I know because we looked at trying that as an option and it simply will not fit. Unless you can buy one that has a five or six inch thread. If you do please let me know and I'll be happy to try it!

And believe me I am certainly not "mucking about". I've been attempting to fix this for several weeks and, frankly, I'm getting sick of doing it. I do appreciate people taking the time to reply, but please remember that I'm not a professional plumber; if I were I wouldn't be asking for help here.
 
right i see
how much gap roughly would you say between bottom of tray and the wood base ?
and diameter of the hole or that tube ?
 
I know my original post was quite long but I wanted to make it clear what had been done. I have covered everything in it so please do read it so you don't waste your time advising me of something I've already done. I don't wish to be rude, but it's quite frustrating for both parties!

You are not being rude, but in my defence, I've only been on the case 4 minutes, whilst you have been on the case a few weeks. It takes time for things to sink in, my little brain cells aren't up to what they once were. :rolleyes:
 
right i see
how much gap roughly would you say between bottom of tray and the wood base ?
and diameter of the hole or that tube ?

Excellent! Just measured it and it's about 13.5cm (figured this'd be easier than inches) from board to floor. That's not an exact measurement as there's a piece of carpet (don't even ask, I don't know!) there, so maybe add another cm or so?

The inside diameter of the tube is 7.5cm. I can't get underneath to measure the hole in the board, but it's slightly larger.

Serco would something like this be nearer to what the OP is after.

This was for the wet room aqua deck. Still neads careful sealing.

http://www.heatandplumb.com/acatalog/Trap_a_dapta_1_with_Solos_Shower_Trap_-_Vertical.html[/QUOTE]

That looks like it might work if it's available in a shorter depth?

You are not being rude, but in my defence, I've only been on the case 4 minutes, whilst you have been on the case a few weeks. It takes time for things to sink in, my little brain cells aren't up to what they once were. :rolleyes:

My apologies; it's been a bit of a pig this shower and it's so frustrating trying to get it fixed. I feel like I've been working on it forever!
 

DIYnot Local

Staff member

If you need to find a tradesperson to get your job done, please try our local search below, or if you are doing it yourself you can find suppliers local to you.

Select the supplier or trade you require, enter your location to begin your search.


Are you a trade or supplier? You can create your listing free at DIYnot Local

 
Sponsored Links
Back
Top