

Hi guys
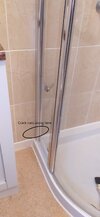
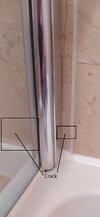
I've recently noticed a hairline crack in the tile of my quadrant shower cubicle, which is unfortunately behind the cubicle frame which means that if I want to fix it properly, I'll need to dismantle the whole shower. I'm not sure if it is a recent crack caused by a little un (or even big un), or if it has been there unnoticed since we recently moved in, or if it is caused by something else (water ingress from elsewhere).
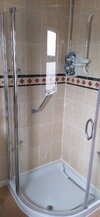
It looks fairly straight-forward to dismantle (remove the screw/bolt on top of the door hinge; remove the door; unscrew the arms supporting the glass pane; remove glass pane which should then provide access to the frame screws; unscrew frame), but I'm unable to identify the model/name of shower cubicle, so haven't been able to source the installation instructions on-line. There's no writing on any bits of the frame, and the only writing on the glass is to indcate that it's toughened glass. Google image search hasn't revealed anything. I may be overthinking it by trying to find the installation instructions, but I just want to make sure that I'm doing it properly and not missing any crucial steps out.
I think it's a fairly old model given that the previous owners (v elderley) don't recall when it was installed, and the electric shower unit appears to have been discontinued over 15 years ago.
Having read about this on this forum, I'm now aware of weep holes in showers - I noticed that it was all sealed up on the inside, which I understand can lead to water ingress so I started to remove some at the bottom (where you can see the gap in the closesup) to see if any water ran out after passing some where the glass pane meets the frame, however nothing ran out so I suspect it should be resealed. Incidentally, I did also remove some sealant running up the inside of the frame beside the crack to check if I could see any obvious gaps where water could seep through, but it seemed ok.
Does anyone recognise this model of shower by any chance? Alternatively, do you think I could get away with plugging the crack with sealant or waterproof epoxy and monitoring (as I've seen in a few posts here)? I already have a million and one jobs to do in the house, and I've been told in no uncertain terms that I don't have the time to be dismantling the shower in order to fix something that may not even be a problem, but I would also like to fix this properly...
Thanks for listening to my ramblings
Edited to add: for those concerned, electricity to the shower has been cut off at the consumer unit. The solenoid valve developed a leak, so it's looking as though it'll be cheaper to buy a new one (many Triton showers have similar footprints) as opposed to fixing it.
I've recently noticed a hairline crack in the tile of my quadrant shower cubicle, which is unfortunately behind the cubicle frame which means that if I want to fix it properly, I'll need to dismantle the whole shower. I'm not sure if it is a recent crack caused by a little un (or even big un), or if it has been there unnoticed since we recently moved in, or if it is caused by something else (water ingress from elsewhere).
It looks fairly straight-forward to dismantle (remove the screw/bolt on top of the door hinge; remove the door; unscrew the arms supporting the glass pane; remove glass pane which should then provide access to the frame screws; unscrew frame), but I'm unable to identify the model/name of shower cubicle, so haven't been able to source the installation instructions on-line. There's no writing on any bits of the frame, and the only writing on the glass is to indcate that it's toughened glass. Google image search hasn't revealed anything. I may be overthinking it by trying to find the installation instructions, but I just want to make sure that I'm doing it properly and not missing any crucial steps out.
I think it's a fairly old model given that the previous owners (v elderley) don't recall when it was installed, and the electric shower unit appears to have been discontinued over 15 years ago.
Having read about this on this forum, I'm now aware of weep holes in showers - I noticed that it was all sealed up on the inside, which I understand can lead to water ingress so I started to remove some at the bottom (where you can see the gap in the closesup) to see if any water ran out after passing some where the glass pane meets the frame, however nothing ran out so I suspect it should be resealed. Incidentally, I did also remove some sealant running up the inside of the frame beside the crack to check if I could see any obvious gaps where water could seep through, but it seemed ok.
Does anyone recognise this model of shower by any chance? Alternatively, do you think I could get away with plugging the crack with sealant or waterproof epoxy and monitoring (as I've seen in a few posts here)? I already have a million and one jobs to do in the house, and I've been told in no uncertain terms that I don't have the time to be dismantling the shower in order to fix something that may not even be a problem, but I would also like to fix this properly...
Thanks for listening to my ramblings
Edited to add: for those concerned, electricity to the shower has been cut off at the consumer unit. The solenoid valve developed a leak, so it's looking as though it'll be cheaper to buy a new one (many Triton showers have similar footprints) as opposed to fixing it.
Attachments
Last edited: