Run skirting down stairs?

Joined
14 Nov 2021
Messages
4
Reaction score
0
Country
Australia
When our house was built they finished the stairs really poorly! They seem to be slightly twisted so there are massive gaps in places between the stairs and the wall. It was covered by a flat bit of timber that looked awful. We’ve taken that off and are now trying to figure out how to create a flow down the stairs. They had just butted the stringer to the skirting boards which also looks awful.

we’ve packed out the largest gaps and are planning on cutting the top of the stringer off so that it is level with the top step and then running the skirting board down on top of it to hide the gaps and provide a flow down the stairs.

does this sound like a good plan? Any other approaches I haven’t thought of?
 

Attachments

  • E56C3DAD-0324-4375-89A5-0E4331B281F4.jpeg
    E56C3DAD-0324-4375-89A5-0E4331B281F4.jpeg
    214.9 KB · Views: 123
  • 1CF3D06A-7B63-4486-8C09-8CFB72BB200A.jpeg
    1CF3D06A-7B63-4486-8C09-8CFB72BB200A.jpeg
    140.9 KB · Views: 119
  • D088A3D0-8292-416E-BF48-22240BD6EB35.jpeg
    D088A3D0-8292-416E-BF48-22240BD6EB35.jpeg
    220.7 KB · Views: 122
  • 90598146-8C59-4AAB-AF24-6A329DDB129A.jpeg
    90598146-8C59-4AAB-AF24-6A329DDB129A.jpeg
    267.3 KB · Views: 157
Sponsored Links
Could fit plasterboard over the wall covering the gap. Then skim.

Or
Fit trim over the entire top scribed to wall vs bead down the edge.
 
They had just butted the stringer to the skirting boards which also looks awful.
Agreed. Even adding a corner block to transition one to the other would have looked better

we’ve packed out the largest gaps and are planning on cutting the top of the stringer off so that it is level with the top step and then running the skirting board down on top of it to hide the gaps and provide a flow down the stairs.
Be careful of cutting the top of the stringer off - those two little pieces of timber are actually what carries half the load of the stairs if they haven't side fixed the stairs! (and with metal stud work, for exmple, they don't always do that)

Screenshot 2021-11-14 at 13-21-14 bwf-stair-scheme-installation-guide-for-web pdf.png

I'm leaning towards adding an oak top capping the the top of the stringer (10mm thick x 5mm narrowwr that the stringer) then trimming away 10mm from the ends of the skirting and inserting the capping there are well. Will ideally need a mitred joint
 
Last edited by a moderator:
general comments
under NO circumstances remove anything from the top off the string
easiest and least fussy is quadrant or scotia the smallest size to cover the gap
and fill in the wider gaps a bit every few inches to give support to the moulding

what your thinking about cutting the string and fitting skirting down the stairs will in my opinion visually stress you far more than the butted skirting to string feature
 
Sponsored Links
Agreed. Even adding a corner blaock to transition one to the other would have looked better


Be careful of cutting the top of the stringer off - those two little pieces of timber are actually what carries half the load of the stairs if they haven't side fixed the stairs! (and with metal stud work, for exmple, they don't always do that)

Good to know. I’d assumed given they were above the step it would be ok.

the capping sounds a bit like what was there before ( although poorly executed). I think if we do that we will run it flush with the stringer so that it looks cleaner. Part of the problem is the curved bits of the stringer, the angled capping was a real mismatch. I can’t quite picture what you mean at the top to connect it to the skirting. Do you have an image?

what about fake posts at the top of the stairs so that the stringer and the skirting boards don’t have to connect? That seems more within my skill level.
 
the capping sounds a bit like what was there before ( although poorly executed). I think if we do that we will run it flush with the stringer so that it looks cleaner.
The only issue with doing that is that you'll end up with a visible crack line which may vary in size as it goes up the stairs. That's why I suggested a slight set back to form a quirk (it's a long standing way to deal with this sort of issue and make the join less obvious). It also allows you to potentially buy an off the shelf timber strip as opposed to having to have a strip machined to size. Another way is to have a capping the same with as yoursuggested method, but to incorporate a small rebaye along the bottom edge. This can be DIYed, but it does require woodworking tools

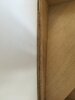
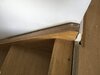
This is a rough sketch of what you have to start with (the lower image shows the gap between the wall and the back of the stringer:

Stringer Capping 001-1.jpg


Stringer Capping 001-2.jpg


First thing to do is to trim out the last 10mm of the skirting. Whilst this can be done with a hand saw and a straight edge, it is far easier and you are a lot less likely to damage the wall if you use a multitool and straight edge. The straight edge needs to be attached temporarily to the skirting to do this job and I'd recommend taking the bottom bit (the cover bead for the laminate expansion gap) before commencing. It can be cut to length and refixed later. You should end up with something like this:

Stringer Capping 001-3.jpg


The two techniques I was referring to above are the set back style:

Stringer Capping 002-1.jpg


and the rebated style:

Stringer Capping 003-1.jpg


The problems are that (i) to do this type of capping you'll need at least an adjustable mitre box or possibly a powered mitre saw and (ii) you didn't mention this in your previous post:
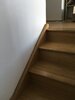
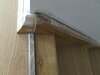
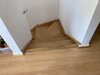
Part of the problem is the curved bits of the stringer...

which does change things quite a bit! Any chance of a photo which shows these curved bits?

what about fake posts at the top of the stairs so that the stringer and the skirting boards don’t have to connect? That seems more within my skill level.
Yes, and you can actually buy what are called half newel posts for this purpose, but you'll still need to trim away the original skirting to get one of those in and you are tight enough on the right side of the stairs but appear to have absolutely no space at all on the left side, so I think the backs of the half newels would need to be notched out so that they could sit over the tops of the stringers
 
The only issue with doing that is that you'll end up with a visible crack line which may vary in size as it goes up the stairs. That's why I suggested a slight set back to form a quirk (it's a long standing way to deal with this sort of issue and make the join less obvious). It also allows you to potentially buy an off the shelf timber strip as opposed to having to have a strip machined to size. Another way is to have a capping the same with as yoursuggested method, but to incorporate a small rebaye along the bottom edge. This can be DIYed, but it does require woodworking tools

thanks for those pictures - really helpful!
The wall doesn’t go anywhere at the top so I was planning on taking that bit of skirting off and either replacing with new, or trimming it to size off the wall.

I think a transition block, fake post thing potentially all the way around the wall at the top of the stairs (replacing the skirting) may be the best option. I’m confident in notching it, creating a custom one.

This whole thing started with painting the stringer! It’s become a bit more of a task than planned, but it will all get painted white which I’m hoping will help hide some of the imperfections. Or at least stop it drawing your eye.
 
The top of the stairs.
 

Attachments

  • 2FCDC91A-DE29-4CE3-96E8-132983A953BA.jpeg
    2FCDC91A-DE29-4CE3-96E8-132983A953BA.jpeg
    211.6 KB · Views: 97

DIYnot Local

Staff member

If you need to find a tradesperson to get your job done, please try our local search below, or if you are doing it yourself you can find suppliers local to you.

Select the supplier or trade you require, enter your location to begin your search.


Are you a trade or supplier? You can create your listing free at DIYnot Local

 
Sponsored Links
Back
Top