Sandtoft 20/20 tiles - low pitch roof

Joined
16 Apr 2017
Messages
2
Reaction score
0
Country
United Kingdom
IMG_3010.JPG
IMG_3011.JPG
Hi all,

After some advice please.

I have recently had an extension done with 2 new low pitch roof. They've been tiled with sandtoft 20/20 tiles.

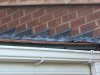
The rooves have both been in about 6 months now and I keep getting water dripping through the soffits. The roofers have been back several times to do different things however last time they added a timber under the last tile with "weep holes" put in. After this last visit the roof now doesn't look right and looks very untidy. I'm
Also worried about pests (birds, bees, etc) being able to access the roof space through all the holes!! I know something doesn't look right but I'm no expert - I've attached some pics, would anyone be able to offer advice please. Thank you. Rich
 

Attachments

  • IMG_3012.JPG
    IMG_3012.JPG
    125.1 KB · Views: 551
  • IMG_3012.JPG
    IMG_3012.JPG
    125.1 KB · Views: 321
Sponsored Links
The whole thing is dire, where's the eave tray on the left ? and the abutment detail is on another level of bad.
 
Hi, thanks for your replies. Yes they are definitely sandtoft 20/20.

Do you guys have any advice on what I should do please? It looks quite neat elsewhere it's just the front of the roof that looks terrible. Does in need to come off? Are the facials and gutters in the right place?

Thank you for your help. What a nightmare.

Rich
 
Sponsored Links
Whoever it was, they probably originally set the fascia too low and the last course of tile drooped.
They then used a batten to raise the tile in line with the plane of the roof.
The gutter is serving two roofs so it must stay in that position. Likewise the fascia.

As above there is no eaves tray or felt showing over the gutter - they should project over the gutter by 25mm to 30mm.

The flashing is wrong for that kind of tile but probably works - you should have soakers & separate stepped cover flashing - ie two piece flashing at side abutments.
There seems to be a secret gutter below the flashing on the right abutment in pic 1.?
Pic 2. is a jumble - could you post a pic showing a larger context of that abutment going up the roof?
Pic 2. flashing should come down and project over the gutter as in pic 1.
Roofing felt can be seen flopped up at the bottom of the abutment in pic 2. That is well wrong if it is felt?
The very bottom of the LH abutment needs pics from the old roof side, and a close up from the new roof side.

What is the square of fascia material doing on the left, propping up the tile?
Leave the gutter and fascia and batten alone and install eaves trays.
 
Last edited:
Its a bit of a lash up. Firstly they have tried to keep the fascia line the same on both roofs. but it looks like plate levels are wrong for what they were aiming for.
There is underlay support trays fitted but the bit of batten on edge is on top of it.
flashing is messy, but they appeared to have used a secret gutter system which is clearly visible but cut short.
The secret gutter to the left is distorted and may even be fractured.
the gutter could be raised by using a hopper and some clever fiddling.id be inclined to get the bottom couple of courses stripped off and re arranged,
 

DIYnot Local

Staff member

If you need to find a tradesperson to get your job done, please try our local search below, or if you are doing it yourself you can find suppliers local to you.

Select the supplier or trade you require, enter your location to begin your search.


Are you a trade or supplier? You can create your listing free at DIYnot Local

 
Back
Top