Joined
16 Dec 2017
Messages
12
Reaction score
0
Country
United Kingdom
Hi All,

I really would appreciate advice on the following;

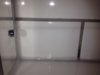
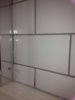
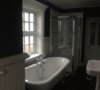
Bathroom was completely stripped back to bare brick. Shower area was created with a small partitioned wall for water pipes to hide behind. Dry lined with water resistant plaster board. Plaster board sealed prior to professional tiler coming in and tiling the 2 walls of the shower area.

Requested the tiler wait until the day after tile application to grout.

Left to dry >48 hours prior to sealing the grout. Left to dry for weeks because we were delayed fitting the rest of the shower. 2 glass panels fitted for the rest of the cubicle.

Plumbers fitted the actual shower, no problems.

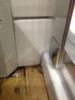
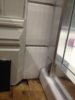
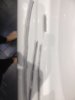
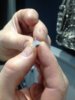
Short time later water is seeping up in-between the [Karndean] tiles, tracked this back to corner where one glass panel meets the wall. Dried out for >3 days using a hair dryer. Some grout appeared darker than the rest, but upon inspection of the sealant it appeared there was a small gap. Pouring a cup of water on the area meant more water leaking. (No water marks on the downstairs ceiling).

After drying, sealed again and allowed to cure for >48hrs.

I have just tested the area and there is still water leaking!

Water now appears to be coming from behind the tiles. The very bottom, left hand side tile. Currently drying it out again whilst searching desperately for an answer.

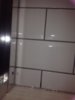
There is no plumbing on this side of the shower. The only possible answer is the grout. I can't see any physical deterioration of the grout but this may be because it's wet. (again!! pfff).

Is there anything I can do without ripping the whole shower out?

P.S. I know ripping it all out is probably the go to answer but we really cannot face this after the bathroom taking nearly a year (long story!). Yes, very nervous that if it is indeed the grouts integrity that's shot we won't know how much of the other grout is also leaking.
 
Sponsored Links
Still drying it out with a hairdryer...
Feeling under the tile to the plaster board behind - feels dry even though I was testing the leak.
I've spoken with my tile supplier and they suggested that by using cif cleaner on the grout sealant will damage the integrity of the seal... is it as simple as that?!
 

Attachments

  • IMG_0704.JPG
    IMG_0704.JPG
    221.6 KB · Views: 408
  • IMG_0705.JPG
    IMG_0705.JPG
    205.8 KB · Views: 423
  • IMG_0706.JPG
    IMG_0706.JPG
    155.6 KB · Views: 439
  • IMG_0707.JPG
    IMG_0707.JPG
    150 KB · Views: 411
  • IMG_0709.JPG
    IMG_0709.JPG
    140 KB · Views: 451
From what I can see of the grouting in your pics it looks fine. The silicone sealing however looks very dodgy. Inspect closely the whole length ,both where the top of the silicone meets tile ,and also where it meets the tray. See if its lifting away anywhere .
 
Sponsored Links
Thanks for taking the time to reply....the silicone looks bad because we've applied on top of the original silicone after allowing everything to dry and cleaning with meth. spirits. The original silicone appeared to have a small gap where there was a leak. Pushed it in using a rubber fougie.
Unfortunately there's still a leak...
 
Never a good idea to apply silicone onto silicone .strip it off and do it properly. Its highly unlikely a problem with the grout.
 
Whats underneath the transparent silicone where the tray meets the bottom of the tiles along the horizontal - its not grout is it?
 
Thank you. I can't tell you how much of a relief it is that it's unlikely to be the grout.
Do you have any idea why the water seems to be appearing from behind the tiles?
Our plumber applied CT1 between the shower tray and the wall prior to tile application. Impossible question to ask but if the leak is on the horizontal edge water may be falling down and tracking along the CT1 and coming out on the outside of the tray?

Underneath the transparent silicone is grey silicone, no grout.

We siliconed over the top because we were concerned about damaging the integrity of the silicone behind the glass panel. (The grey silicone was applied after the tiles were applied and before the glass panels were fitted). It has to be the worst looking silicone I've ever done (not that I've done much!). I'll be kind of glad to get rid of it!
 
When you stated " water seems to be appearing from behind the tiles" it left me somewhat confused . as I understood your earlier posts ,water is showing beneath the floor tiles ( vinyl ), and in the corner shown in pic ,the tiled wall in that pic does not have the shower supply pipework or shower. So where is water showing behind tiles ???
 
Before installing the upright screen profiles, did you apply a short bead of silicone to the intersection between wall and tray where the ‘heel’ of the profiles sit? This not being done is by far the most common cause of leaking enclosures that I come across!
 
. The original silicone appeared to have a small gap where there was a leak. Pushed it in using a rubber fougie.
Unfortunately there's still a leak...
As Terryplumb says - remove all the silicone and replace with Neutral Curing silicone. A lot of "sanitary" silicones are acetoxy? Smell of vinegar - this type DOES NOT stick to plastic - so when the tray moves it will come unstuck. I know (the vinegar one) is used everywhere and by window fitters - But I went to a job where there were yards of it flapping in the wind. Pulled it off and re did it with neutral curing. Whats a fougie:unsure:
 
Before installing the upright screen profiles, did you apply a short bead of silicone to the intersection between wall and tray where the ‘heel’ of the profiles sit? This not being done is by far the most common cause of leaking enclosures that I come across!

Yes, this was done prior to the panels being fitted.
 
As Terryplumb says - remove all the silicone and replace with Neutral Curing silicone. A lot of "sanitary" silicones are acetoxy? Smell of vinegar - this type DOES NOT stick to plastic - so when the tray moves it will come unstuck. I know (the vinegar one) is used everywhere and by window fitters - But I went to a job where there were yards of it flapping in the wind. Pulled it off and re did it with neutral curing. Whats a fougie:unsure:

I've just checked out the tube we used on top of the original silicone... acetoxy silicone.... !
(This tube wasn't what was used originally but I'd have to ask what was used - a mute point really seeing as it'll all be coming off).

Having looked up fougie I think 'Fugi' is the right word!! I can't find our set to take a photo but this is what I'm on about:
https://www.ebay.co.uk/p/Yato-Silic...22003303705?iid=222651781284&var=521501872353
I promise you I'm not affiliated with the seller....

Used the fugi on all of the interior window sealant and they do an amazing job. Don't take my bathroom pictures as evidence though; I was shaking so much doing that!
 
Links in this post may contain affiliate links for which DIYnot may be compensated.
When you stated " water seems to be appearing from behind the tiles" it left me somewhat confused . as I understood your earlier posts ,water is showing beneath the floor tiles ( vinyl ), and in the corner shown in pic ,the tiled wall in that pic does not have the shower supply pipework or shower. So where is water showing behind tiles ???

Good Morning, sorry... I'll try to make myself clearer.

The leak was first found tracking along the floor vinyl (along the adhesive lines), we tracked it back to the corner in the photo.
The water is not leaking over the shower tray, so unable to observe any obvious water leak/ hole.
First signs of any leak is when the first horizontal grout line gets dark and water starts to seep on to the floor from behind the tile.
Almost as though the leak is travelling behind the tiles from that corner of the shower...
 
Mini update:
Removal of some of the horizontal sealant showed that we only had a small amount of original grey seal. (please see photos 1 and 2).
I'm hoping that we can get the shower dried out and re-sealed and back to looking like the last photo for christmas!

Thank you for all of your suggestions... I really appreciate it.

I think I was dreaming of hoping to have it fixed before my OH came back from a weekend away!
 

Attachments

  • IMG_0713.JPG
    IMG_0713.JPG
    122.3 KB · Views: 292
  • IMG_0714.JPG
    IMG_0714.JPG
    173.1 KB · Views: 273
  • IMG_0262.JPG
    IMG_0262.JPG
    238.8 KB · Views: 278

DIYnot Local

Staff member

If you need to find a tradesperson to get your job done, please try our local search below, or if you are doing it yourself you can find suppliers local to you.

Select the supplier or trade you require, enter your location to begin your search.


Are you a trade or supplier? You can create your listing free at DIYnot Local

 
Sponsored Links
Back
Top