• Looking for a smarter way to manage your heating this winter? We’ve been testing the new Aqara Radiator Thermostat W600 to see how quiet, accurate and easy it is to use around the home. Click here read our review.

Tado v3+ wiring to ESi-Plumb 2 Heating Zones (ESWCPCB3CB)

Joined
12 Oct 2025
Messages
5
Reaction score
0
Country
United Kingdom
Advice needed to replace existing 3 Channel WIRED Programmer and Wired Thermostat with a wireless Tado V3+
I need to remove the 3 wires on the Heating Zone 1 connector
and also remove the 4 wires on the 3 channel programmer
Its a Y plan system

Just need help connecting the 4 core cable supplied with the tado unit

Thanks
 

Attachments

  • ESWCPCB3CB-Wiring-Diagram.pdf
    ESWCPCB3CB-Wiring-Diagram.pdf
    869.6 KB · Views: 29
  • 1661364198733.png
    1661364198733.png
    163.1 KB · Views: 20
First of all the ESi has two heating zones plus hot water. the Tado only has one heating zone plus hot water, so I assume that you are presently only using one of the heating zones of the ESi. If you are using both central heating zones of the ESi then something is not right. A 3-Port valve will not work with a 2 zone heating system.

If you do have a Y-Plan and only one heating zone, then:

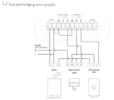
The Tado replaces the 3 channel programmer. If your existing programmer is as below, you should have wires in the ESi programmer terminals N, L, 1, 3, & 4.

3.jpg


If so, these wires would the move over to the Tado terminals that have the same function as follows:

ESi N = Tado N
ESi L = Tado L
ESi 1 Hot Water Off = Tado HW NC
ESi 3 Hot Water On = Tado HW NO
ESi 4 CH 1 On = Tado CH NO

Add the purple bridging links between L and the Com terminals

The existing room thermostat can be left in place and set to maximum to prevent it interfering with the Tado, or you can remove it and insert a link to join the terminals on the control PCB where the two live switching wires have been removed from.

so:

1.jpg


Becomes:

2.jpg


The black wire shown above in the same terminal as one side of the link may not be present if you don't have a frost thermostat fitted.

If any of my assumptions are incorrect, do not proceed, but post back details and someone should be able to help you further.
 
the 3 channel programmer is a TQX0027, there seems to be only 4 wires coming out off it and wired into the PCB,
It think its basically the same unit as the Esi one
i don't have a frost thermostat fitted
I am only using heating zone 1
My only question would be, where is the fifth wire from the 3 channel programmer going as i only have the 4 wires attached to the PCB marked PROGRAMMER on the PCB
Looking at the manual for the ES3247b only N , L , 3 and 4 are used
 
Last edited:
Can't say I'm familiar with a TQX0027. However the connections details should be printed on it somewhere so you can check if it's the same as the diagram I posted. Or, if you have the installation instructions for it even better.

For a Mid-Position valve to work you need a 'Hot Water Off' connection which would be from terminal 1. This is why I questioned if that's what you have. Mid Position valves don't work properly without a Hot Water off connection from both the programmer and the HW Stat to its grey wire. This is shown in the Tado diagram

1.jpg


However, an S-Plan system with two x 2-Port valves would only use the 4 terminals that you mention. N , L , 3 and 4
 
Thank you very much for helping out, i have a good understanding of what i need to do to get the Tado working now

The whole system is

Elite Cyl Pre-Plumbed Twin Zone 170 L indirect (esppt0170)

im only using 1 zone and its a 2 port valve on it
 
If as you say, you only have 4 connections to N, L, 3 and 4 at the existing programmer, and the system is working correctly now, then if you swap them over as below it will be a direct swap like for like. Nothing will have changed.

ESi N = Tado N
ESi L = Tado L
ESi 3 Hot Water On = Tado HW NO
ESi 4 CH 1 On = Tado CH NO

im only using 1 zone and its a 2 port valve on it

So not a mid-position valve after all ;). The above 4 wires should be OK for you then.
 
Last edited:
The existing room thermostat can be left in place and set to maximum to prevent it interfering with the Tado, or you can remove it and insert a link to join the terminals on the control PCB where the two live switching wires have been removed from.

Do i still need to insert a link as you have previously mentioned once the old wired thermostat is removed as part of the install of the Tado?
 
Do i still need to insert a link as you have previously mentioned once the old wired thermostat is removed as part of the install of the Tado?
You can't have two thermostats trying to control the same heating, they will fight with each other, so either remove the old thermostat as per the drawing and insert the link, or leave it in place and set it to maximum.

If you were just to remove the old thermostat the wiring would be left 'open circuit' and wouldn't work with the Tado, hence the link
 

If you need to find a tradesperson to get your job done, please try our local search below, or if you are doing it yourself you can find suppliers local to you.

Select the supplier or trade you require, enter your location to begin your search.


Are you a trade or supplier? You can create your listing free at DIYnot Local

 
Back
Top