Gaps in replacement tiles after chimney removal

Joined
7 Aug 2016
Messages
38
Reaction score
4
Country
United Kingdom
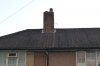
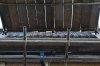
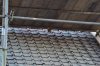
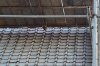
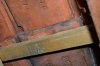
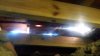
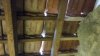
Hi recently had a party chimney removed. The gaps in the replacement tiles look far bigger than existing ceiling. Does new bedding look as bad as I suspect? Also the party wall is not flush to roof. Is there any regulation around this? Or should I fill gap myself with concrete? Or get builder to do it? The roofers left on Friday without saying they have finished. Scaffolding Is still up. I guess the boss will visit site next week prior to payment.

I emailed the boss. Their response:

" the tiles will kick as there clay tiles and will not follow the shape of your roof this will take time. "

Thoughts?

Images attached...

PS More info here
 

Attachments

  • new-left-existing-right.jpg
    new-left-existing-right.jpg
    250.2 KB · Views: 441
  • new-gaps.jpg
    new-gaps.jpg
    219.8 KB · Views: 426
  • gap-neighbour.jpg
    gap-neighbour.jpg
    202.1 KB · Views: 1,108
  • existing-roof-example.jpg
    existing-roof-example.jpg
    47.2 KB · Views: 400
  • existing-left-new-right.jpg
    existing-left-new-right.jpg
    267.9 KB · Views: 431
  • existing-left-new-right-2.jpg
    existing-left-new-right-2.jpg
    251.4 KB · Views: 427
Last edited:
@catlad : Outside Pictures + 1 Before. - excuse my tatty soffits ..
@noseall : Is that pointing or something else? If anything was on the existing roof it has long since disappeared.
FWIW These are all 1930s ex-council houses , and the ones that are still council owned recently had all of their roofs replaced.
 

Attachments

  • DSC_0397.JPG
    DSC_0397.JPG
    102.4 KB · Views: 466
  • DSC_0799.JPG
    DSC_0799.JPG
    118.1 KB · Views: 412
  • DSC_0798.JPG
    DSC_0798.JPG
    147.3 KB · Views: 398
  • DSC_0795.JPG
    DSC_0795.JPG
    143.3 KB · Views: 419
  • DSC_0794.JPG
    DSC_0794.JPG
    156.6 KB · Views: 432
  • DSC_0793.JPG
    DSC_0793.JPG
    203 KB · Views: 426
  • DSC_0790.JPG
    DSC_0790.JPG
    158.8 KB · Views: 414
  • DSC_0791.JPG
    DSC_0791.JPG
    191.8 KB · Views: 434
  • DSC_0789.JPG
    DSC_0789.JPG
    168.1 KB · Views: 1,036
  • DSC_0788.JPG
    DSC_0788.JPG
    196.8 KB · Views: 427
So you've had a shared chimney stack removed - the whole stack on your side & your neighbour's side? Where is the photo of the patched over roof?
Are you referring to "new bedding" on the party wall? I dont see a photo of it?
Plus, you are saying that there are gaps below the roof and above the party wall? ie between your lofts?
You dont use "concrete" - use sand and cement.
Have you or your neighbour had any part of the chimney breast's below roof level to ground floor removed?

The job looks to be a bad'un, & the tiles look to be concrete not clay.

From what I can see & what you say, it seems outrageous that they went to all that trouble without (at the least) lifting the tile and felting the roof.

FWIW: Working from roof ladders - three of us would have dropped that stack and made good the roof in half a day.
 
I emailed the boss. Their response:

" the tiles will kick as there clay tiles and will not follow the shape of your roof this will take time. "

Wtf? It's that boss and his roughers that want the kicking.

Tip of the day: gaps and roofs are not a good combination.
 
Hi,
Tiles are clay FWIW
A bit more info: The reason for removal is the previous owner of my house had removed chimney breast and only supported the stack with a wooden lintel.
10 years later, I'm planning to rent the house now and wanted to make sure it is safe. (long story involving council, gallows, RSJs, cost of engineering calcs - seemed better approach was to take chimney down )
Regarding the gap between party wall and roof space - before the job there was a small gap 1" , 2" gap - which I fill with wirewool and expanding foam to help control vermin.
After the job there is a huge gap - for example one of the attached picture (linked again below) was taken of the neighbours tiles from my side of the loft.
The works agreed was as follows:

CAREFULLY REMOVE THE COMPLETE CHIMNEY STACK BELOW ROOF LEVEL

BAG UP ALL DEBRIS AND CLEAR FROM SITE.

SUPPLY AND FIT NEW TIMBERS TO FORM FRAMEWORK OF THE ROOF

STRUCTURE THIS TO BE BOLTED AND SECURED INTO POSITION READY TO

RECEIVE NEW ROOFING MATERIALS.

SUPPLY AND FIT NEW TANALISED TIMBER BATTEN FIXED SECURELY BY

MEANS OF GALVANISED NAILS LEAVING SECURE.

SUPPLY AND FIT NEW TILES TO MATCH EXISTING AS CLOSE AS POSSIBLE

THESE TO BE BOUGHT FROM A SALVAGE YARD LEAVING SECURE IN

POSITION.

SUPPLY AND BED NEW RIDGE TILES TO MATCH THE EXISTING AS CLOSE AS

POSSIBLE THESE TO BE BEDDED ON A 3;1 SAND AND CEMENT MORTAR, BUTT

JOINTED AND FINISHED WITH A WEATHERSTRUCK JOINT.

CLEAN DOWN THE COMPLETE ROOF COVERING OF ALL DUST AND DEBRIS

THIS TO INCLUDE THE FRONT AND REAR ELEVATION GUTTERS AND

DOWNPIPES LEAVING ALL CLEAN AND TIDY ON COMPLETION AND GUTTERS

FREEFLOWING.


gap-neighbour-jpg.103145

http://www.diynot.com/diy/attachments/gap-neighbour-jpg.103145/
 
Last edited:
There does seem to be a lot of light coming through the tiles
poor workmanship or the tiles are not quite the same.
I will give you a tip don't pay until its rained, I have never
used that type of tile so I don't know there idiosyncrasies.
 
You have to clip the corner on those tiles sometimes to get them to lay correctly. And sometimes you have to bin them because tehy are all bitter and twisted.
 
The annoying thing is both myself and the neighbour had tiles which were in better condition than the ones he used, but he was keen to use his stock.
Only realised after they had been laid how poor his ones were by comparison.
 
Clay tiles lose their shape whist being fired. If you were to bin all the misshapen ones then you would have none left for the roof. They look like the worst tiles in the universe with which to try and achieve a uniform finish or decent lie.

You only need to look closely at the rest of the roof to see there are gaps. Look at the join in the centre of this image.

dsc_0789-jpg.103161
 
@noseall - agree - the new tiles are redder and mostly hidden by the scaffolding. This has gone now. I've attached back elevation piccy. and one showing a tile with a crack in the groove.

FWIW I've not paid roofer yet. They've resisted all attempts to re-bed tiles. Saying they 'come out if any problems'.
I've ordered a written survey of works from another roofing firm. This is so I can withhold some payment with evidence why.

Obviously 2nd firm have vested interest to critique original job, but they agreed tiles need fanning out better (perhaps shifting over some of the original tiles on each side),
and raised some other less significant issues (insulating stack etc).

I plan to deduct cost of survey and 'fanning' from original invoice. (approx £85 survey + about £150-200)
I may pay extra to whomever gets fanning job to insulate stack at the same time.
 

Attachments

  • new-back.JPG
    new-back.JPG
    140.4 KB · Views: 382
  • groove_crack1.JPG
    groove_crack1.JPG
    49.7 KB · Views: 344
  • missing_lug.JPG
    missing_lug.JPG
    154.9 KB · Views: 360
I've learned a bit more whilst looking for a good roofer to fix the issue. Problems started with their carpentry/timberwork (no ridgeboard, rafters extended with screws and 1 foot overlap) etc.
by the time they got to the tiling they had no chance. Two roofers I've seen since said I shouldn't have paid them anything but they did knock down the chimney I guess.
I've put up a page with some pictures of their timbers - I'm not bitter - lol!
 
Patching in with clay tiles like that is always going to be difficult. As noseall says there will even be variations in tiles from the same batch let alone from completely different ones and the profiles may also be slightly out too.
Even laying a completely new roof with new clay tiles like those is a pain.
 

If you need to find a tradesperson to get your job done, please try our local search below, or if you are doing it yourself you can find suppliers local to you.

Select the supplier or trade you require, enter your location to begin your search.


Are you a trade or supplier? You can create your listing free at DIYnot Local

 
Back
Top