Building a half stud wall for kitchen cabinets

Joined
26 Nov 2017
Messages
65
Reaction score
0
Country
United Kingdom
Hi everyone,

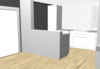
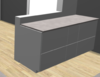
I am getting a new kitchen installed and need to build a half height stud wall to attach some floor cabinets onto. The kitchen is going to be from Ikea. In the attached photos from the planner, I will only be building the half height part, the other small bit of wall already exists and is masonry.

I have found this video which seems to be exactly what I'm after, and think if I built something like that, that it should be strong enough to hold the cabinets:

I was wondering if I could run a few questions by anyone who has done this type of thing before.

Building the frame
I plan to make the stud using a frame just like in the video using a nail gun to build up the actual frame.
  • Would it be better to instead use screws?
  • Also, on the side where the suspension rail and cabinets will be attached, should I add a crossbeam or something at the height where the rail is to be screwed so that its extra secure, or should the vertical supports of the frame being roughly 6" apart provide enough?
Since these cabinets will be attached to this stud only, would it be wise to build a floor frame to sit the cabinets onto (like in this video
), instead of just the supplied feet?

Attaching the frame to wall and floor
I want it to be rock solid. The bit of wall that I will be attaching to is masonry.
  • Should I chip out the plaster of the wall end I'm attaching to, to get straight into the brick?
  • Should I use large lag bolts with big wall plugs to attach to the wall?
The floor is a suspended floor, which has a solid oak flooring on top. I cannot get under the floor or lift any of it. Instead of nailing the frame to the floor, I was going to screw it down.
  • Would this be the right thing to do, and if so, what size of screw would be suggested?
I know the oak flooring is about 1" thick, and since the kitchen is in the old part of the house, I imagine it has old floorboards underneath. From the position of the sink and radiators, I would think that pipes would not be an issue, but obviously I will check.

Covering the frame
Once the frame is built, I am going to attach plasterboard onto it and have it skimmed
  • How much additional thickness should I leave for the skim?
A couple of final questions would be;
  • Do I need to vent the wall at the bottom on the opposite side to the cabinets?
  • What about skirting board where it meets the start of the back of base cabinet?
Apologies for all the questions, but I just want to get my plan correct before starting.

Many thanks!
 

Attachments

  • Screenshot 2020-03-13 at 18.24.11.png
    Screenshot 2020-03-13 at 18.24.11.png
    562 KB · Views: 772
  • Screenshot 2020-03-13 at 18.24.29.png
    Screenshot 2020-03-13 at 18.24.29.png
    433.8 KB · Views: 328
Sponsored Links
For maximum rigidity...

1. DON'T use a nail gun - the joints will not be rigid enough in my experience. For best rigidity you need to pilot, countersink and screw the frames together using 5.0 or 6.0 x 100 screws.

2. Use 4 x 2 rather than 3 x 2 for the framing if you can. Either way use a dry, regularised (or better) timber, NOT rough sawn carecassing or the like. Select for straightness. 3 x 2 is the bare minimum size. Joinery grade planed redwood is stiffer than whitewood or failing that C24 structural graded softwood is stiffer than C16 or ungraded

3. If the floor is masonry use Rawlbolts or resin anchors to fix down. If timber use coach bolts into drilled steel plates on the underside. Preferably add an 18mm plywood mattress to the underside of the floor before bolting down (sits between underside of flooring and steel plate). Failing that fix to floor with something like 10mm coach screws at 200mm centres through large square washers.

4. Where possible fix to masonry walls using brown plugs and 5.0 or 6.0 x 100mm screws (7mm holes) - leave the plaster on and go through it. Unless it's really thick lime plaster you'll be OK

5. Use timber wedges beneath the sole plate at each bolt to plumb up the frame before finally tightening it down

6. Clad the faces of the frame with plywood, glued and screwed before plaster boarding. 6mm ply is adequate, 12mm is better (and allows cheaper OSB to be substituted for plywood). This gives you a structure to carry your cupboards if needs be. You may be able to get away with ply one side only, but TBH if you do you'll need to.use thicker PB on that side. PB needs only to be the thin 6mm stuff where overboarding ply/OSB as it contributes no strength

7. Don't skimp on fastenings

8. Skirt out as if it is a wall

9. Skim is normally 3mm these days. For tighter spaces go to taper edge boards and tape and joint instead

Based on building more pygmy walls than that over the years in shops, restaurants, hotels etc where they need to be rigid and durable
 
Last edited by a moderator:
Thank you for such a great response @JobAndKnock . Very helpful! The wall I'll be attaching it to (and the subsequent depth of the half wall) is just shy of 7", so the 4x2 should work quite well, and will go with the 12mm ply on both sides and plasterboard. Would you say the frame construction in the first video is good, with the spacer block on top of the sole plate between the vertical beams?

I can't get under the floor at all, so unfortunately won't be able to apply the ply mattress and steel plates. So will have to settle for 10mm coach screws. When you say 200mm centres, I assume that means the coach screws are spaced 200mm apart from their centres? I guess I'll need something like a 10mm x 160mm coach screw (https://www.screwfix.com/p/turbocoach-coach-screws-yellow-zinc-plated-10-x-160mm-50-pack/27508), as it will be 2" spacer block, 2" sole plate, then oak flooring and underfloor (which I have discovered is sheets rather than floorboards, but I'd guess they are underneath.)

Any when you say to fix to masonry walls with brown plugs, I assume that is the standard 7mm ones (https://www.screwfix.com/p/rawlplug-uno-wall-plug-7mm-300-pack/89068) ?

Sorry for the extra questions, just want to get everything 100% in my head before starting and buying materials.
 
J&K,
great post you did above.

but, fwiw, here's something we do when building stud knee walls around tiled shower enclosures - this method is to keep things narrow and save space:
1. frame up,
2. and then picture rail with one x by centred around the inside of the stud bays
3. and then, from both sides of the knee walls, insert stiffeners of ply inside the knee wall stud bays.
4. as you recom, everything fixed with screws.

rip the ply just outside the line, and the above works fine.
 
Sponsored Links
Would you say the frame construction in the first video is good, with the spacer block on top of the sole plate between the vertical beams?
It's good, but unnecessary if you either skin with plywood/OSB or follow @bobasd 's advice to insert a tightly fitted stiffener of 18mm plywood or the like inside your frame (and the main reason I don't often do that is because we more often than not install onto screed at a point in the build where we don't have much 18mm or thicker plywood on site). In point of fact I don't normally build frames in situ like that - I mainly make up frames either on the floor or (more often) on temporary bench (two home made trestles, a few pieces of 3 x 2 and a sheet of whatever I have to hand.
When you say 200mm centres, I assume that means the coach screws are spaced 200mm apart from their centres? I guess I'll need something like a 10mm x 160mm coach screw
Yes. In terms of coach screw length your are only looking to go through the floor by 20mm or so, so you could away with shorter screws

And by brown plugs I do mean 7mm ones (which in the UK are generally brown)

Bob, it's always nice to see an alternative method (y)
 
Last edited by a moderator:
@JobAndKnock @bobasd Thank you both very much for your help and advice.

@bobasd I'm not entirely sure what is meant by "picture rail with one x by centred around the inside of the stud bays". Does this mean a horizontal block at the halfway height of each stud bay? Would you have a photo or something to show what this looks like?

Thanks!
 
no, it means just like the four rails that surround a picture - sides & top & bottom.

but its only a useful method if you need the space from a narrow knee wall(s).

J&K's standard method would probably be best for you
 

DIYnot Local

Staff member

If you need to find a tradesperson to get your job done, please try our local search below, or if you are doing it yourself you can find suppliers local to you.

Select the supplier or trade you require, enter your location to begin your search.


Are you a trade or supplier? You can create your listing free at DIYnot Local

 
Sponsored Links
Back
Top