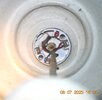
Hard to tell exactly, but does the hall rose have thermal damage?
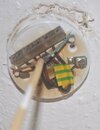
It's possible that the blue wire has shorted onto the bare reds. Certainly seams to be the worst point. (or even brown to red if reversed LN)
It can't really just be plastic yellowing, as the other side of the terminal block looks fine.
I also find it interesting that there are no screws holding the rose up, and it has shifted a little.
No earth sleeve that I would expect to see with that age cable and CU.
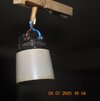
Has someone being trying to replace the hall light?
Last edited: