2way Switch Replacement on Stairs

Joined
2 Jan 2023
Messages
6
Reaction score
2
Country
United Kingdom
Hi All,

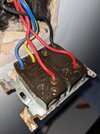
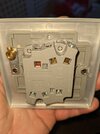
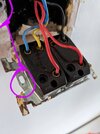
I'm trying to replace a light switch on the stairs. 1 switch does downstairs, the other upstairs. I'm confused by the labelling on the new BG switch (L22, L21, L12, L11), and the enclosed slip doesn't even mention them specifically (just L1, L2).

How would I match the existing labels to the new switch?

Appreciate the help,

Pete
 

Attachments

  • PXL_20230102_123851838.jpg
    PXL_20230102_123851838.jpg
    259.9 KB · Views: 70
  • PXL_20230102_123930504.jpg
    PXL_20230102_123930504.jpg
    220.5 KB · Views: 84
Sponsored Links
re-wire.jpg


And ensure there is an effective Earth connected to the earthing connector on the new switch, This connection is a safety requirement to prevent the risk of electric shock from the metal switch.

Do not mix up the two reds,
 
1672664953331.png

EDIT: the black may need to be in L11 to get 'down on'

And yes agree it requires an earth link if it's a metal front plate
 
Last edited:
Sponsored Links
Thanks for that. I'm going to get an electrician to do it for me I think. I know my limits and glad I checked with you before drilling out the new back box. The Earth wasn't even attached, so at least it's safer now than it was.
 
Thanks for that. I'm going to get an electrician to do it for me I think. I know my limits and glad I checked with you before drilling out the new back box. The Earth wasn't even attached, so at least it's safer now than it was.
What have you had to do to the backbox?

Apologies if our conflicting advice has confused you.
However we have both offered the same advice and both will work except Bernards will transpose the position of the switches.
IE the upstairs light switch is currently on the left and the way he has drawn the wiring it will be on the right.

My first attempt at drawing it I did the same thing due to the way the photos show the switches IE the existing switch appears upside down.
 
What have you had to do to the backbox?
Sunray, I'll admit it did initially confuse me, but even after the edits (thank you), the limit for me comes from not understanding the labeling on the new switch.

For the back box, this house is 1930s and it looks like the previous owner had already upgraded the switch but the screws nowhere near align and they'd bodged it to hold together. It's about 10mm width and height too small from current backbox size.
 
For the back box, this house is 1930s and it looks like the previous owner had already upgraded the switch but the screws nowhere near align and they'd bodged it to hold together. It's about 10mm width and height too small from current backbox size.

Have you got a picture? That sounds unusual, though I do note that the existing switch is a grid arrangement, you are not looking at the centres of the fixings for the cover plate into the yoke are you? because all that will be removed when you fit the new plate switch
 
Sunray, I'll admit it did initially confuse me, but even after the edits (thank you), the limit for me comes from not understanding the labeling on the new switch.
Do you now understand the labelling ,and what connects where ? It's pretty simple. With the aid of the helpful diagrams provided by Sunray and Bernard you shouldnt have any difficulty . If you need further clarification ,just ask.
 
Do you now understand the labelling ,and what connects where ? It's pretty simple. With the aid of the helpful diagrams provided by Sunray and Bernard you shouldnt have any difficulty . If you need further clarification ,just ask.
Yep, I'm 100% confident I get it (now)... Now I've packed everything away and looked at it over a cup of tea. Typical.

Really appreciate the help and patience from everyone (and teaching me)
 
The 2 sets of markings are essentially the same, the only difference being the old consists of 2 completely independant units labled as COM , L1, L2.
new has numbered the 2 switches by adding a number 1 or 2 in the middle

1672685717799.png
 
Just want to thank everyone here for your help earlier in the year. Managed to get around to sorting this now the evenings are a little lighter. Turns out who ever fitted the back box for a single light switch, used a double backbox and mounted it vertically! Had to hammer out the wall and cement fill.

Wiring was spot on, and now have a working light switch again. Thanks again.
 

DIYnot Local

Staff member

If you need to find a tradesperson to get your job done, please try our local search below, or if you are doing it yourself you can find suppliers local to you.

Select the supplier or trade you require, enter your location to begin your search.


Are you a trade or supplier? You can create your listing free at DIYnot Local

 
Sponsored Links
Back
Top