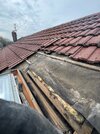
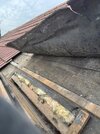
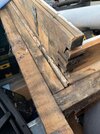
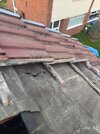
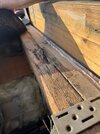
I've had water marks appearing around one of my attic windows; usually it's the gutters blocked with moss, but this time it isn't. When checking around, i found several batten sections rotted on one side, which prompted me to remove some tiles....and discover a few horros underneath!
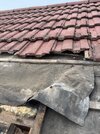
1. The felt is ripped in a number of places; and has been cut so it ends on the joists surrounding the velux window; it doesn't lap up the windo frame
2. they have packed out the velux window with multiple sheets of plasterboard - which is can see from outside after removing the metal flashing cap - nothing in between!
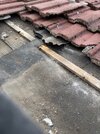
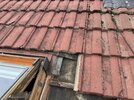
3. The metal channels on the left side have been badly bent and the outer lip completely flattened on install to try and get the tiles (which have been 'cut' by literally hammering bits off!) to sit flush. they don't and have just meant water has run down the sides and onto the bare wood underneath (and the cause of most of the damp marks inside!)
4. the felt has been cut below the nearest horigzonal joist under the window, meaning i can see into the attic and any water going under the apron goes inside the roof (and starting to turn the wood black ...thankfully not rotted like the tile battens! There also appears to be no additional batten above the lower tile batten as seems to be fitted on newer flashing installs.
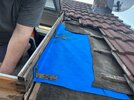
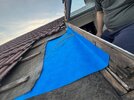
The window is ancient (GHL-2, so pre 91!). I've already retrofitted the 308 glass and fitting kit, and uprated the lift springs, which work great; but from what i understand, any newer (308/MK08) flashing kits will require adjustment of the window frame height (normally inwards) - which frankly isn't worth doing as i plan to replace it completely in 18 months or so (new job depending). I plan to patch the felt with some new membrane in the worst sections and flashband the side joinst and under/overlap above and below; but i can't find any info for how the fitting was meant to be on these ancient windows for flashing - i'm thinking of turning it up the sides of the window frame and stapling in place, but i'm not sure if there should be a batten below the window, or how to seal effectively.
Could anyone provide me with any advice on best approach?
.jpeg")
.jpeg")
.jpeg")
.jpeg")
.jpeg")
.jpeg")
.jpeg")

.jpeg")
1. The felt is ripped in a number of places; and has been cut so it ends on the joists surrounding the velux window; it doesn't lap up the windo frame
2. they have packed out the velux window with multiple sheets of plasterboard - which is can see from outside after removing the metal flashing cap - nothing in between!
3. The metal channels on the left side have been badly bent and the outer lip completely flattened on install to try and get the tiles (which have been 'cut' by literally hammering bits off!) to sit flush. they don't and have just meant water has run down the sides and onto the bare wood underneath (and the cause of most of the damp marks inside!)
4. the felt has been cut below the nearest horigzonal joist under the window, meaning i can see into the attic and any water going under the apron goes inside the roof (and starting to turn the wood black ...thankfully not rotted like the tile battens! There also appears to be no additional batten above the lower tile batten as seems to be fitted on newer flashing installs.
The window is ancient (GHL-2, so pre 91!). I've already retrofitted the 308 glass and fitting kit, and uprated the lift springs, which work great; but from what i understand, any newer (308/MK08) flashing kits will require adjustment of the window frame height (normally inwards) - which frankly isn't worth doing as i plan to replace it completely in 18 months or so (new job depending). I plan to patch the felt with some new membrane in the worst sections and flashband the side joinst and under/overlap above and below; but i can't find any info for how the fitting was meant to be on these ancient windows for flashing - i'm thinking of turning it up the sides of the window frame and stapling in place, but i'm not sure if there should be a batten below the window, or how to seal effectively.
Could anyone provide me with any advice on best approach?