Help installing and moving Wireless Thermostat

Joined
16 Nov 2022
Messages
7
Reaction score
1
Country
United Kingdom
Hi all,

Looking for some help please. I'm fairly capable but started confusing myself a little!

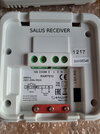
System boiler in kitchen with wall mounted programmable controller for HW & CH, water tank upstairs in cupboard. I have a Salus 510RF wireless thermostat, which I am looking to mount on middle floor landing (3 storey home, living room on middle floor!) Original dial stat on ground floor with usual heating regulation problems as very cold down there!

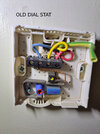
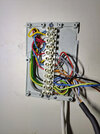
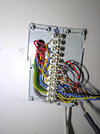
Now I was looking to fix receiver unit in cupboard upstairs, directly into wiring centre to control motorised diverter valve from there. It is a mess of colours everywhere so obviously can't take the colours for 100%. I was under the impression that I was to disconnect the original thermostat but I'm not completely sure if it's going straight into the wiring centre or in to the programmer in the kitchen? (I'm assuming wiring centre in cupboard?). I'm trying to work out if it goes into programmer, then up to wiring centre. Obviously I want to completely disconnect this but I also want to ensure heating is completely controlled from the new stat. i.e. I know you can wire a couple of ways, which includes leaving heating on constant on programmer but ideally I want to remove this completely from programmer.. if that makes sense??!

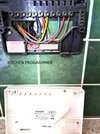
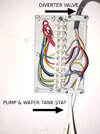
I'll attach a couple of photos of what I'm dealing with. Again assumstions wise.. the BROWN link wire on programmer base, is that the thermostat loop? Also looking at the wiring centre there is a large, thick GREY wire, is this the mains live? Never seen that before. Like I said I think whoever wired this up didn't sleeve up a couple of wires, so I need to be sure what's doing what!

Sorry I know a lot of Q's!! - Sorry no pic of wiring diagram for old stat.
20221109_153500 (1).jpg20221109_160248.jpg20221116_130012.jpg20221116_132646.jpg

Thanks, Steve
 
Last edited:
Sponsored Links
One of the red wires linked together appears to be from the programmer to the room thermostat. The yellow from your current room thermostat goes to the white wire from the 3 port valve. So the red and yellow wires if you trace them should go in the same cable, once you’ve found this you can wire the red from existing thermostat to the Com on Salus, and the Yellow from existing thermostat to NO on Salus. For definite confirmation you need testing equipment, such as a multimeter.

If you’re still unsure just join the red and yellow wires in the same terminal on existing thermostat and change the wiring for Salus near wiring center.
Hi, thank you! Sorry I just realised the loop/link wire on the programmer I was reffering to is actually BROWN! Which is linking from the main live terminal to the CH.

It's hard to see in photo but on the wiring centre there are a squashed bunch of incoming cables, x3 lots plus the random single heavy duty grey as mentioned. Two white and then one grey insulated.

Steve
 
I have a Salus 510RF wireless thermostat, which I am looking to mount on middle floor landing (3 storey home, living room on middle floor!) Original dial stat on ground floor with usual heating regulation problems as very cold down there!
Without knowing all the intricacies of your system. The ground floor sounds like the correct place to position the thermostat. The thermostat switches off the entire heating system when the area in which it is located gets up to the set temperature. So, ideally it should be located in the last place in your home to get warm. The radiators in the other rooms should have TRV's fitted so that they don't become overheated.

If you move the thermostat to a warmer area, you could run the risk of the thermostat switching off the entire heating system before the other rooms were warm enough.

Moving the thermostat may also mean that ground floor location would never get warm as the thermostat in the warmer area will switch off the heating before it did, but that may not be a problem for you if that is the case then you could simply drop the thermostat down a bit.

However, as you are fitting a wireless thermostat you have the option to move it around and try different locations. Remember though that the radiator in a room where the thermostat is located shouldn't have a TRV fitted (or if it does it should be set to MAX) otherwise it can interfere with the correct operation of the thermostat.
 
Sponsored Links
Without knowing all the intricacies of your system. The ground floor sounds like the correct place to position the thermostat. The thermostat switches off the entire heating system when the area in which it is located gets up to the set temperature. So, ideally it should be located in the last place in your home to get warm. The radiators in the other rooms should have TRV's fitted so that they don't become overheated.

If you move the thermostat to a warmer area, you could run the risk of the thermostat switching off the entire heating system before the other rooms were warm enough.

Moving the thermostat may also mean that ground floor location would never get warm as the thermostat in the warmer area will switch off the heating before it did, but that may not be a problem for you if that is the case then you could simply drop the thermostat down a bit.

However, as you are fitting a wireless thermostat you have the option to move it around and try different locations. Remember though that the radiator in a room where the thermostat is located shouldn't have a TRV fitted (or if it does it should be set to MAX) otherwise it can interfere with the correct operation of the thermostat.
Thank you! Yes very fair and correct point. Unfortunately the house design/build is not great and it is quite a substantial temperature drop downstairs. Although I understand completely the logic behind this, every way we have tried to balance the heat only ends up being an overwhelmingly and unbearable heat upstairs! There just seems to be no happy medium. But I totally understand what you mean. And yes as yu say, the stat can be moved wherever in the home if needed!

Cheers
 
Struggling here, if anyone can assist please?!

(N.B. I'm aware of how messy it is and the broken center, will tidy afterwards!)

I'm really struggling to get the permanent live to the receiver. So my multimeter has decided it wanted to fall apart!.. but before it did I checked and found a 240v going through to the ORANGE wire from actuator but upon wiring I'm still not getting a power light to the receiver?

I've tried a couple of ways just to double check something else wasn't affecting it as you can see in pics. But the first pic if you see at the top I have isolated what I believe to be the old room stat wires. As I want to obviously cut any power so I can blank off the original stat.

Unfortunately it seems Im having issues just getting a perm live to the unit, let alone anything else.. I was quite confident I did it correctly the first time. The wiring to the pump has been confusing me (very bottom of center) as it looks like the BROWN live is in a Neutral terminal and the the BLUE is also going to a Neutral, unless this is a switch?

Hope someone can shed some experience on what the heck I'm doing wrong here.. assuming the stat receiver itself isn't faulty!

P.S. The bunch of wires coming in from the right are from the new receiver.
Cheers.
01.jpg02.jpg
 
From your photos it appears you have a Y-Plan system with a single 3-Port motorised valve. Assuming you do, if the mains supply comes in via the programmer downstairs there may not be a permanent L in the wiring centre, which would explain why you can't find it. (as there are two wires in the programmer N terminal this looks likely) The orange wire from the motorised valve you refer to will only become live when the boiler is running.

It's best not to interfere with the wiring centre unless you know where each of the wires go and what they do. Unfortunately there is no fixed wiring colour code or specified terminals to use, it's all down to the preferences of the original installer.

The easiest way to install the Salus is to reroute the 3 existing wires that currently go to the old thermostat to the new receiver.

1. Red: Live, goes to Salus L
2. Yellow: Switched Live goes to Salus NO
4. Blue: Neutral goes to Salus N
5. Insert a link wire between the Salus L and COM terminal

The existing programmer should then be set such that the heating is permanently 'on' 24/7 to maintain power to the Salus receiver, and the Salus used as the sole means of controlling the central heating. [doing this provides a permanent live to the Salus receiver]

If you do wish to use the wiring centre, then first of all make a note of where everything is connected in case you have to put it back.

1. Identify the incoming cable from the old dial thermostat.
2. Carefully mark the terminals to identify each wire from the thermostat is connected to
3. Disconnect the old thermostat cable completely and remove it from the wiring centre
4. Connect the Salus to the same terminals:

Where the red wire was removed from connect Salus L
Where the yellow wire was removed from connect Salus NO
Where the blue wire was removed from connect Salus N
Insert a link wire between the Salus L and COM terminal

5. As before, set the programmer such that the heating is on 24/7 so that the Salus takes full control
Ahh, thank you so much that makes sense! My original idea was to wire to where the existing stat was but everything I read or watched seemed to say connect to the wiring centre! Yes it is a Y-Plan setup with 3 way valve and motorised actuator. I still may do this as I need to replace the centre as it's falling to bits and I don't like how cramped the wiring is.

I knew that there was an option of using a link between live/com but thought the other route meant I didn't have to leave the programmer on constant heat (not that it matters tbh).

In the case of me wiring into centre as originally intended, do I need to remove the BROWN live link on the programmer? I thought this was just powering the CH part of the programmer switch?

Thanks so much,
Steve
 
If you removed the brown link completely, you would be removing the live to the thermostat which comes via the programmer, so it needs to stay.

Nothing needs to change at the programmer end, unless you want to by-pass the central heating control part so that it can't be inadvertently switched off. If you wanted to do that move the end of the brown loop in 5 and put it in 4 with the red wire. The red wire in 4 then becomes your permanent live for the new thermostat.
Amazing, thank you so much that's extremely helpful!

Oh and if I go the permanent live route (moving brown link) would I no longer need to link the L & COM in the receiver?
 
Last edited:
You will still need the L & COM link.

COM and NO are just an on/off switch. When the heating is 'on' they are electrically connected. when it's 'off', they aren't. You will need the L to COM link to provide the live supply to switch.
 

DIYnot Local

Staff member

If you need to find a tradesperson to get your job done, please try our local search below, or if you are doing it yourself you can find suppliers local to you.

Select the supplier or trade you require, enter your location to begin your search.


Are you a trade or supplier? You can create your listing free at DIYnot Local

 
Sponsored Links
Back
Top