How to remove ballast from LED tube fitting

Joined
9 Dec 2014
Messages
29
Reaction score
0
Location
Bedfordshire
Country
United Kingdom
I have changed a fluoro T8 tube bulb to LED.
As first it did not work (flickering), but I removed the starter and it is now stable.

I wonder if I should also remove the magnetic ballast?
I guess this will use less power and increase longevity?

If so, to bypass the ballast am I right in thinking that I simply unscrew the two brown wires from the terminal block, then connect them together using a new terminal block? (see photo)
 

Attachments

  • ballast.jpg
    ballast.jpg
    60.5 KB · Views: 839
Sponsored Links
Thanks, can anyone advise if the rewiring I suggested is correct or will cause a problem?
 
Yes, remove the ballast and connect the wires together. Also remove the wiring to the socket for the starter, to stop anyone putting a starter back in.
 
Sponsored Links
OK... so its not going to blow the bulb or fitting if I put those two brown wires (in the photo) together, right?
The diagram on the ballast (see photo) suggests the top wire is live and the bottom one is neutral, so by connecting these wires I will be connecting L to N, not L to L, is this OK?
 
I wish I could but there's plenty of wires and it is a bit beyond me. :(

I've added two more photos.

I can see the incoming wires (white sleeve) coming in from the power supply.
These go into terminal block and then onto the starter/ballast.
I guess I have to rewire that bit so it goes to the two ends of the fitting somehow.
I'm getting lost thinking about doing it that way.

I was hoping I could just bypass the ballast by connecting the two brown wires that go in/out of it, I reckon either this will work it or will blow it up.
 

Attachments

  • PHOTO_20161013_203858 (Small).jpg
    PHOTO_20161013_203858 (Small).jpg
    91.9 KB · Views: 510
  • PHOTO_20161013_203908 (Small).jpg
    PHOTO_20161013_203908 (Small).jpg
    84.7 KB · Views: 454
How hard can this be.

You have two wires coming in (live and neutral) and you have only two wires to connect to the LED lamp- also live and neutral.
Everything else can be removed.
 
OK having looked again at the photos, I think the blue wires are all already wired up correctly.
I just need to put the two brown wires together, this bypasses the ballast.

I just wanted to get a 'yep sounds right' before I go ahead.
 
LED Tube Wiring Diagram for LED Retrofit To Fixture With Magnetic Ballast
Installing an LED tube light in an existing fluorescent fixture is relatively simple. If the fixture has an electronic ballast, you need to remove that and then wire the power directly to the end sockets. This is fairly simple, and typically you can use the existing wire in the fixture and then just add some wire nuts. If you have an older fixture with a magnetic ballast and starter, you will have to remove or open the starter and remove or short the magnetic ballast. Remember, of course, that when servicing a fluorescent fixture or lamp for any reason, electrical power to the entire fixture should be disconnected. This is not always practical in situations where a large number of fixtures are controlled from the same power control (such as in open office areas). In these cases, insulating gloves and a nonmetallic ladder should be used if the fixtures must be serviced when power is present.

Below, are some diagrams and then some pictures I took of an actual installation in a fixture.
Wiring Diagram for Retrofit of Fixture with Electronic Ballast
LED-Tube-Light-Installation-Made-Simple.jpg


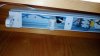
Electronic Ballast with Wires Clipped
LED_Tube_Light_Installation.jpg


Here is a picture of the actual electronic ballast that I removed from the fixture in this example.

Depending on how much wire you have to work with, it is a good idea to leave long enough wires leading out of the ballast to be able to reconnect the ballast with wire nuts, if you should ever want to convert the fixture back to use for fluorescent bulbs or want to use the ballast somewhere else. In this example, I have clipped the wires a little too close to the ballast, but then, I am not planning on ever using this ballast again.

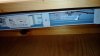
Now, here is a picture of the wires connected with wire nuts.
Wires Connected with Wire Nuts
LED_Tube_Installation.jpg


In the picture above, I have placed the electronic ballast with the clipped wires in the fixture so that you can see how it was wired previously, but you would, of course, remove the ballast from the fixture.

Wiring Diagram for LED Retrofit
LED_Tube_Light_Installation_Made_Simple.jpg


I don't have any pictures right now of a retrofit to a fixture with a magnetic ballast and starter, but here is a simple wiring diagram.

LED Tubes - Wiring Diagram for LED Retrofit to Fixture with Magnetic Ballast

So, that's all there is to it.
 
I don't think you are doing anyone any favours by pasting copied stuff from american websites. It could confuse UK DIYers, apart from the copyright issues. Wire nuts are the creation of the devil.
 
Understood, but the circuit diagrams still remain the same. Line to one side and Neutral to the other as long as both ends have the pins facing one side of the tube it would work either way around.
 
Not all tubes are like that though. Some have L & N at one end and disconnected pins at the other. So you may need to check if there is a diagram on the tube itself.
 

DIYnot Local

Staff member

If you need to find a tradesperson to get your job done, please try our local search below, or if you are doing it yourself you can find suppliers local to you.

Select the supplier or trade you require, enter your location to begin your search.


Are you a trade or supplier? You can create your listing free at DIYnot Local

 
Sponsored Links
Back
Top