Ikea fun!

Joined
18 Jan 2015
Messages
122
Reaction score
0
Location
London
Country
United Kingdom
Hi all

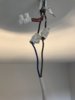
I recently replaced an old pendant with a new standard one (original wires are on the pic attached with the dodgy looking terminal block.
After good advice from here I fitted a new pendant light and the wires that were previously in the terminal block went into a permanent live connector on the new pendant.

All is good and the light works great!!

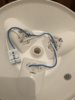
However today I have been asked to fit a new light from ikea by the wife (I know...not the best) but the connector seems very basic - to me it seems like just a live and neutral. So my questions;

- is the new ikea fitting just a live and neutral? No instructions for wiring included.

- how do I know which one is for live and which is for neutral? No markings or indicators to determine which is which.

- assuming I can stick the other existing wires in the new live and neutral on the ikea fitting - what do I do with the two permanent live?? Can I terminate them with something?

If anyone is able to advise on the above that would be appreciated. Also any extra kit I need from screwfix that would also be appreciated as I can pop down there tomorrow as opposed to ordering something online!

Thanks very much as always

James
 

Attachments

  • 14AF51B0-FB1F-4927-B154-D6BAA987CF3B.jpeg
    14AF51B0-FB1F-4927-B154-D6BAA987CF3B.jpeg
    115.1 KB · Views: 317
  • B4AA2E06-4466-4DA7-A310-1C0EE37FD79C.jpeg
    B4AA2E06-4466-4DA7-A310-1C0EE37FD79C.jpeg
    128.9 KB · Views: 309
Sponsored Links
I'm assuming the new light fitting is plastic.
switch live and neutral into the new light, either way round, perm live into a terminal block, and you need to sleeve and reterminate those CPCs that are not connected properly. emulsion is not a recommended way of terminating wires!:confused:
If the top part is metal rather than plastic then you have a problem. You'd need to find a small terminal box to surround the two terminal blocks and possibly modify the ceiling to make space. But I'm assiming given the state of the supplied terminations that it's plastic!
 
Are the cables shown in your first pic the actual ones that your new fitting is going to be connected to ? If your new fitting is double insulated ( not requiring an earth connection ) there should be a symbol on the fitting ,which is a square within a square. Is there one ? Your pic does not show how the fitting is fixed to the ceiling , Is there another part ? Only the switched line and neutral would be connected to the terminals on the fitting. The two live conductors would be connected to each other in an insulated terminal block ,not connected to the fitting. The CPC ' s would also be isolated from the fitting and in their own insulated terminal block ,assuming the fitting is double insulated.
 
Sponsored Links
I had a similar problem, and a timed extractor fan as well, but the ceiling height is 3m, so I used a JB fixed to the ceiling, with the light fitting spaced below it.

I saw today some purpose-made JB enclosures, including strain relief for the cables, which would have saved me the trouble of mounting connector strips in a box. You can also use choc-boxes, but they're not so elegant if you have several cables.

ASJ501.JPG


ASJ804.JPG


btw you can use heat-shrink sleeving to identify your cable cores by colour. Small mixed packs are available for a pound or so.
 
Thanks (as ever) for the replies!!!
To answer some of the questions ;

I'm assuming the new light fitting is plastic.

Yes it is - does this mean I don’t have to worry about the earth?

Are the cables shown in your first pic the actual ones that your new fitting is going to be connected to ? If your new fitting is double insulated ( not requiring an earth connection ) there should be a symbol on the fitting ,which is a square within a square. Is there one ? Your pic does not show how the fitting is fixed to the ceiling , Is there another part ?

That was an old pic prior to being connected to a new pendant but they are pretty much the cables to go into the new unit. I’ll have a look for the icon re earth.
Re fitting to the ceiling the lamp has been supplied with a large bolt that runs through this fitting and into the ceiling to attach it.

Do the lamps/bulbs for this new light screw in

They screw in - E27 fittings x3 bulbs.
Does that make a difference?

So it seems that in summary I can connect the neutral and switch live to the new fitting (in either order as it’s not marked) and terminate the permanent live to an insulated terminal block?
Could someone please post a link to one on screwfix that would be up to the job??

Thank you again!
 
They screw in - E27 fittings x3 bulbs.
Does that make a difference?
yes, that means you have to ensure for safety reasons that the live/line is connected to the centre pin of the holder, and the neutral is connected to the (easily touchable via the bulb when unscrewing) outside screw shell of the holder.
 
yes, that means you have to ensure for safety reasons that the live/line is connected to the centre pin of the holder, and the neutral is connected to the (easily touchable via the bulb when unscrewing) outside screw shell of the holder.

Cheers John - could you explain this point a bit more for me? I’m not quite following how to do this.
 
yes, that means you have to ensure for safety reasons that the live/line is connected to the centre pin of the holder, and the neutral is connected to the (easily touchable via the bulb when unscrewing) outside screw shell of the holder.
Thanks for answering this - I was busy typing a message to you in another thread :)

Kind Regards, John
 
Ok thanks

The instructions that came with the unit didn’t have the above image but the online version does


So seems fairly straight forward now, just need something to safely terminate the perm live!
 
for bonus points you can use a multimeter to confirm that the connector marked N really does connect to the shell of the bulb holder. Not everything is made correctly in the factory.
For even more bonus points you could check the polarity of the supply, but in reality that would be difficult to do safely without either opening your consumer unit (which usually has live parts you can't isolate with the built in main switch) or working live, or using test equipment you probably don't have.
 

DIYnot Local

Staff member

If you need to find a tradesperson to get your job done, please try our local search below, or if you are doing it yourself you can find suppliers local to you.

Select the supplier or trade you require, enter your location to begin your search.


Are you a trade or supplier? You can create your listing free at DIYnot Local

 
Sponsored Links
Back
Top