Lath & plaster ceiling & cornice - repair and paint in old Victorian house

Joined
19 Jun 2019
Messages
2
Reaction score
0
Country
United Kingdom
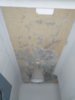
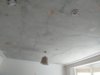
Hi all, I have a lath & plaster cracked ceiling repair to do and I need some advice on how to best tackle this problem. The cracks extend to the cornice as well, so those cracks need to be filled, made good and painted as well.

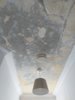
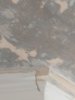
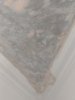
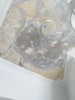
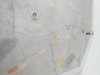
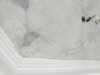
Originally, the hall ceiling was covered with woodchip wallpaper. I removed the woodchip paper and sanded the ceiling using a Mirka Deros using 80 grit Abranet abrasives. Doing so, I have eliminated almost all of the glue that held the wallpaper to the ceiling. The ceiling cracks extend to the nearby cornice all around.

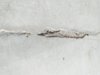
I have not cleaned out the cracks on the ceiling, nor have I filled any of the cracks yet. I have, however, cleaned out some of the cracks on the cornice (see photos attached). I was thinking of using the Toupret 1.5Kg tub ready-mixed filler to fill the cracks, both on the ceiling and cornice, then sand the ceiling using Mirka Abranet abrasives (240 or 320?). The plan so far is, once the I finish sanding the ceiling, to cover it with the Wallrock Fibreliner Plus 180 - one of those paste-the-wall type of lining papers. I will be using the Wallrock Power Adhesive as glue for the lining paper.

The fiberliner will not expand or contract, which in my opinion would make it an ideal lining paper for the plaster/lath ceiling I have. Am I correct to just use the filler to fill in the ceiling cracks, versus using the filler, together with something like the Toupret scrim tape? Others on this forum mention the Toupret Elafib, however would that be easy to sand? Others even suggest using the
Fibracyl.

Do I need to PVA the cracks before filling them in? I have read conflicting views on this topic.

Here are the paints I am going to be painting the ceiling & cornice with:

Cornice: Loft White 222 Little Greene Absolute Matt Emulsion
Ceiling: Strong White 2001 Farrow-Ball Absolute Estate Emulsion

Once I fill in the large cracks, do I need to skim the whole ceiling with something like the Toupret TX 130, or is that step not needed since I will be applying lining paper over the ceiling?

I am planning to paint two coats of the Little Greene paint over the lining paper. Any objections?

I have two more rooms, the downstairs living room, and the master bedroom upstairs, whose ceilings need to have the same kind of repairs.

Many Thanks!
Chris
 

Attachments

  • foto3.jpg
    foto3.jpg
    185.6 KB · Views: 1,078
  • foto5.jpg
    foto5.jpg
    185.3 KB · Views: 657
  • foto4.jpg
    foto4.jpg
    194.9 KB · Views: 603
  • foto1.jpg
    foto1.jpg
    210.5 KB · Views: 745
  • foto2_ceiling_before_sanding_woodchip_paper_glue.jpg
    foto2_ceiling_before_sanding_woodchip_paper_glue.jpg
    157.1 KB · Views: 1,102
Sponsored Links
I’d bring that ceiling down by cutting the laths around the cornice and put up a whole new plasterboard ceiling, leaving the cornice in place. Looks like there is too much movement in that ceiling for it ever to be crack free.
 
Hi again,

So, I have removed all the woodchip wallpaper from the ceiling in the main bedroom. I have managed to also remove some of the wallpaper on the ceiling in the living room (last photo on this post is from living room ceiling, which shows the area that I have also sanded using the Mirka Deros).

It looks like the main bedroom ceiling is quite cracked, with a few places having the top coat plaster missing. The missing plaster was caused by myself, not being extra careful when taking out the paper.

When gently knocking the plaster, some places feel like the top plaster coat is blown, just a little.

From the photos, where the downlight ceiling lights are located, one can see there are two separate layers of plaster/cement. What is the top coat made of? Is it normal plaster? If I were to hire a professional to remove the top coat of plaster (the thin layer) and apply a new one, would that solve the issue for me? If so, what kind of plaster would it be suitable to apply?

Thanks
Chris
 

Attachments

  • 20190620_142301.jpg
    20190620_142301.jpg
    154.2 KB · Views: 762
  • 20190620_142310.jpg
    20190620_142310.jpg
    188.5 KB · Views: 468
  • 20190620_142326.jpg
    20190620_142326.jpg
    175.7 KB · Views: 511
  • 20190620_142334.jpg
    20190620_142334.jpg
    159.4 KB · Views: 655
  • 20190620_142337.jpg
    20190620_142337.jpg
    168.8 KB · Views: 628
  • 20190620_143606.jpg
    20190620_143606.jpg
    178.3 KB · Views: 462
  • 20190620_160316.jpg
    20190620_160316.jpg
    153.7 KB · Views: 460
As per my post above.

The skim coat has cracked because the browning (the coarse layer of plaster underneath the skim coat) has cracked because of movement in the building or the laths or because the nibs on the back of the browning coat are detaching and the whole ceiling is pulling away from the laths.

The only way to fix this permanently is to stabilise the ceiling so that the skim coat has something solid to attach to. If you didn't have the cornice you could just plasterboard over what is there and then get it skimmed. However, as you have the cornice you would need drop the existing ceiling (leaving the cornice in position), put in new plasterboard and skim. This is a common fix in older houses.

A plasterer could potentially scrim over the cracks and re-skim whats there, but it will just crack again at some point as the ceiling isn't stable (which is why its cracked)
 
Sponsored Links
I don't know how old the property is but lathe and plaster ceilings eventually fall down.

It can happen in as little as 100 years. I had a client in Chiswick that ended up overboarding all of the ceilings because he didn't want his family to die.

I would suggest that you follow Lower's advice. Be warned that you may lose some of the cornicing though. If you don't want to run that risk, then consider adding an extra lip and screwing new sheets of plasterboard straight in to the ceiling joists. The upside is that you won't have the mess and disruption of pulling the old ceilings down.

Lining paper will buy you extra time but at some point those ceilings will fall down. It is impossibleaa to say when though.
 
I heard of people trying to stabilise old lath and plaster ceilings by removing the floor above, hoovering/removing all if the dust/nibs/detritus and then using PVA or similar to "glue" the browning back to the laths.

I've no idea how successful it was, and I'm sure there are additional steps to ensure the PVA adheres to the browning, but you may want to experiment if the above options (which are better ideas IMO) do t appeal
 
I've done that, but not just PVA, you clean off all the dirt and loose nibs, hoover it, and pour a runny mix of finish plaster onto the top of the ceiling.

Some broken nibs will be under the laths and have to be removed because you press a flat board to the underside of the ceiling first. If the laths are not dependable you fix expanded metal lathing to the sides of the hoiysts, having bent the sides up to form trays.

I doubt it is financially viable if you pay someone to do it, but is sometimes done in the restoration of historic houses.

it is not as filthy as pulling down an old ceiling.
 
Have a look at this thread which is a very similar job on my house.

It depend how well attached the bulk of the existing plaster is to the laths, if its well stuck over the majority, just loose in a few areas around the cracks a good plasterer (or other skilled individual) should be able to remove the loose areas with a hammer/tools re-fill it, tape up the other cracked areas, and skim it all. They can also feather the thickness down a bit at the edges to ensure the minimum detail of the cornice is lost.
Obviously if you want a conservation spec job you can get a lime plaster expert in, which I considered, but they are few and far between. We used 'limelite' a lime cement-based product to fill chases in the wall, but none of the local plasterers where at all interested using real lime, or tackling the ceiling with anything but gypsum based bonding and finishing plaster.

If the whole lot is hanging on a thread, a reason amount more and or all of maybe have to come down, but often not. Do you have any access to the floor above to inspect the nibs of plaster from behind?
But yes, its a good thick coat of coarse lime and horse hair, pushed well into the laths. Then a few days later (drying times being one reason people prefer modern materials) its finished in a much finer skim which can be really quite thin.
Unless its loose you wont remove the whole layer, but again, with a good ear and the right tools you can take off all that is loose/blown, be that just the finishing plaster or the lot, and then make good with new.

https://www.diynot.com/diy/threads/lath-and-plaster-lime-ceiling-repair-skim-with-gypsum.518257/


Daniel
 

DIYnot Local

Staff member

If you need to find a tradesperson to get your job done, please try our local search below, or if you are doing it yourself you can find suppliers local to you.

Select the supplier or trade you require, enter your location to begin your search.


Are you a trade or supplier? You can create your listing free at DIYnot Local

 
Sponsored Links
Back
Top