Leaking sink waste

Many Thanks Johnny think I understand now the trap needs turning the other way around due to the height differences at the bottom of each sink!!

I feel a right dick now lol!!

Also one last question and will then leave you all alone (hopefully!!) did you see my post about that black washer thing I have spare to slip into that large nut doesn't fit in properly and is exactly the same as the other flat ones that just slip over the pipes?
That goes into the groove, look at the other side and do the same.
I know you've worked it out, but for future reference should you need to lower the trap, you could use this

https://www.screwfix.com/p/mcalpine-t12a-3-1-bsp-coupler-white-40mm-x-40mm/7195v

They also do a 2 inch (T12A-2)
 
Sponsored Links
Common DIY mistake, everyone expects the straight down pipe into the trap should be the main sink rather than it's for the half bowl and the short end goes on the main bowl, so you just need to turn your setup around and remove the shelf just now until it's all fitted.
 
Common DIY mistake, everyone expects the straight down pipe into the trap should be the main sink rather than it's for the half bowl and the short end goes on the main bowl, so you just need to turn your setup around and remove the shelf just now until it's all fitted.

Many Thanks mate much appreciated
 
Sponsored Links
Also we mentioned previously that the washer that slips over the top of the pipe leading to the strainer should be at the bottom and the fixed nut screws onto the strainer but just found the below photo? Does it matter which way around it is? What will be the most secure way?
 

Attachments

  • Screenshot_20201228_094701_com.android.chrome.jpg
    Screenshot_20201228_094701_com.android.chrome.jpg
    86.1 KB · Views: 162
If I understand you correctly, the older version of the kit had a loose nut and the pipe with the flanged end would fit up inside the waste and then the loose nut would tighten it all up catching the seal in between and still have a loose nut and seal at the trap end.

The new version has the nut moulded as part of the pipe and a square ended seal fits inside a groove in the top of the pipe and the nut then screws directly onto the waste. The loose nut and square washer sits at the trap end and leave it loose so the whole pipe can be rotated and tightened onto the sink waste and then tighten the lower nut at the trap.

Hi mate im also confused by myself lol.

OK I've taken all the old gear out now but I've attached photos the new setup below, just need to put the 2nd strainer in but I've tried the trap in and it all will reach, just need to cut the elbow off the waste pipe on the left and extend that up to meet the trap.

However these are my concerns.

1. Do I have the right hand pipe leading up to the 2nd strainer with the black square washer over the outside of the pipe at the top as per one of the photos or at the bottom as per my other photo?

2. That pipe leading up to the 2nd strainer doesn't have a washer inside it but it does have a groove. I've checked the other ones like Johnny advised but then ate completely different as per one of the photos I took below. Therefore I understand I just put the spare square washer that slides over the pipe into that groove on the nut?

3. I've now got another problem! The overflow port on the back of the new strainer is smaller than the port on the old strainer. When I offer the overflow pipework of the existing overflow pipe up to the strainer port they are the same size approx, ive attached photos of the measurement of the actual port of the old strainer and the new strainer, the new one measures around 28mm internal and the old strainer port measures around 33mm? I can't replace the whole pipework up to the overflow for two reasons, one it's a really tight fit to get to without removing the sink therefore won't be able to check it's seated and sealed correctly will just have to rely on putting it in place and tightening it from the front and secondly and most importantly my new strainers have a different shape overflow port as per photos? The old overflow is square but the one that came with the new strainers is round and smaller?
 

Attachments

  • IMG_20201228_105832.jpg
    IMG_20201228_105832.jpg
    156.6 KB · Views: 146
  • IMG_20201228_105842.jpg
    IMG_20201228_105842.jpg
    104.9 KB · Views: 152
  • IMG_20201228_105955.jpg
    IMG_20201228_105955.jpg
    272 KB · Views: 152
  • IMG_20201228_110208.jpg
    IMG_20201228_110208.jpg
    179.5 KB · Views: 147
  • IMG_20201228_110223.jpg
    IMG_20201228_110223.jpg
    180.3 KB · Views: 137
  • IMG_20201228_110233.jpg
    IMG_20201228_110233.jpg
    216.1 KB · Views: 148
  • IMG_20201228_111034.jpg
    IMG_20201228_111034.jpg
    152.3 KB · Views: 143
  • IMG_20201228_111203.jpg
    IMG_20201228_111203.jpg
    151.4 KB · Views: 147
  • IMG_20201228_111613.jpg
    IMG_20201228_111613.jpg
    238 KB · Views: 153
  • IMG_20201228_111621.jpg
    IMG_20201228_111621.jpg
    120.1 KB · Views: 142
Took the old one out as per below picture came off really easy was slightly loose doesn't look like was even any sealing compound around it anyway so can't do a worst job of replacing it than the way it was already on!
 

Attachments

  • IMG_20201228_113504.jpg
    IMG_20201228_113504.jpg
    230.5 KB · Views: 136
Pic 4, that's the end that needs to fit to the higher up half bowl. There should be a squared edge washer seal in there.

You were left with washers/seals weren't you? I think it's time to take the trap kit apart again to make sure you have the correct washers in the correct places.

The overflow will not fit, you have different sized overflow on the new strainer, you'd be lucky if the old franke one would fit.

Thanks mate just leaving to get this one

https://www.toolstation.com/stainle...3qsu1bpLHLYmtuJB4jvlL_Y_KnT3Pg2oaAiCMEALw_wcB

The existing is around 50mm wide x 25mm high so hopefully this one will fit...
 
All Sorted!

And not a single leak! Didn't even have to tighten anything up as did all the joints up hand tight and no leaks therefore didn't bother tightening anymore.

Filled each sink full and did full dump of water on each sink.

Also tested the overflow by filling up the sink and letting overflow for about 5 mins and felt around the back of the sink where the overflow mates with the back of the sink and bone dry so I'm well happy!

If any of you guys need any assistance, pointers, or tips on anything from me guys just give me a shout LOL :)

No seriously guys I really do appreciate your help and assistance with this, as me as a non plumber I don't have a clue what's available and what fits what!

You've got the patience of a Saint!

I've posted some photos of the finished product, however please note the following.

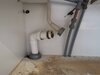
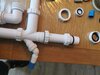
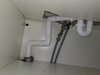
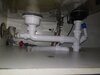
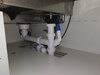
1. I didn't bother cutting the existing elbow off the waste pipe as the angle is wrong on the straight piece of pipe coming up out of the floor therefore by me cutting that elbow off and running a new piece of straight pipe up with another elbow would have resulted in the same?

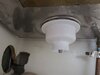
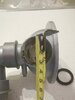
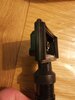
2. I had a nightmare with the new overflow I purchased today due to the design of the square piece it would have been impossible to get a seal on the back have a look at the below photo see the problem? So I ended up using the new stainer I bought but discarded the overflow pipe and luckily the old overflow fitted the new strainer I got today. So I washed out the old pipe was full of **** and linked all that back up with the new strainer.

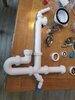
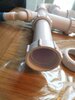
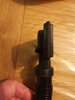
3. I've used solvent cement on all the waste joints, and everything seems nice and tight and firmly in place with no movement, however if possible I would really like to fail-safe that weakest joint on the trap, the upright section that goes up to the second strainer with the existing grey overflow, can you see the joint im referring to in the photo? It's the one we were talking about earlier with the black washer that goes on the outside of the pipe to stop the nut coming off, i positioned the fixed nut at the top and the one relying on the black washer holding it on at the bottom, and I'm sure if I really applied enough force to that then that would come off, but it's the only joint like that in a vertical position therefor the main failure point like the last one that gave me that flood!! , Although it was mainly caused by that strainer fixing breaking as per the original photo at the beginning of the thread. Any ideas on how to failsafe that joint? I was thinking a couple of bits of battening running tight underneath the nut edges and screwed into the front and the back of the top plinth? That way even if there was a failure the trap can't fall down and open up that joint?
 

Attachments

  • IMG_20201228_193516.jpg
    IMG_20201228_193516.jpg
    176.1 KB · Views: 137
  • IMG_20201228_193522.jpg
    IMG_20201228_193522.jpg
    174.2 KB · Views: 143
  • IMG_20201228_193958.jpg
    IMG_20201228_193958.jpg
    246.7 KB · Views: 133
  • IMG_20201228_204922.jpg
    IMG_20201228_204922.jpg
    278.5 KB · Views: 128
  • IMG_20201228_215807.jpg
    IMG_20201228_215807.jpg
    89.6 KB · Views: 121
  • IMG_20201228_215812.jpg
    IMG_20201228_215812.jpg
    123.9 KB · Views: 152
  • IMG_20201228_221532.jpg
    IMG_20201228_221532.jpg
    105.3 KB · Views: 138
  • Thanks
Reactions: CBW
Good job done, only thing I'd suggest is turn the spigot with the dishwasher hose up a bit, (ideally wants to be vertical, same as the blanked spigot on the opposite end), and try and get the hose to loop up as high as you can before it comes back down to join the trap. Currently you are risking backflow into the machine when the sink is discharged.
 

DIYnot Local

Staff member

If you need to find a tradesperson to get your job done, please try our local search below, or if you are doing it yourself you can find suppliers local to you.

Select the supplier or trade you require, enter your location to begin your search.


Are you a trade or supplier? You can create your listing free at DIYnot Local

 
Sponsored Links
Back
Top