Master & slave light switch

Joined
21 Nov 2020
Messages
9
Reaction score
1
Country
United Kingdom
Hello,

I was wondering if anybody here would be able to advise me on the replacement of a manual master and slave light switch? I'm looking to swap my current switches over to LightwaveRF switches, but I'm a little confused with my current wiring. My current wiring doesn't match up with the instructions provided by LightwaveRF.

I have created a quick drawing of my current wiring

Light-switches.png


IMG-58341.jpg

2-gang switch

IMG-58371.jpg

Single-gang switch


I have two LightwaveRF switches, a master to replace the 2-gang and a slave to replace the single gang switch.

The wiring instructions provided by LightwaveRF are as follows

full


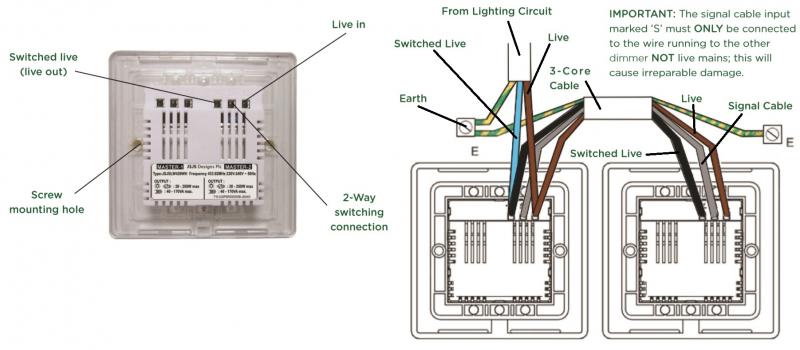
There are two red wires going to 1C 2-way switching on the single gang switch, which I'm not sure of. I'm also not sure why 1 (blue) goes to 2 and 2 (yellow) goes to 1. The second switch on the 2-gang switch and the switch on the single gang switch; control a single light.

Any help would be greatly appreciated!

Cheers,
Richard
 
Last edited:
Sponsored Links
Your 1st drawing, are you sure thats how the red wires are wired
I'm really not sure, sorry. I attached photos of both switches afterwards as I'm not entirely sure as to where those wires go after they enter the wall cavity.


After looking at a help document on the LightwaveRF website and following their wiring instructions, I've come up with this drawing. Do you think this would be the correct wiring?

Light-switches2.png
 
Last edited:
Can we have more pictures of the two switches so that we can see which cables the wires come from?

Where does this red wire go?
upload_2020-11-22_0-22-59.png
 
Sponsored Links
Can we have more pictures of the two switches so that we can see which cables the wires come from?

Where does this red wire go?
View attachment 212297
Thank you for getting back, here is an uncropped version of the photo. That red wire goes into a terminal block, with another red wire. There are also three black wires going into another section of this terminal block o_O

IMG-5837.jpg


Looking at it, I can only assume that there is a 3-core from the 2-gang switch which goes to the single-gang switch as pictured above. I think this is the 3-core which is routed through the bottom of the back box, with the red going into the terminal block. I'm obviously not an electrician and I could be talking a lot of rubbish, but I think the other red wire from the terminal block is going to the light.
 
Hi again. Thank you for your drawing. I'm honestly not sure, what you have drawn above looks like the way it's currently wired. The three core cable from the 2-gang switch is going to the single-gang switch with the blue and yellow going to the switch and the red wire going into a terminal, with another red wire coming from the terminal, I assume going to the light. On the same terminal block in a different section, there are those three black wires, all of which seem to route upwards and out the top of the back box. This is the way the cabling has been, nothing has been changed with the wiring with these two switches since living in this property.


In regards to Left/Right, I probably confused you sorry. When I say left is living room and right is dining room, I mean when the switch is fixed to the wall and you are facing the switch buttons.

Cheers,
Richard
 
Ok, so this is the new switches:

I have reversed the picture so that it looks the same as your diagram so bear in mind they will be the other way round on the actual switches.
You will have to separate the two reds in the connector block.
The one from the Red,Blue,Yellow cable goes to the switch along with the two live loop Red wires; the other from the Red,Black cable is the Switched Live on the new switch.

Do not alter the Black wires.

upload_2020-11-22_1-16-54.png
 
Ok, so this is the new switches:

I have reversed the picture so that it looks the same as your diagram so bear in mind they will be the other way round on the actual switches.
You will have to separate the two reds in the connector block.
The one from the Red,Blue,Yellow cable goes to the switch along with the two live loop Red wires; the other from the Red,Black cable is the Switched Live on the new switch.

Do not alter the Black wires.

View attachment 212299
Thank you again for your help, it's really appreciated! Just wanting to make sure I'm understanding, would this be correct?

Light-switches-3.png
 
Yes, that is correct.


The three Blacks are Neutrals - two from the supply loop and one to the light - so must be connected together.

The red from the three-core is moved to L because it has been repurposed from "switched live from living room to light" to "supply live to new living room switch".
The other Red that was in connector block is now the "switched live to light"
Not sure why you have drawn one remaining in connector block when all four are correctly drawn on the switch.

Your Blue wire from light marked "Neutral?" is actually Black and one of the three in the connector block.
It IS a Neutral in your case and not Live as in the printed switch instructions.

Your confusion is probably because the new switch instructions are for circuits supplied to the light positions (looped at lights) whereas yours is supplied to the switch positions (looped at switches) which is why you have three neutrals.
 
Thank you so much EFLImpudence! I decided to go ahead and attempt the installation and I'm happy to say that it was a success! Words honestly can't describe how thankful I am from the help that you have provided me with. I'm not finding it particularly easy at the moment and getting an electrician out at the moment isn't financially possible so thank you so much!
 

DIYnot Local

Staff member

If you need to find a tradesperson to get your job done, please try our local search below, or if you are doing it yourself you can find suppliers local to you.

Select the supplier or trade you require, enter your location to begin your search.


Are you a trade or supplier? You can create your listing free at DIYnot Local

 
Sponsored Links
Back
Top